I’ve got to confess right up front… there are some audio intricacies I still don’t feel I’ve mastered.
Doesn’t matter how many decades you work with music gear… there’s always something else to learn; somewhere else to grow; some new facet of our industry and our performance methodology that we can conquer.
This week… it’s the mic drum shield!
A Movie’s Worth a Thousand Clicks…
To start things off, here’s a very revealing vid showing the unboxing of the shield I used, and two subsequent recordings: one with the mic shield, and one without.
Do you think I found any difference between the two??
Time to wake up and smell the cymbal cleaner… !
What’s the Big Whoop??
So, what’s a drum mic shield and why would I want one anyway??
Well, hopefully that groovin’ vid let you glimpse a little bit of the reason why, but as a quick primer, let’s just say they’re mostly to bring down the amount of CYMBAL BLEED in your drum mics.
When it comes time to mix a song, it always helps to have clear signals of each of your drums, where the mic on a particular drum hears it and not the other drums or cymbals or percussion that might be nearby.
If there’s too much cymbal wash, buzz, crash or sizzle oozin’ into your drum signal path, it makes it a lot harder to keep things sounding clean and tight.
Plus you don’t get as many options for leaving things OUT of the mix somewhere down the cable, because if you tried you’d still hear the unwanted signal through some other mic. DRAT!
Enter today’s shield test. I’ve heard of these little “sound caves” for decades, but just never bought in to their hype. This week, I decided to give ’em a try and share the results with all of you.
The shootout I did with and without the shield taught me a lot, and showed me a few things I didn’t expect.
What did you expect??!
Choose Your Guard
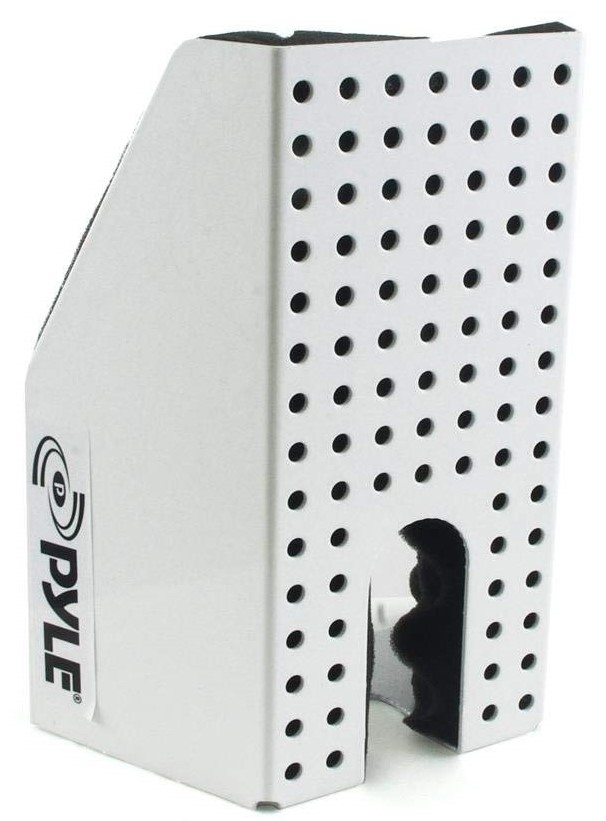
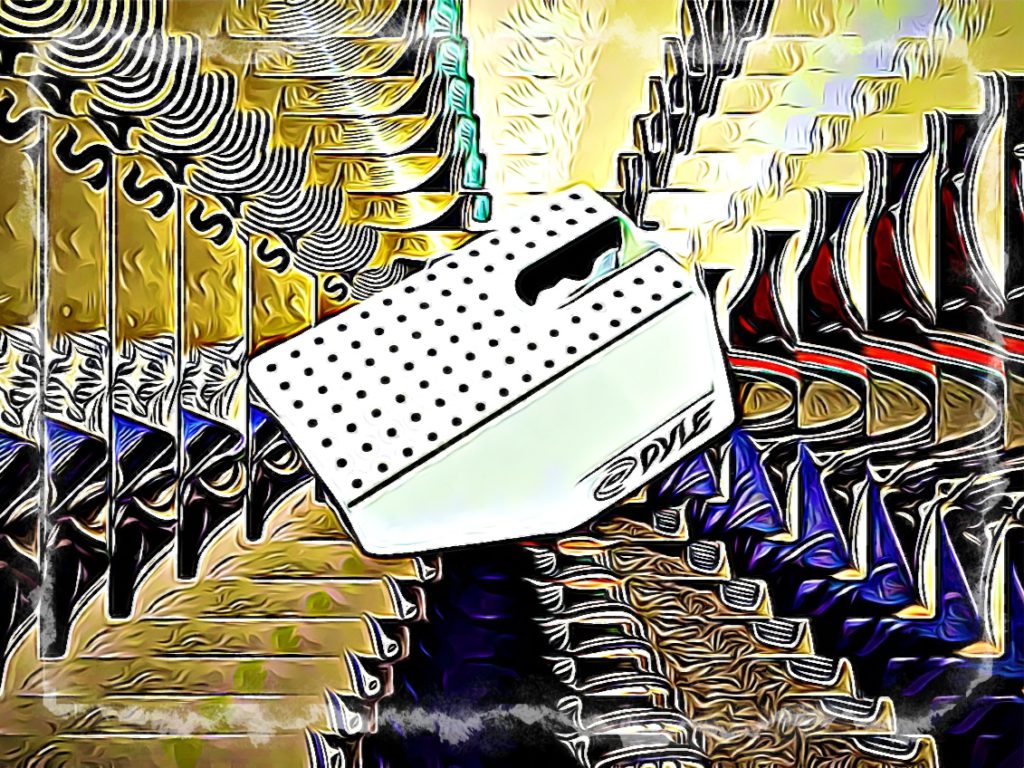
There are not many of these drum guards to choose from. I picked up the one that’s a little larger than the others. I wanted to be able to try it on varying mics, and that means size differences.
For the video recording, I used the “PYLE Drum Microphone Guard“. Here’s the specifics on how it does what it does:
For versatile Drum Recording & Sound Isolation
Great for Cymbal Sound Absorption
Ready for Session: Quick & Easy to Setup
Box-Style Engineered for Maximum Isolation/Reduction
High-Density dB-Absorbing Acoustic Foam
Ideal for Studio Drum Recording
Universal Microphone Compatibility
Works with many sized mics
Universal Standard 5/8” Microphone Threading
Portable, Compact Design
Charcoal Gray inner foam color
White Outer Shell
Microphone, Stand Mount not included
Weight: 0.93 lbs.
Mics! Mics! Mics!
When setting up for a live drum kit session, the decisions about WHAT microphones you’re going to use are paramount to eliciting a pleasing, powerful, attractive sound outcome.
To dig deep and maximize my profit for this experiment, I used many different mics, and eventually heard which gave me the best sound right off the bat. I’ll be featuring an article on all of those mics, and how different they sounded, in my next post, so stay tuned.
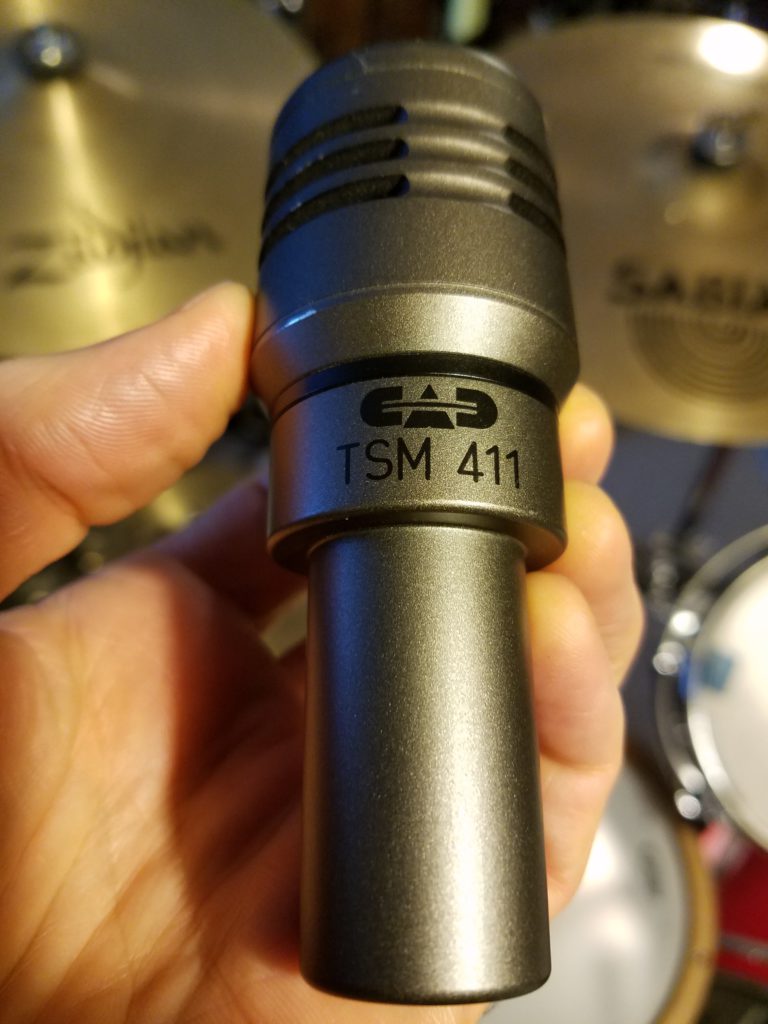
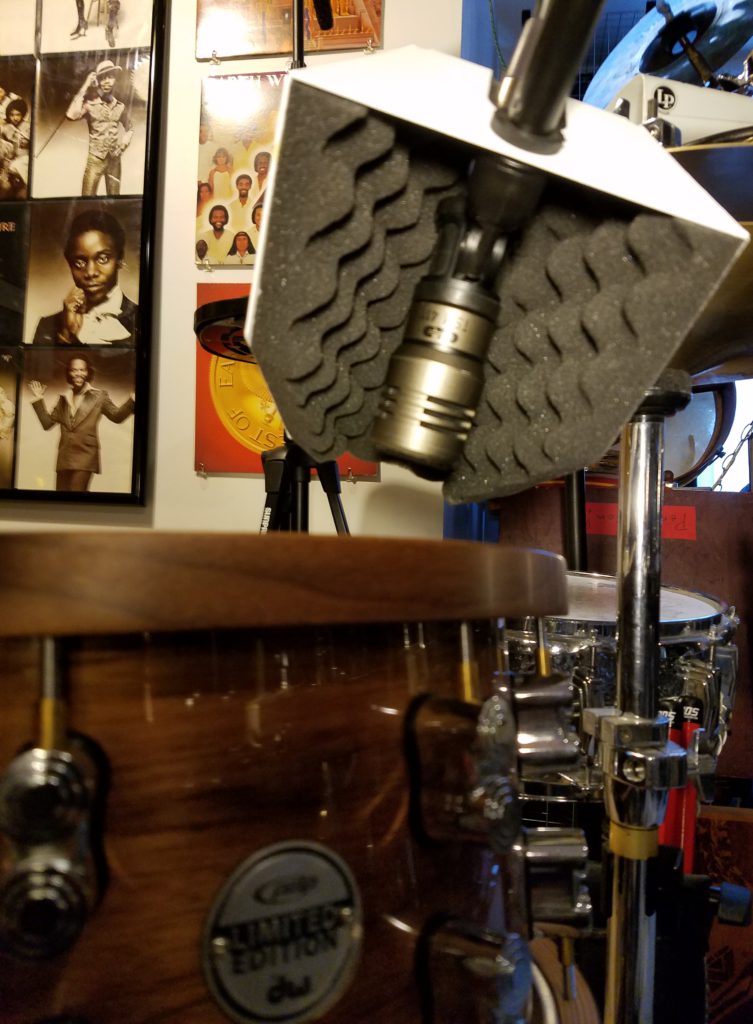
Suffice it to say that nothing sounded as good, and full, and slamming as my TSM411 snare mic. I ended up placing it at almost a 45-degree angle toward the head, with the Pyle shield angled slightly toward the high hat. This enabled me to get maximum isolation from the hi-hat jangle as possible.
After I had a blast layin’ down a beat with the shield in place, I then took it off and did the exact same thing with all the exact same settings, only without the shield. The recordings that you heard in the above video revealed how both of those sounded.
One important note I shouldn’t let slip without telling you: this drum shield really never got in the way of my playing at all. I honestly thought it would, and was expecting my hands to be like some sugar-craving kid at a pinata party!
Once I started playing though, I never got near it. No matter where I put it, I easily played around it and never felt nervous about its positioning.
An welcome surprise!
Location! Location! Location!
Anyone who’s recorded audio for long knows that whereyou place the microphone, and at what angle, makes a huge difference in the sonic outcome. It’s one of the first things you decide upon when setting up mics for a session.
For this test I placed the mic in at least 8 different positions, and at the drum at three different angles, to find out what the optimal juxtaposition is for this kit, for this song, at this moment.
I tried aiming the mic at 11 o’clock on the snare head, 12 o’clock, 1, 2… basically any position that wasn’t in my way when playing!
I also tried all the mics at different angles to the head: 90°, 45° and even almost horizontal with the head. Each placement gave, as we would expect, a slightly different sound.
It’s a Keeper!!
Now let me tell you why I’m going to keep this mic guard: I discovered that it didn’t really isolate the snare signal as much as I had hoped it would. I could still hear the hi-hat quite clearly, tho’ the dB level of the hi-hat, measured on my level meters, DID drop by a couple dB.
What it really does well is cuts the crash and ride cymbals dramatically. That’s probably the biggest, most obvious reason why right away I suggest you get one too and start implementing it into your recording method.
There were a couple of other things that I noticed though that make me want to keep it: first, the EQ differences. Each position changed subtly affected the EQ of the snare and the spilling cymbals. What you hear in the video is what I landed on as the best timbre of the snare, with the least-imposing hi-hat assault.
This final “best position” cut out many of the middle frequencies of the hi-hat, letting only the sparkly high frequencies come through. This is great, ‘cuz that means they’ll be easier to cut with a high-pass filter AND I won’t have to dip the shelf of attenuated frequencies as LOW as I might usually, giving me the maximum snare spectrum of sound.
“AAAhhh!! Somebody put a SHIELD on that NAKED mic!!”
The second thing I’m impressed with about this shield is how it improved the snare timbre. The 411, shielded, and at this particular angle, sounded better than any of the other 20 or 30 variations I tried this week. It has snap and crack in the high frequencies, where some of the other positions and other mics made the snare sound a lot more mid-rangey, and even, sometimes, somewhat BASS-y. Both of those we obviously want to avoid if there’s vocals, guitars and/or keys in the mix.
Oh, and yes, I tuned up my drums before the test, so they were optimized before I started. That’s how I know they were even better!
(If you want further training on the whole “tuning” thing, check out THIS ARTICLE!)
No Need to Fix it in the Mix!
I’m really pleased with how the mic guard substantially lowered the amount of cymbal bleed in my snare microphone. It was really obvious with regard to the crash and ride cymbals. They really didn’t stand a chance.
The Hi Hat still bled through, but what I liked was that the EQ was very different using the shield, such that it makes it EASIER to dial out those whiny hat frequencies with a high-pass filter.
Here’s a final recording to show you what I mean: this showcases my whole kit (minus the toms which I didn’t use in this test), plus I threw on some compression and reverb to make it sound closer to what I normally do for a real song mix.
The first take you hear is WITH the Pyle shield in play. The second is WITHOUT it.
Aaaaand… downbeat! 😉
That Isolated Feeling
One thing’s for sure: I’m gonna be using this shield EVERY time I record in the studio from here on in. In the final analysis, I don’t think it was amazing, but it managed to eke out a bit more clarity between my hi hat and my snare, and when it comes to recording, every step ascending the mountain gets you closer to the pinnacle… of your sound!
One of the reasons that I like doing these reviews is that you can take all of my work and experiments and bring them to bear upon your own recordings, hopefully improving them as I strive to ever improve mine.
How you install the shield towards your hi-hat, roward your particular snare, might be different than how I put it today. But no matter what mic you put on it, and no matter what the angle, it will admirably attenuate your crash & ride cymbals so obviously that you probably will find yourself wanting it in the mix from here on out.
I know I do!
So, are your drum signals sounding washed in a foggy bleed? Wanting that tight clarity of a Mick Fleetwood or David Robinson like me??! Then you’re in luck! For very little cash you can make a pretty decent improvement and make final mixing easier than ever.
So GO for it. Who knows? It could make the difference between sounding good… and sounding GREAT!!
Now, go… make… (clean) SOUNDS!!!
Teaj
9 Replies to “The Drum Mic Shield – How To NOT Let It Bleed!”
Percussion instruments cut through the din on stage and bleed into other percussion mics. Crashguard allows greater seperation between mics.
Those are great questions, Chris, and the answers only come one way – by trying different angles and listening to how they sound.
The way to do this the EASIEST is to have TWO people: one at the kit, placing the mic in various positions then hitting the drum, and the other in the control room listening to how each sounds when struck.
Every placement will sound slightly different. Which one is best for you depends on what style of music you’re playing and the timbres of the other instruments in your mix.
Getting rid of unwanted cymbal bleed in your drum mics will make EQ’ing your drums SO MUCH easier. I know some studios that have these shields on every mic on every drum. The clarity of toms, for example, becomes fiber optic!!
Thanks for stopping by! Lemme know if ya have any other questions. 😉
They don’t need elaborate instructions in the box when they have SeriousGas to do it for ’em, Samson! LOL
What guitar(s) do you play?? Are you a beginner or an ol’ pro??
Check out my FAVORITE guitar in THIS POST. I can’t play it enough!
Thanks for referring your musician friends to our site here, Nicki! Much appreciated!!
And I’ll have you know I’ve played Rock Band dozens of times with my kids… it’s a BLAST!! lol
You bet, Dale! I always like to give people some inexpensive ideas for musicians, especially around holiday time.
When he gets it, have him watch my video so he can optimize the positioning for his own kit.
I’ve also got plenty of other drum-related posts I think he’d enjoy. Show him THIS ONE, about the biggest drum provider for session players in L.A.!!
I actually had no idea where they placed the mics on the drum kits for recording before reading this article. Not that I gave it much thought, I’ve always just watched the drummist in amazement while he/she was doing their thing. Your sound tests that you added here sound really good and clear.
I personally don’t play the drums other than on rock band lol, but I have a few guy friends who are in bands and record their music. I’ll send them the link to this page and maybe it’ll help them out! Cheers!
The excitement used in describing and analyzing this product is infectious and i commend you on that. I hear the difference when the Pyle guard is set up as against the “naked” mic. Its a recommendable product but i feel a more elaborate set up instructions should be included in the package. If i wear a drum fanatic, i would try it out but for now, i’m good with my guitar. Looking forward to more reviews from you
Great article, actually explains a problem we’ve been facing with the final stereo image of our drum line on one of our songs. At first we put it down to the EQ’s on Ableton being too harsh (we just switched from Logic), but I think we are getting bleed between the various drum tracks, and the EQ is therefore effecting elements of the drums we want left alone.
How far should the mic placement be from each piece of the kit?
Wow this kind of sounds like my kid was talking about the other day. Him and some buddies have a back yard garage band (where most stars are born). He was rambling to me about this the other day. Please know Im the dad and Im here to listen. Not necessarily understand but to listen. I thought hundreds and hundreds of dollars. Well your article proved me wrong. Its something I can get him for Christmas and can afford to. Thank you for this.