
Okay, who likes to cook???
Anybody?? Any galloping gourmets in the audience today??!
I like to cook when I don’t have to, especially when it’s a HUGE project that takes 4 or 5 HOURS to complete plus an overnight marinating!
One thing I’ve learned from cooking (and from watching my wife’s favorite show, “The Great British Bake-Off” with her) is that the ORDER in which you add the ingredients can make a crucial difference in how your food turns out.
Which is exactly why we’re focusing today on the 4 cable Method of setting up your guitar amp and effects. Maybe you’ve not heard, but there are some pretty solid reasons why you should put guitar effects in a particular order if you want to sound stupefyingly mind-blowing on your axe.
The Nutshell
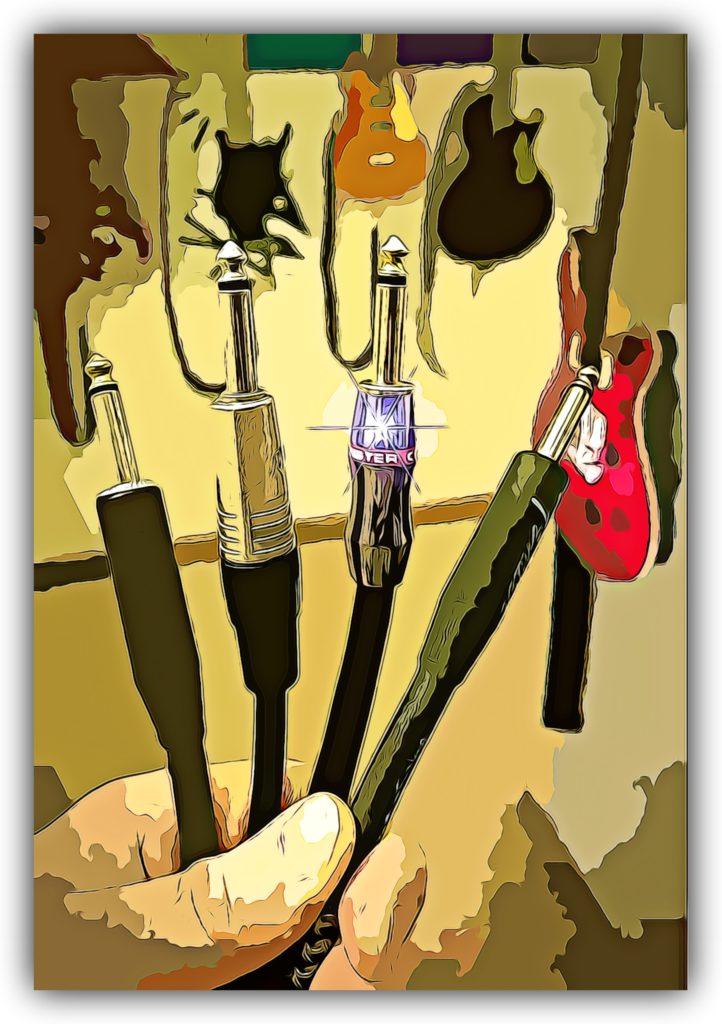
The four-cable method of guitar/amp setup, sometimes simply referred to as “4CM“, is simply using four cables to place effects onto our guitar signal.
Effects are applied in one of two places:
- BEFORE the amplifier’s EQ section and gain stage, or
- AFTER the amplifier’s EQ section and gain stage.
The “gain stage” of an amp is where we can turn on our overdrive, or distortion, effect.
If we’re talking pure quality of tone and clarity of signal, the 4-cable method is the preferred method for guitar/amp signal routing.
Let’s find out why, shall we?
The Rock ‘n’ Roll-y Trinity
All guitar effects fall into THREE categories:
- Gain-based effects
- Modulation effects
- Time-based effects
Break it down for us, Teaj! Okay. Gain-based effects are your overdrive, fuzz, distortion, or crunch effects. A lot of times a noise reduction unit, a tuner or an “Octaver” unit is also placed in this category since they all should be at the TOP, or start, of your signal chain.
Next, Modulation effects. Under this heading we find chorus, flangers, phasers, envelope filters, tremolo & vibrato. Modulation effects, as a rule, always follow Gain-based effects in the signal chain.
Finally, we arrive at Time-based effects such as Delay, Echo, Reverb, or Loopers. These work best at the END of a guitar signal chain.
Now, before we outline specific cabling diagrams, let’s get this question answered: why would we want to separate effects this way??
Because it SOOOOOUNDS BETTERRRRRR!!
Certain effects will be clearer and work better BEFORE an amp’s preamp stage, and other effects sound much better AFTER the preamp stage. The 4-cable method allows us to utilize all effects in an optimized fashion to get the very best sound possible out of our rig.
Want some proof?? Check out the following video. Aaron did a great job letting us hear just why we need to consider this setup. Pay close attention to the awful guitar sound at 2:15, then the quality, clean guitar sound at 2:30:
Go With the Flow!
I find that the easiest way to understand the 4-cable method is simply to grasp the signal flow that makes your guitar sound awesome when it comes out of the cabinet and spills onto your 80,000 cheering audience members.
It goes like this:
First, your guitar is FIRST plugged into your effects processor. We do this because that’s the first place we want to put on gain-based effects. Like a distortion sound. OK, so let’s pretend we’ve done that. Great.
Now the guitar signal, with distortion added, can go into the amp’s PREAMP stage. This is where the sound of our amp really comes in.
Where to next? Well, we probably have some more effects that we want to put on that belong to the Modulation and time-based effects family. For those, we’ve got to go back into our effects processor.
The processor then puts on those effects, like maybe some Chorus, a little bit o’ Tremolo, and after that finally some nice Reverb to make it sound like we’re playing for those 80,000 cheering audience members… even when you’re just in your room!
At this point we’re done with effects so we can send the signal out of the effects box once again back into our amp.
The amp, in the final step, directs your incredible-sounding signal into your cabinet and/or straight to the PA system, and voila – you’re gold, baby!
Did you follow that flow? If you can really get your head around how the signal passes through each stage, and why it’s passing in that certain order, you can master the 4-cable approach no matter what amp or effects processor you have, and be able to set it up without bowing before the almighty Google. 😉
But since I know that you probably appreciate specifics, let’s look at two popular ways to set up guitar effects with amps…
With Processors – Ports is Ports!
Most of the players that I’ve worked with professionally have used, like myself, a rack-mounted effects processor.
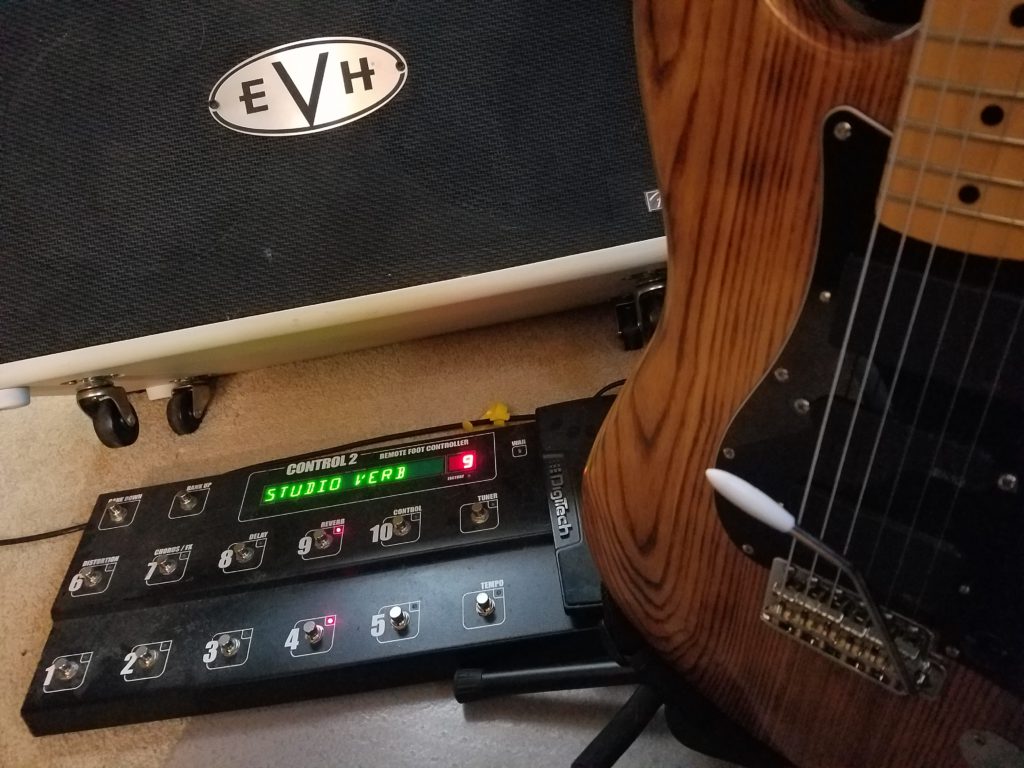
Most of us also have a Foot Controller to change things on the fly, with just a tap of our foot. This is helpful because we don’t want to have to go side-stage to twiddle with any knobs. We want to be able to do it all from where we’re performing, and that’s where a foot controller really saves the day.
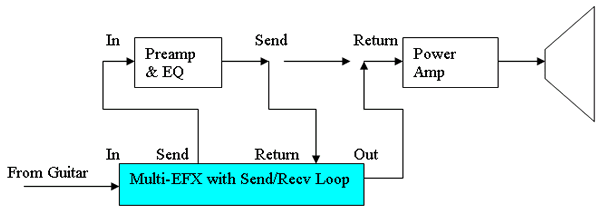
There’s one important caveat to successfully setting up the 4-cable method with the processor: the processor must have an effects Loop. A send and return, in other words. If not, the 4 cable method is not an option for you.
But let’s assume for now that your processor is loaded with all the necessary ports. Using the flow logic that we outlined above, here is our signal flow cable layout:
- GUITAR to processor INPUT
- Processor SEND to amp INPUT
- Amp SEND to processor RETURN
- Processor SEND to amp RETURN
Cool! Now that that’s set up correctly, we know our signal will get to where it needs to go.
But wait – there’s more! In most processors, you must ALSO go in and assign the effects, either to ‘before the preamp’ or after it.
Why? Well, the processor doesn’t know whether you’re using a 2-cable, 3-cable, 4-cable, or 20-cable technique; you’ve got to tell it!
Each processor is different in how it assigns effects with regard to signal flow, so I won’t go into those particulars here. if you don’t know how to assign effects in your particular processor, it’s time to get out the manual, or head over to YouTube, and become a programming master of your gear. This MUST be done if you want to sound amazing.
And you DO want to sound amazing, right??!
Once you’ve successfully assigned the effects, based on your processor’s unique method and menu, the whole guitar wall of sound coming from your rig should make the most-celebrated Guitar Hero jealous!
Or maybe not. They’re probably using the 4 cable method too. 😉
Using Pedals
In the last 7 years or so, the popularity of guitar pedals has skyrocketed. When I was growing up in the 80s they were big, but then they kind of went the way of the dinosaur when rack-mounted processors showed up. Clearly though, they have had an incredible resurgence. I see younger players now with enough guitar pedals in front of them to make your amp spin.
Somehow they just love doing that toe-tapping dance!
Alright, so how do we set pedals up within the 4-cable method? Again, we must go back to the three genres of guitar effects & how they’re separated for optimal total excellence. Do you remember??
- Gain-based effects go before the preamp
- Modulation and time-based effects go after it.
Now that I’ve mentioned that a few times, I bet you’ve got it, right?
I knew you would. 😉
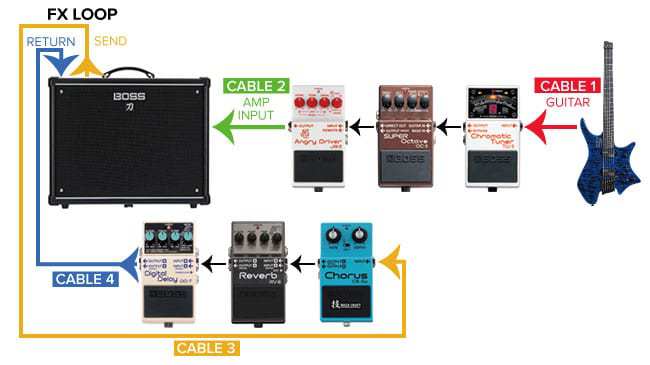
With that in mind, here is the cabling layout for utilizing foot pedals in a four-cable system:
GUITAR to, & through, Gain-based PEDALS (usually tuner first)
Last Gain-based pedal OUT to amp INPUT
Amp SEND to Modulation & Time-based Pedals.
Last Time-based pedal OUT to amp RETURN
Okay, so… did you follow the signal flow logic again? it’s just like following the course that a river takes – if you’ve got a map, and you understand why it’s flowing where it’s flowing… you’ll never get lost!
How My Own Rig Rocks with 4CM!
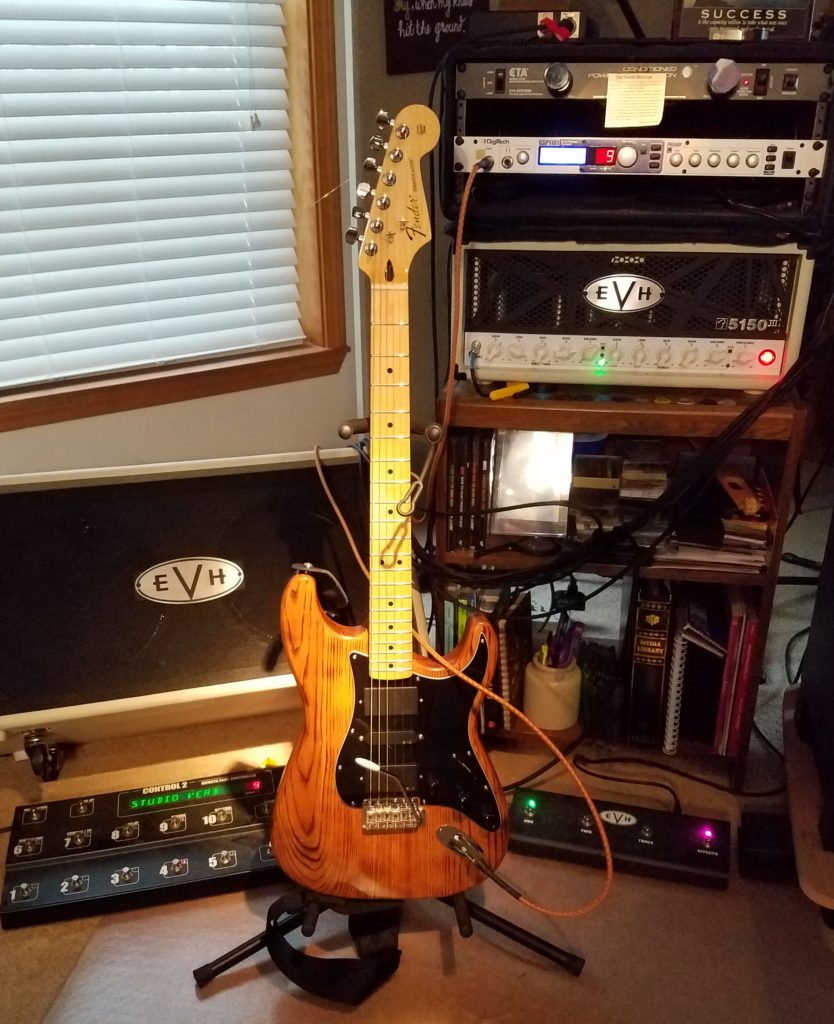
We humans always learn better when we’re given specific examples to peruse, so let’s take a look at my favorite guitar rig here in my studio: my EVH 5150 III & DigiTech GSP1101 combination!!
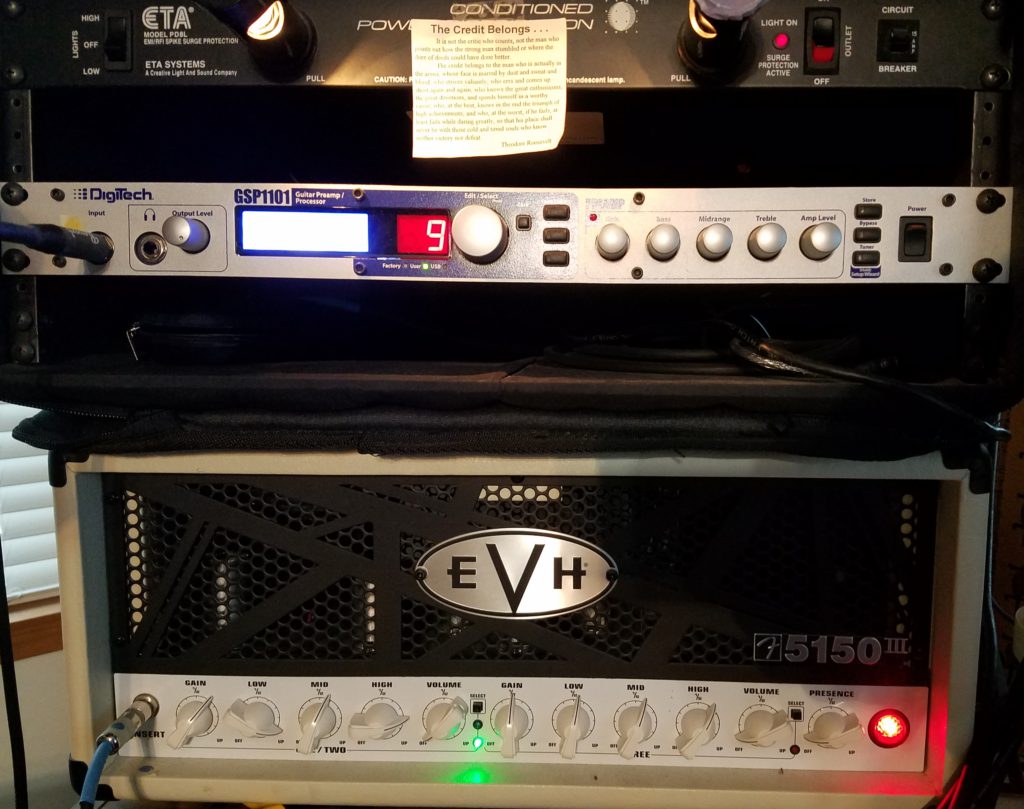
If you’re unfamiliar with the 5150 III amp… oh man… this thing ROCKS THE UNIVERSE!!! See the full review of it I did RIGHT HERE. And if you ever PLAY through one… be prepared to never hear guitars the same.
The first thing I’ll do is take my guitar (which today is a Fender Partscaster with a cool “Burned Ash” body that I had hand-built) and plug it into the input of my processor.
The GSP1101 will then apply, according to how I programmed it, all of my gain-based effects.
I then send the signal out of the processor through the send port and I bring it into my amp by plugging into the input of the 5150. You can see this in the cable with the blue tape (I keep my cables all color-coded for fast hook-up at gigs).
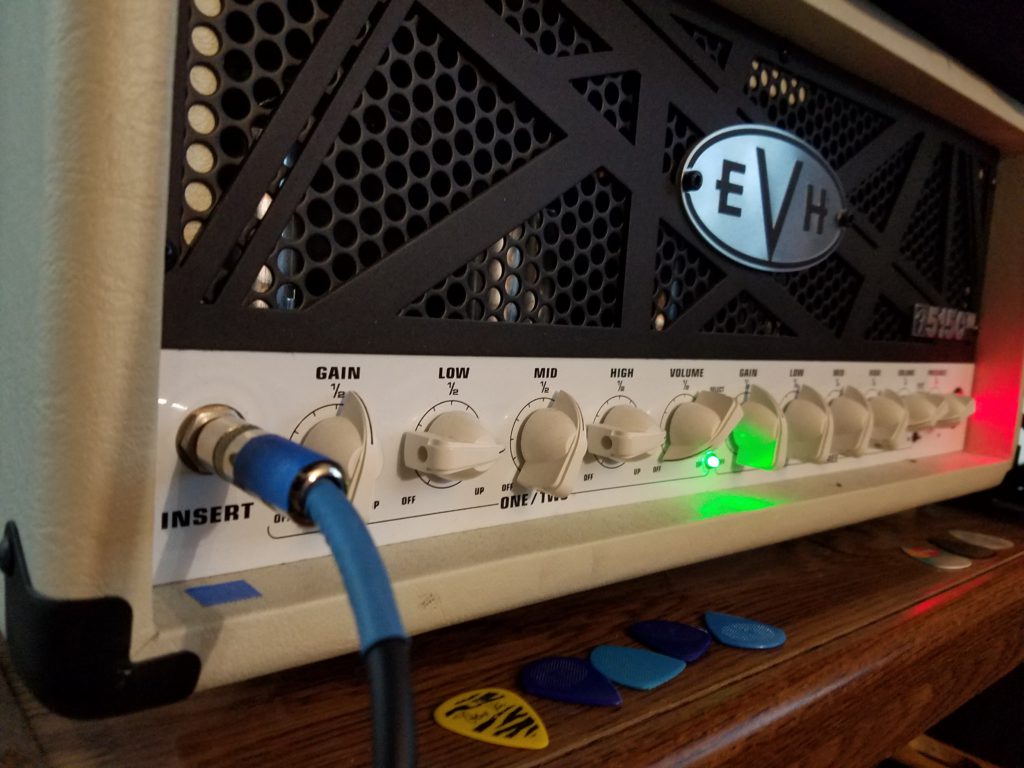
This is where my amp will apply all that beautiful EVH Magic in the preamp stage.
As a quick aside, the whole reason I chose my DigiTech processor is that it doesn’t suck tone from whatever amp I pair it with. a lot of processors the tone of the amp, sometimes in very unfortunate ways. this 1101 consistently let’s my 5150 shine in all its Glory.
And the choir sang “Amen!!”
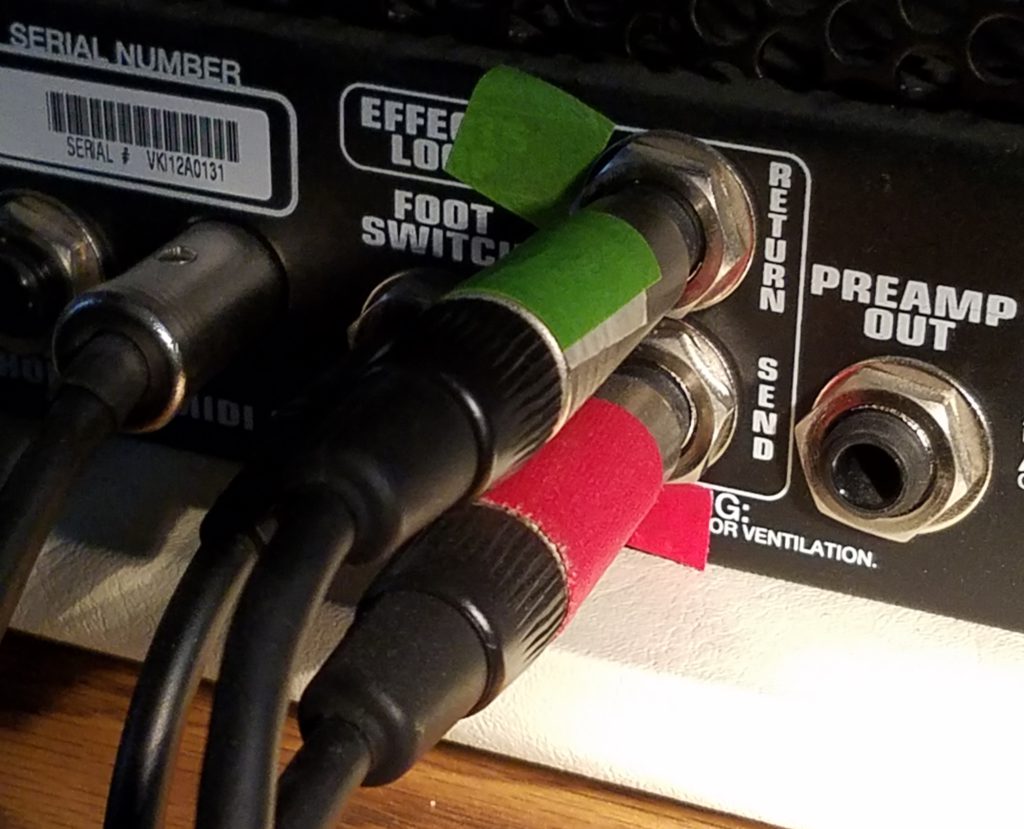
Now that we have our real amp sound applied by the preamp send the signal out to the other effects that must come after it. You see this in the cable that has the red tape around it, coming out of the amp’s SEND, and going into the processor’s RETURN.
At this point the processor applies all the modulation time-based effects, fulfilling weird request that will create our signature sound.
Now we’re ready to go back into the amp, to the power amp stage, so that all that lusciousness can be amplified loud! the final cable, with the green tape, goes from the output of the processor to the effects return of my amp.
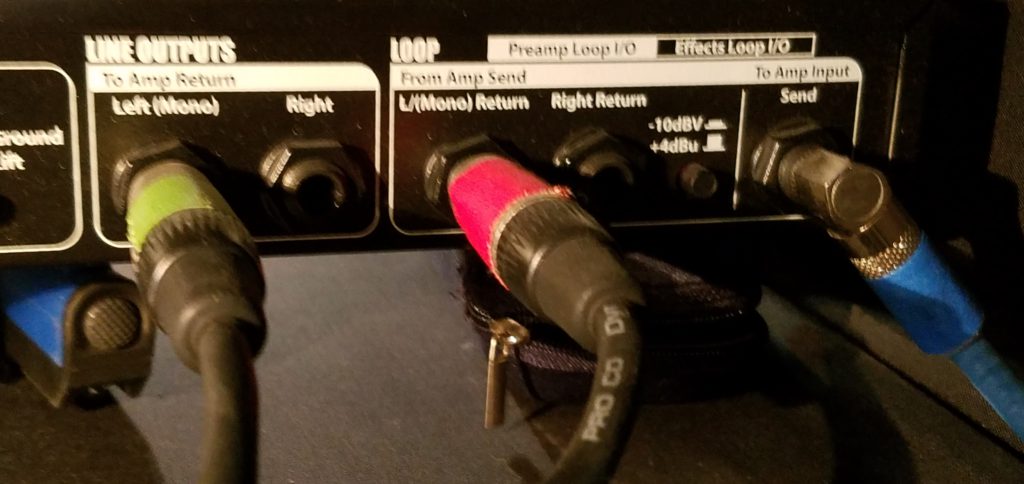
That’s it! Cables complete. If I hadn’t already done it, I would now program my processor so that it assigns certain effects either post- or pre-preamp.
If any of that was a little confusing to you, just go back and re-read it a few times. It’ll become clearer. And the good news is you really only have to do this ONE time. After that you can just leave the cables, and the programming assignments in the processor, exactly as they are. They will serve you faithfully until the time you want to make any changes in effects or cabling.
By the way, in the next week, I’ll be finishing up an article specifically on the DigiTech GSP1101. So if you want more particulars on it, check in here at Seriousgas.com and you won’t miss any of the tasty tidbits!
The Final Power Chord!
I hope this post has shown you just how advantageous it is to use the 4-cable method and apply it to your guitar rig. Having reverbs, chorus fx and delays before high-gain effects can really, as Aaron showed us earlier, sound outright awful.
But with a bit of forethought, a cup of study, a tablespoon of trial, and pinch of error, you could just wind up COOKIN’!! With a guitar tone and effects selection that sounds better than any time in your life up to this point!!
I’d say that’s a goal worth pursuing, wouldn’t you??
Got questions? Have 4-cable technique experience yourself? Still wondering how you can get all your cables UNTANGLED, let alone in the right ports of your amp??!! Talk to us in the Comments section. We’d love to hear your story.
Tangled or knot. Uh, I mean… NOT. 😉
In the meantime, grab your guitar, your amp, your processor or pedals, and four free cables and…
… you know the drill – go… make… sounds!!
Teaj