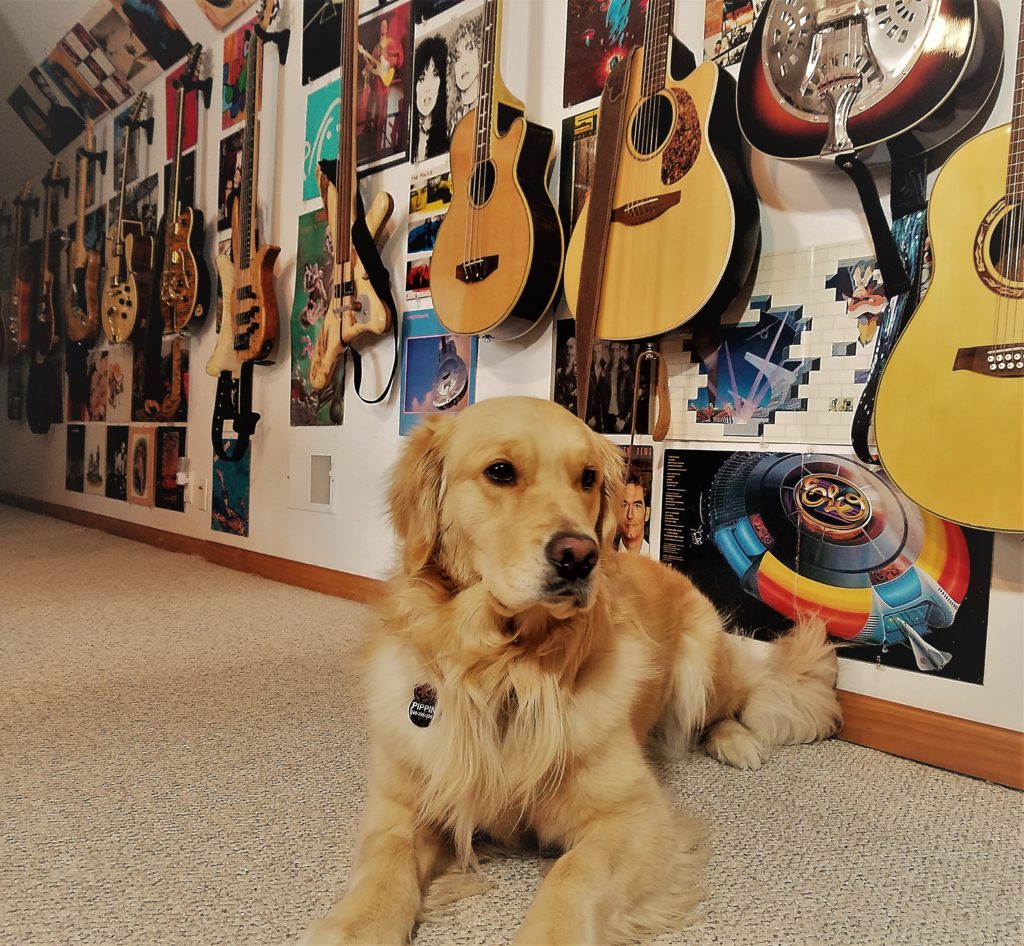
Ever since I was a child, I’ve been a dog guy.
Don’t get me wrong, I like cats too. But there’s just something about man’s best friend…
Like how they can fetch! Our pooch Pippin will chase and bring back any number of things. It’s adorable… and fun.
Now if I can only teach him to bring me the headphones! Lol
Whenever I’m tracking or mixing, I also get a lot of practice fetching – FREQUENCIES! More so than any other processing, I’m tweaking with EQs incessantly throughout the recording process.
Which is why it’s crucial to have a good one. A powerful one. One with lots of options, but breeze to use.
Enter the FabFilter Pro-Q 3!!
This fabulous plug-in quickly became my favorite when I picked it up last year. It was like finding a restaurant that serves a dish you’ve never had, that’s vaguely familiar but clearly blows away any cuisine you’ve ever had!
Yeah. It’s that good.
Let’s investigate, shall we?!
Recording Wooden Shoes?
The FabFilter company hails from Amsterdam, Holland. Up ’til now there weren’t any Dutch companies that would never spring to mind when the words “pro audio” were uttered, but these bad boys have changed all that. Wooden shoes or not!
The company is fairly young – they first opened their doors in 2002. But their vision-casting, synergizing and trailblazing methods have assured them a top place in the pro audio halls of fame. Not to mention that their small team of around 20 now have an annual revenue of over $4 million!
The reason is clear: their products are amazing! They not only do the job with astounding prowess, but they also look and feel like a whole new world compared to their other old, dusty, “same ol’, same ol” competitor’s products.
I’m not alone in singing their praise either. Virtually every online post and magazine article I’ve read about the FabFilter company has lauded them for the quality, power, and the “WOW!” factor of their graphical user interfaces.
I totally concur with mastering engineer Jeff Sanders, who said this about their products:
“While (others) are busy trying to model hardware, FabFilter is leaving them in the dust by being visionaries.”
Couldn’t have said it better. But let’s not stop there… for an impressive look at just how many industry legends have embraced their innovation, check out this telling vid’ about their 10 year anniversary:
The Q3 Revolution!
FabFilter’s flagship EQ is now in its third iteration. The Q3 plug-in is every bit as revolutionary as it was when it first hit the market…only now with more cutting-edge additions than ever.
Time and again I’ve heard pro audio industry professionals say, “I thought they couldn’t make their stuff better – it was already awesome. But they did!!”
Again, I totally agree. There are so many features and benefits in their software that I don’t find anywhere else, in any of the other manufacturer’s products.
They obviously have some very cool patents up their sleeves!
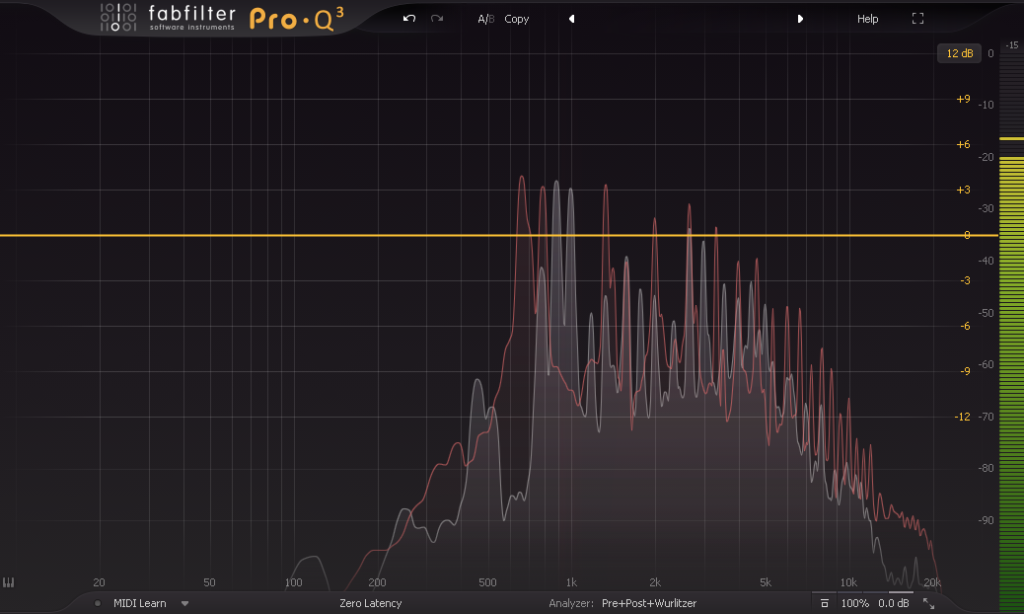
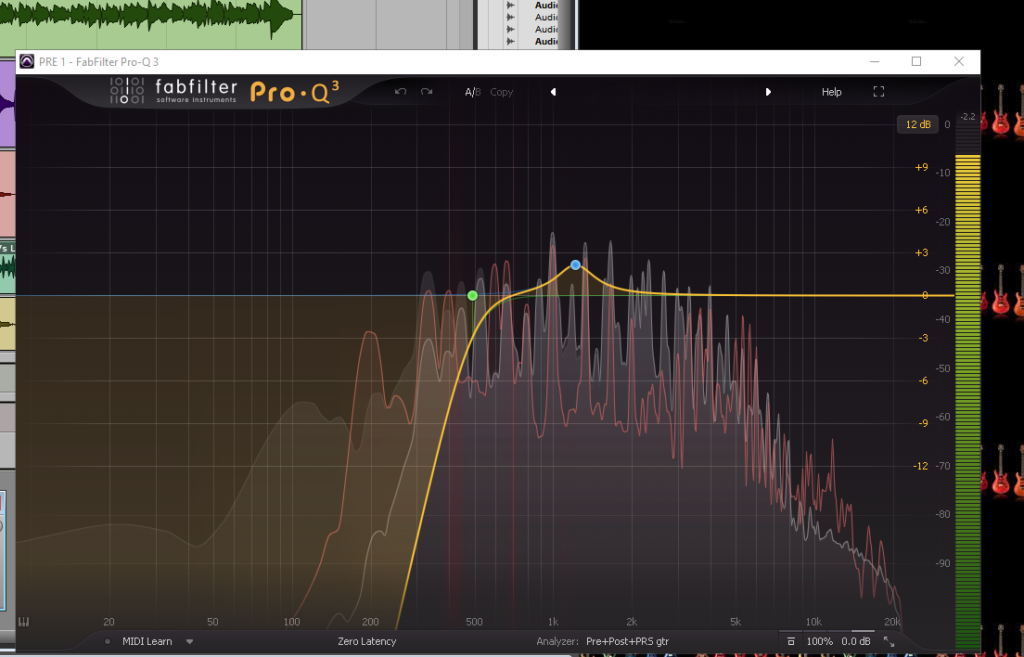
The first impression when you open up any of their software is extremely impressive. Their graphical user interface, or GUI, may just be the best in the field, and that goes for pretty much any other plug-ins. But the Q3? It’s especially cutting-edge. Here’s a quick pic to show you what I mean:
Sharp-looking, isn’t it? The shapes, the colors, the spread-out and well-placed menu options… It’s all put together SO well. An award-winning design for sure.
Vid’ me, Baby, One More Time!
As usual here on Seriousgas.com, we’ve produced a lengthy, detailed video for you about much of what the Q3 plug-in offers. It was a pleasure to make, since any time we can be playing with FabFilter plug-ins is a GOOD time!
It’s only “Part One” though. We’ll be doing a “Part Two” video later, to explore some less common options, and to kind of spread out the review a bit for the sake of time.
Britney Spears fan or not, let’s rock this thang!! 😉
Shape It Up!
In this first “Part One” article, we will be mostly covering the basics of the Q3, so to start with… you can’t get more basic than the various EQ curves and shapes that engineers use daily to carve out those perfect, balanced mixes.
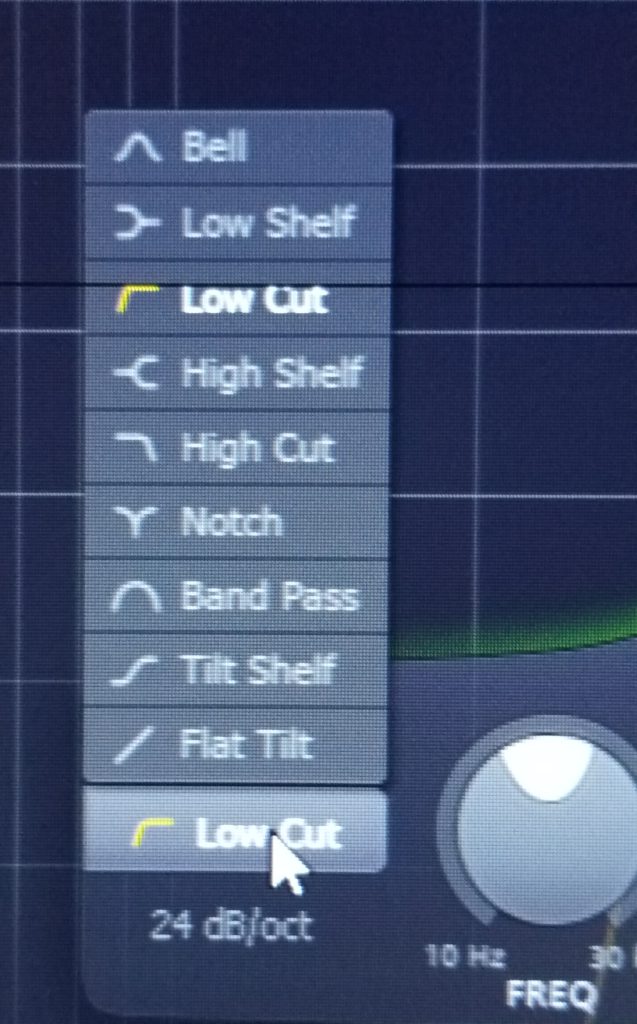
Here’s the options Q3 provides:
- Bell
- Low Shelf
- Low Cut
- High Shelf
- High Cut
- Notch
- Band Pass
- Tilt Shelf
- Flat Tilt
Except for those last two, we see all that we would expect in a modern-day EQ processor. I can’t think of anything they missed there, can you?!
I find them all to work flawlessly and produce the expected results. The difference is that the Q3 does it style and panache that I’ve not seen on any other software platform.
All controls you’d expect on a completely parametric EQ are there. When you engage each cut or boost, however, they each are shaded a different color, such that when you finally interact completely EQ’d a track completely, it can end up quite resembling piece of modern art… and a piece that looks wicked sweet at that.

In fact, that gives me an idea… I think I actually will print out a large color poster of my vocal track running through the Q3. I can hang it in my studio and sign it at the bottom. Cuz, ya know… It IS me! Lol
Tilting at Sound Mills
Let’s examine those bottom two EQ shapes that are NOT usually found on most EQs: the “Tilt” functions.
They’re interesting, new twists on cutting & boosting that I’m curious to use in the future and see if I can find some cases any of my mixes where this kind of processing would be appropriate.
Both the “Flat” and the “Shelf” functions share the same basic method – there’s a center frequency of your choice, and on either side of it, all the frequencies, up to the high and low boundaries of human hearing, are cut on one side and boosted on the other.

So, because of how the tilt is shaped, the only time I see the appropriate for mixing would be when you’re middle frequencies are pretty dialed in, but you notice that the highs and lows need some adjustment, specifically, diametrically opposed directions. Because this function is broad, you’ll have to be careful though.
Still, I love it when a company innovates new options for us to have at our disposal. “Can’t hurt, might help”, right?!
There are two ways I plan on using it soon: first, I’ll use it whenever I record some percussion. This will necessarily need to occupy a small section of the EQ band, so the shelf tilt should be just the ticket.
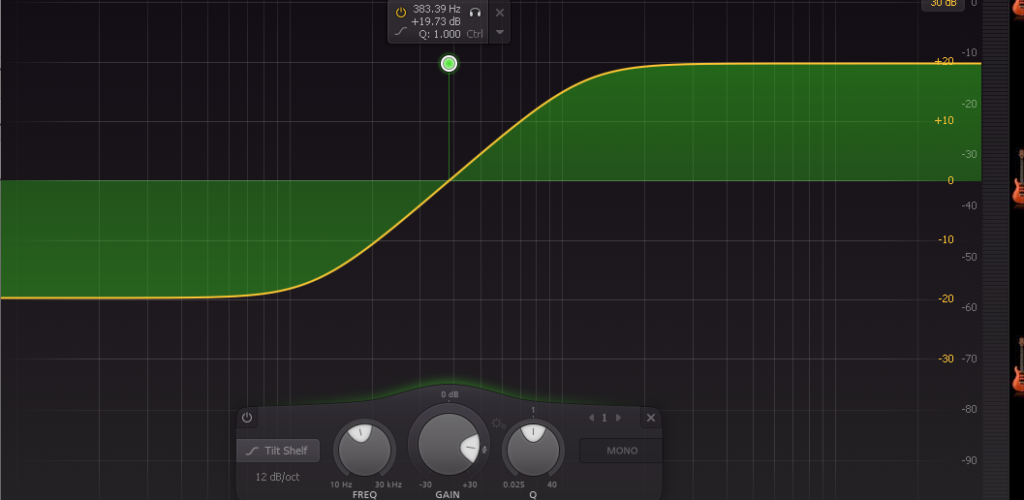
Second, when I have the right psychotropic song for it (LOL), I plan on automating it so it’ll sweep through frequencies like a wah pedal in real time. If my idea is correct, it should produce a pretty cool sound that I’ve never been able to try before with any EQ in this precise shape.
Creative effects – I love ’em!!
In a nutshell, if you need very BROAD tonal sculpting of the highs and lows, then the tilt function might provide just the uneven floor you’re looking for!
Collisions – Oh, How it Hertz!
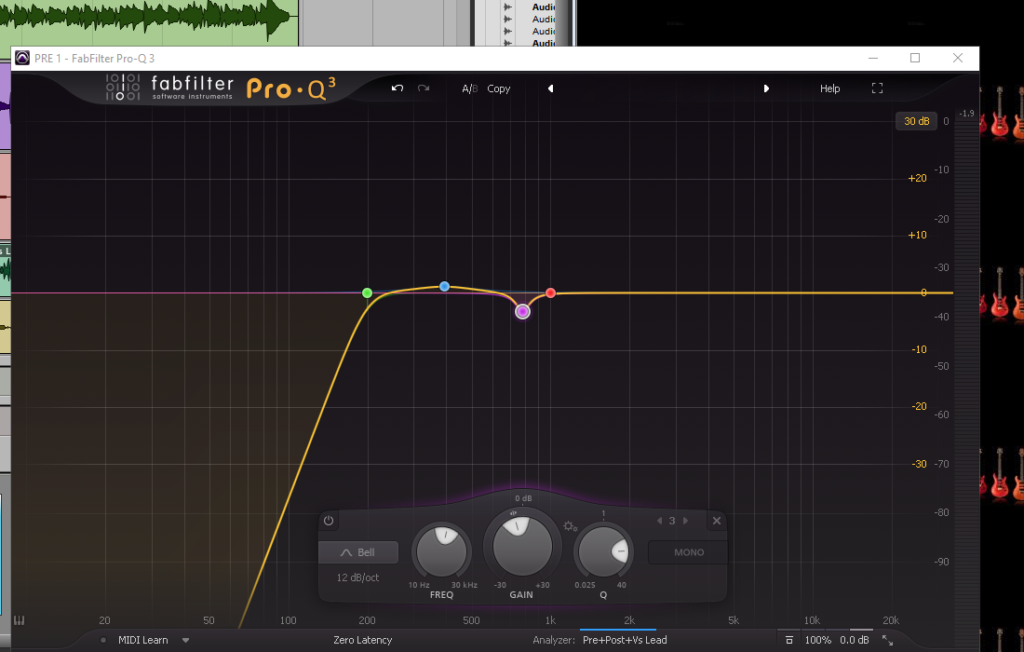
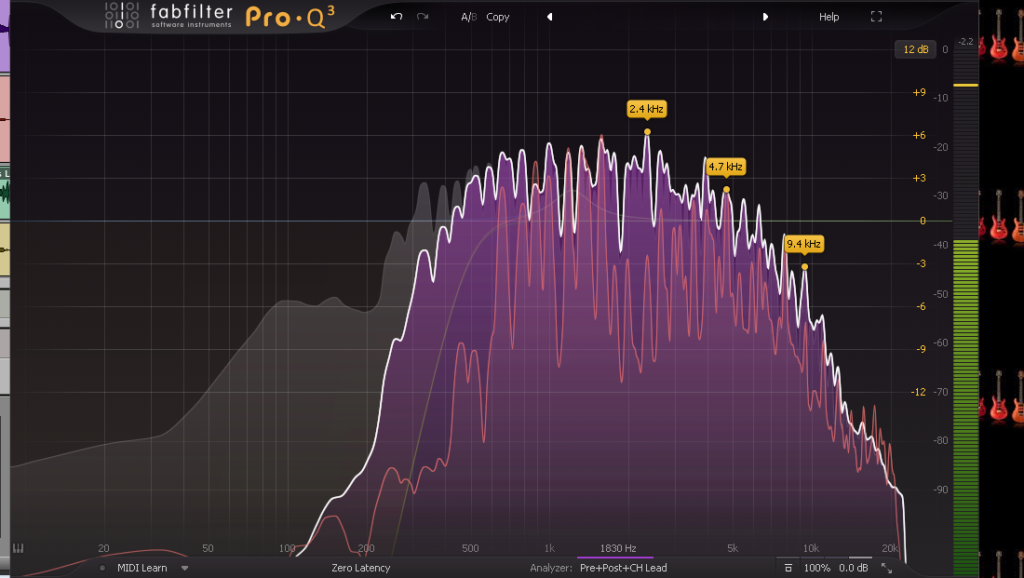
The “Frequency Collisions” monitoring parameter that the Q3 provides. I find to be extremely useful and a real time saver.
Imagine you’ve recorded a clean electric guitar on one track, and a synth rhythm track on another (like I did video above). They’re both occupying the same general area of the midrange, so you know you’re going to have to tonally separate them a bit for the sake of clarity in your mix.

Well, with the Q3, you won’t have to spend time finding where the two tracks overlap tonally – an obvious stripe of red in the waveforms will tell you exactly where you have coinciding fundamental frequencies.
I love this, ‘cuz within seconds I can cut and boost a bit on both tracks, in opposite frequency ranges, and voila… they’re instantly occupying their own little zone. No muss, no fuss. Quick and easy, it’s DONE.
Even while I’m tracking, I always leave this function on. Why? ‘Cause when I reach MIX time, all the instruments are pretty much already portioned off, ‘cuz I did it on the fly because it made the collisions so obvious.
This ends up saving a ton of time and helps get that next single that much quicker.
And isn’t that what we… always want?! 😉
Spotlight, Please!
Now here’s a feature that I didn’t find talked about much by anyone, but that I find a killer creativity boost – the “Solo” button that’s there every time you click a new EQ adjustment point!
The headphone icon points the way. Whenever you click on that, it will turn red, giving you a visual indication that you’re now in “solo mode”, but ONLY for that particular EQ band or frequency.
Way cool. It’s another way that the Q3 gives me something I’ve never had on another EQ plugin.
It’s quite a weird feature, but I really like it, and it’s in part why I’m using Q3 almost exclusively for EQ-ing now.
The reason comes from answering this question: on any instrument that we record that occupies the mid-range at all, don’t we, many times, want it to sound different from how it does naturally?
Of course! Sometimes, dramatically so, right?
Well, now, thanks to these “Solo buttons”, you can quickly and easily experiment with a bunch of options, and often… create a dramatic change that proudly occupies your final mix!
Here’s what you do:
- Bring forward your Q3 on any individual track.
- Click to create 3 or 4 different adjustment points, at different places.
- Start playing your full mix.
- Click the solo headphone button on each of the adjustment points to audition each one!
What you’ll end up hearing is that particular instrument reduced to 3 or 4 small slices, or “spotlights”, of the EQ Spectrum, with all the rest of its natural sound cut out.
It’s like processing a vocal to make it sound like a telephone voice; you’re taking away a large portion of its natural sound to make it sound UNnatural, because sometimes… that’s just the thing to make your mix fresh!
As you “demo” that single instrument in those 3 or 4 (or more!) ways, you’ll know if any of those instant variations give the mix a standout surprise lift. If none of them do, no worries… just delete the adjustment points and you’re none the worse for taking less than a minute to try something off the beaten path.
‘Cause we all know… that’s sometimes where GOLD is buried!! 😉
It’s Freezin’ in Here!!
If you open the “Analyzer” menu, which is found just to the right of the middle bottom of the plugin, you’ll see a button all the way to the left that looks like a snowflake. Get on your AC/DC wool cap, baby, ‘cuz you just found…
… the “Analyzer Freeze” function!!
Engaging this button will cause the spectrum to stop falling as the signal plays. Instead, you will see it build up “frequency maximums” of measurements and freeze them into a floating “glacier of sound” over time.
If you happen to forget whether it’s on or not, just check the button: if it’s enabled, there’ll be a blue line on the left side of the button.
I find this is helpful if I want to find quickly where an annoying frequency is within a signal. The strongest, highest peaks will often reveal the culprit so, again, in just a few seconds of playback, another problem is solved.
Can this plugin get any better??!! I doubt it, but I’m sure they’ll prove us wrong again when Q4 comes out! Lol
Dan the Man!
I can’t describe my relationship with FabFilter products without including one of the major advantages the company has given to us, its happy consumers, and that is…
… the Dan Worrall videos!
A renowned sound engineer from Sheffield, England, Dan produces all the plug-in tutorials for FabFilter, and they are and the best I’ve ever seen. His calming, pleasant voice and informed yet easy demeanor makes every video produces a true pleasure to experience.

I’m not surprised though. When I saw on his “LinkedIn” profile HERE that he also produces content for “Sound On Sound” magazine… I was instantly hooked – that is my number one, top, favorite pro audio magazine in the industry!
Not only does he do a thorough job of explaining all the FabFilter plug-ins, he’s also quick to point out how he himself uses them in the studio, and on the latest music that he’s tracked or mixed.
He must also be one of the most private people I’ve ever come across in music, ‘cuz I can’t find a single picture of him online… anywhere.
These days? THAT’S a major feat!!
Even if you don’t have the FabFilter products yet, I bet you’ll still find his videos engaging, educational and subscribe-worthy. If you DO have any of their plug-ins though, you’re going to want to take his training. I mean, come on… It’s free for heaven’s sake! And better than most you’ll see!
So go lift some spaceships with the “Yoda” of pro audio (Just call him “Yodio”!),Dan the man! Find all his FabFilter tutorials HERE.
No Regrets!!
For those who still want to know more (“More… MORE, I tell you!”), feel free to take your quivering G.A.S. pangs over to THIS Q3 MANUAL to investigate further this exceptional bit of pro audio coding.
Or, to investigate their full line of amazing plug-ins (ALL of which I’ve purchased!), browse through the FabFilter Website Here.
Already own the FabFilter Pro-Q 3? Used it in your own music?? Share the processing love and drop us a line in the Comments. We especially like to hear creative ways fellow audio artisans have used different functions for outrageously sweet results!
If you don’t have Q3 yet, I’m just gonna say what hundreds already have…
… just buy it! In light of how so many of us love their products, if you wait you’ll just be kicking yourself later!
Now, go… make… sounds!!
Teaj

Thanks, Coach!
Wow, I suddenly feel like I’m back on my high school track team. LOL
You’re absolutely right – we DO love what we do here. It’s all about the gear that helps bring our music to brilliant life. Except for time with family & friends… you’ll probably find us HERE! ‘-)
For another fun look at how music is our “happy place”, check out THIS POST!!
Please do, Peace! Then come back here and tell us all about your own experiences with it. We love all gear stories!!
I totally agree, Chikiking88. I use it more than any other now, just because it gives me so many more options AND insights into my mix.
You record music too??
Thank you for this great review of the FabFilter Pro-Q3. Actually, an equalizer is probably the tool you use most while mixing and mastering, so you need the best of the best. With FabFilter Pro-Q 3, one gets the highest possible sound quality, a very extensive feature set, and a gorgeous, innovative interface with unrivalled ease of use.
Teaj I cannot even begin to express how very impressed I am with this article. Honestly when I saw the title I wondered whether it would be interesting to read this but I am happy that I did. I simply love reading articles like yours where there is no doubt at all that you really, really, really love and enjoy ‘working’ in your niche. Anyway the information provided was clear and to the point, and a few laughs as well. I am not a big fan of the ‘behind the scenes’ of music, but I am certainly a big fan of yours now. I love what you have done with the website. Congrats and keep it up. Best wishes.
Hi Teaj,
I laughed at this statement: It was like finding a restaurant that serves a dish you’ve never had, that’s vaguely familiar but clearly blows away any cuisine you’ve ever had! So funny! I know the feeling of getting something for the first time that you feel you’ve had before. But actually you never had in reality, you had it in your mind. It was a perfect version of your reality and so, when you get it, it has that vague familiarity.
I would give The FabFilter Pro-Q 3, a try and see if we share the same experience of absolute satisfaction.