 “Hiyyy -YAH!”
“Tchoh!!”
“Whohhhhhhhh – HAH!!!”
If any of you, like me, have ever taken a martial arts class or course, then you know the sounds I’m talking about! Somehow just that little bit more ‘oomph’ comes forth when we utter those syllables of power.
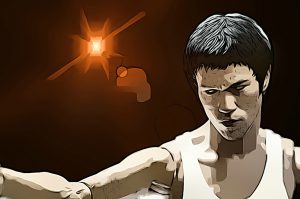
Plus, it just makes you seem more of a bad-ass, right?! I mean, imagine a Bruce Lee movie, where he fought but didn’t make any sounds. Unnatural, dude!!
So, what do martial arts have to do with how to play guitar for beginners?? Well, it’s all about… options!
See, I personally studied the ‘kung fu‘ branch of martial arts for some years, and learned much from some very good teachers at the dojo..
But recently I joined another class from a different discipline: karate. Know what I found? They do everything SO different! You still are accomplishing the same goal: defence against an attacker, but the movements, placements, vocalizations, mental processing… they are all so different from what I learned in kung fu.
And yet… it works. And is awesome in its own way.
In a similar fashion, in this SECOND PART of our series, we look today at how choosing to play guitar is like choosing a weapon, or a form of martial arts. There are many ways to wield your instrument, practice it, and you probably won’t have the time or desire to take them all on. So how do you choose which disciplines to take on?
If you haven’t gone through my first article on how to play guitar, check it out HERE. If you have, then let’s bow a dojo greeting and get swingin’… !
Your Sensei
In martial arts training, the person who has excelled the furthest in a particular dojo, who is the main Instructor and thus the most revered, is the Sensei. The word means “teacher”, but there’s also a profound respect that is carried along with the term in martial arts.
A Sensei is usually a black belt and often has put DECADES of time and study into the craft. Thus, it also carries a tone of respect for someone who has achieved a level of mastery and accomplishment in the art.
The Sensei is there to keep you on track, to make sure you’re aligned with the teachings, and to help guide you toward proficiency and mastery.
In music, one of our most excellent Sensei masters is… the METRONOME! As you progress through any musical studies, if you apply the metronome to all your practice sessions, you will be able to attain mastery that others, who don’t use one, will only dream about.
A metronome is simply a time-keeping device. It doesn’t slow down or speed up, but rather keeps a consistent, steady tempo for you to practice to.
It’s also like having your own private drummer that follows you around, only it won’t ask you to move heavy gear, lend money, or let him or her crash at your place tonight like real drummers do. LOL
These days you can download several metronomes for FREE on your smart phone, so, more than ever, there’s no excuse for not practicing with one. It’s so easy to do and is so transformative and effective. Should you use one? Yes, you should!!
Each time you’re learning an exercise, play it first with the metronome at a lower number, say, around 60, or 70. Then, as you master that speed, bump it up by two or three numbers and practice that until you make no mistakes. Then bump it up again.
Aligning your performance with a metronome will really let you know when you are ready to increase your speed. Basically, if you’re still making any mistakes, you’re not ready.
The Rack o’ Weapons
Take a cue from soldiers in ancient China: they didn’t all do the same thing.
Some wielded swords.
Others spears.
Off to the side, there were the halberd bearers.
And way behind them, on the ridge… the cross-bow deliverers of death!
In hand-to-hand combat, your skills meant life or death, so they didn’t try to take on every style of defence – they chose one and mastered it… or they didn’t last long.
In a concert scenario, there’s more than one way to release your own battle barrage of notes onto the paying, suspecting crowds. Here are your choices:
- Strumming
- Finger Picking
- Plectrium Picking
- Hitting or Striking
 There are even more really way out, wacky methods (I’m looking at you, drill-wielding EVH!), but these pretty much cover most of the playing you’re ever going to see. Each one is a weapon, and must be handled in very different ways to be effective.
Throughout your musician life, but especially when you’re first starting out, it’s important to always be trying out different techniques on your instrument. Even if you’re just playing around with them and not taking the specific technique too seriously. This will lead naturally to developing your own, unique style in due course.
Remember, we PLAY guitar. Not work it. Always approach your instrument with joy, friendly determination and respect. It’ll pay back in rich dividends.
Initially, though, so you’re not overwhelmed (& also so you can feel a sense of real accomplishment), just choose one or two techniques to explore.
Ok, let’s march down the warpath and do a little sparring, shall we?
Skirmishing With Your Heroes
When I started, I had two heroes that I wanted to emulate, and I learned and practiced their styles, back and forth, with passion and consistency: Paul Simon (for acoustic guitar) and Eddie Van Halen (for electric guitar).
Many have raised their eyebrows at my taking on two guitarists who, on the surface, couldn’t be more poles apart.
To me, it was a no-brainer: it was all about the songs! They were timeless, and well-constructed, and emotionally impactful.
But their proficiency on guitar was also AMAZING. Their techniques and inventive approaches to the instrument never ceased to inspire me.
I knew soon enough that if I could learn how to write songs as well as they wrote them, and play even half as good as they did, I could bring some quality music into reality too.
I was right. The more I learned from both of them, the better I got. Learning the songs of your musical heroes is like skirmishing or grappling with them in battle: you learn their moves, their tricks, their stratagems, and it gives you insider insight as to how they think through their ‘campaigns’, song to song.
Plus, if you choose music that inspires you, you’re bound to practice a lot. For me, it was such a high to find myself being able to play their guitar parts finally, when before I had only won “air guitar” contests. Now I was the real deal!
Because of those two heroes, my concentration at first was on two main areas: learning and using scales for soloing (thank you, Eddie!), and learning and refining chords, finger picking and strumming for acoustic sing-along songs (Paul was the bomb for that!)
In the same way, if you’re starting out, I want YOU to pick two guitar heroes that you would just LOVE to play like, and start studying the specific techniques they use the most. Don’t try to learn everything at once. Focus on a couple, really gain control in them, and then move on to other methods.
Let’s break down the most common options you’ll come across…
The Cobra Rhythms of the Hand!
Strumming. It’s a basic prerequisite for acoustic guitar, tho’ you also may see it down on electric at times.
Strumming is usually done with a pick, since you’ll probably want a lot of volume for the part you’re learning.
You can use your fingernail if you want, but I’d only do that if you’re playing in a church or somewhere you don’t want to be loud or brash. Your fingernail will definitely soften the guitar sound.
The most important part of learning to strum is always having your hand and pick continuing in an UP/DOWN pattern. Even if your pick is not hitting the strings, keep the up and down going. This keeps you in the song’s groove and brings a consistency to where you’re striking the strings.
Try these patterns on for size:
- Exercise One:
Strum the guitar strings up and down, slowly, eight times.
While you do that count “ONE – and – TWO – and – THREE– and – FOUR – and”.
How’d you do? If you succeeded, you just strummed one measure, in 4/4 time, on each of the four beats, AND its subdivisions (the ‘and’s). Now do it again.
Once that feels natural, play it and repeat it continuously while counting out loud.
You can also pick up the pace and increase the speed. It’ll start to sound more like a song the faster you get.
When you can do that for lots of measures on end, without making a mistake in counting, then it’s time to get more tricky!
- Exercise 2:
This time we’ll play the SAME pattern as we did above, but with this change: don’t strum the strings on “THREE – and“. Your hand must still go up and down though! Keep it moving, but just don’t strum the strings on “3 – and”. You’ll pass them up and down silently, then come back in, hitting the strings, for “FOUR – and”.
If we put asterisks in where we DON’T play, it looks like this:
“ONE – and – TWO – and – * – * – FOUR – and”.
Increase the speed as you gain more control.
- Exercise 3:
Now try this one: “ONE – and – * – and – THREE – and – * – and”.
Again, the asterisks are where you will not strum the strings, but, as usual, your hand and pick will continue to rise and fall. Don’t stop moving your hand! Keep it going and the groove will be with you… always!
These three patterns are very cool to have in your hip pocket. They cover a lot of songs. To expand on this, just decide for yourself which beats or sub-beats to leave out. Try leaving out “TWO – and – THREE”. That’s a good one. Or how about “TWO – and – THREE – and”? That’ll sound cool.
The possibilities are endless, but the important thing is to start getting used to this constant up and down technique and picking up the speed with a few patterns. Soon, you’ll be sparring with the best of ’em!
The Most Intricate of Battle Formations!
This technique might take you a little longer to get down, since by its nature it is more intricate than simple strumming. But don’t worry – with consistency, and having fun practicing songs and artists you love, you’ll be amazed at your progress!
By far, the most common finger-picking pattern is the Travis picking pattern. There are SO many songs that use this, and I mean really popular ones that have become “standards” – songs you’ll probably never stop hearing on “Classics” stations.
To play it, choose four strings. In fact, let’s make it easy by playing a ‘D’ chord. Since that uses only the upper four strings, our choice is made for us!
Now, you’ll pluck strings in a specific sequence. Here it is:

In case you’ve never read TAB music before (which is on the bottom) the numbers refer to which FRET you’ll press down. Notice how those numbers correspond to the guitar GRID which is above the musical staff. It’s your basic ‘D’ chord.
What TAB doesn’t tell you is which FINGERS to use to pluck. I can tell you that the most common method, which I recommend, is using your thumb and your first two fingers. In the above example, I would use my THUMB for the notes marked 0 and 2. I would use my FIRST finger for the frets marked 3, and I would use my SECOND finger to pluck the fretted note marked 2.
Notice that in typical Travis picking, only at the very start of the pattern do you play two notes at the same time (the 0 with your thumb, and the 2 with your second finger). This is a big part of what gives Travis picking its particular sound and style.
Once you’re comfortable picking the ‘D’ chord, let’s expand the width a bit and try finger picking an ‘A’ chord:

Notice how we are not using the fourth sting in this example. When you’re first starting to Travis pick, concentrating on only four strings is the best. Later, when you’re more proficient, you can skip around a bit more and add ’em all!
Use the same fingers to pluck with as our first example.
As usual, start slowly and then work your way up to faster speeds.
Lastly, let’s move on to picking over the entire width of the fretboard. For this we’ll use a ‘G’ chord, since it uses all six strings.

Use the same fingers to pluck as the other two examples.
Notice here that we are ignoring TWO strings that are usually played in the ‘G’ chord: strings 4 and 5. Notice how the thumb has a much wider distance to cover now; it’s going to alternate between the bottom string and the 3rd string. Quite a hop!
For that reason, this may take a bit more time to master, but mark my words – if you practice consistently (ideally at least 10 minutes a day) you’ll have this down easily within a couple weeks.
And, as always, remember… the metronome is your friend!
Your Battle Shield!
Now let’s talk about using a plectrum, or most players refer to it, a PICK.
It looks kind of like a little shield soldiers would take into warfare in the epoch of the Napoleonic Wars. In our line of work though, we’ll be using it more like an offensive weapon than a defensive one!
As a general rule, the majority of electric guitar players use a pick… but there are exceptions:
- Mark Knopfler of Dire Straits
- Lindsey Buckingham of Fleetwood Mac.
- John Mayer.
- Derek Trucks.
These players buck the trend and use fingers on electric instead, either once in a while or (like Mark) all the time.
Still, at most concerts you go to, if you’re in the first few rows, you’re probably going to get guitar picks tossed at you from the cool guy with weird clothes who’s shredding with fiery fingers on that electric!
On the other hand, most acoustic guitar players who finger pick a lot do not use a pick:
- Bruce Cockburn
- Paul Simon
- Suzanne Vega
- Ed Sheeran
- John Denver
- James Taylor
Watch concert footage of these acoustic players and you’ll see that instead of a pick, they have grown their fingernails out on their right hand, eliminating the need for an extraneous pick that could get lost or dropped.
If you find that most of your acoustic work is strumming however, like Jimmy Buffett, then a pick would be more appropriate since you’re typically wanting a higher volume for a strumming-driven tune.
Which should you choose?? Your choice. Totally your decision to make. Try both ways. See what feels comfortable for you. Everybody’s hands, sense of rhythm and coordination are different, so you’ll have to just leave it to instinct as you practice. You’ll find you will gravitate towards one way or another mostly because of what music you are trying to emulate and which heroes you respect.
The best practice that you must integrate into your practices, with regard to the pick, is choosing to deliberately maintain a DOWN – UP pick movement. Similar to good strumming technique, the more consistent you can be in the down-up method, the faster and cleaner you’ll play.
To make this an instant habit, start your practices with this simple exercise: play four ascending notes on all six strings, using the same frets, while making sure that you are picking in a down-up format. Then do the same thing descending.
It’ll look like this TAB shows:

Notice the symbols at the start of the first measure, above the notes. The bracket means DOWN pick, and the arrow means UP pick. They merely alternate back and forth throughout the whole exercise, which is why is says “cont…”
If you do this for a few months every time you practice anything, it will become ingrained in your playing style easily, and that, my friends, is a good thing. It’s like being able to do endless flying, leaping front kicks to your opponent’s heads while never breaking a sweat! AWESOME!!
Musical Violence is Golden!
The last technique we’ll talk about briefly is hitting or striking the strings… with whatever! But most of the time, obviously, you’ll use your fingers in some fashion to hit are strike the strings or the guitar body.
This technique is used mostly for effect, but there are some who have made a whole career out of this technique. One of the most advanced I’ve ever seen is this guy, Stanley Jordan. Watch that video link. A – MAAAAAAAAZ – ing!
Or how about this great performance by arguably the best all-around guitarist of the last few generations, Phil Keaggy?! He uses normal techniques AND slapping/hitting and that has become his signature hybrid style.
Finally, if you like this style you have to witness Andy McKee do his thing HERE. Can anyone DO more hitting and slapping than this and still sound as outstandingly musical an Andy does here??? I doubt it!!
These examples show that, obviously, this is the most advanced, and rarely used, technique of the bunch. It takes much more practice to attain mastery of this technique, since not many people go there and thus there’s not a lot of training to be found on it. But it can be done.
For example, I utilize it sparingly in my pieces, mostly due to the influence of Eddie and Phil, who both employ it in imaginative and unexpected ways.
Like it? Then practice it! And maybe we’ll see your videos going viral sometime soon.
Samurai Videography!
In case your a visual learner who prefers a video any day over text, I got yer back! Click THIS VIDEO LINK and you’ll enjoy the benefit of a short tutorial video that covers what I laid out above.
Amazing what you can do with a GoPro. 😉
The War is Never Over!
Practicing, ascending to new and/or undiscovered musical heights and pushing the envelope in your playing style, prowess and skill is a never-ending assault on lethargy and apathy. As my father says, “Anything worth doing is worth doing right!”
It takes time, effort and concentration, and the result is not only a smile on your face because of what you’ve accomplished, but smiles upon the audience’s face because you and your music have become an endearing, enduring part of their lives.
So, take these exercises and use them to your advantage. If you feel you’re ready, HERE IS LESSON 3!
Keep going and soon you’ll be creating some timeless, invigorating music… that we’ll all enjoy.
In the meantime, you know what to do: go… make… sounds!!
Teaj