My son came home from school with his buddies the other day, walked up to me and said, “Hey – play us some of those multi tracks!”
I knew just what he meant. I have a number of recorded multi-track versions of some awesome Classic Rock hits. They’re amazing to listen to…

Especially the drums! We often bring the other faders down so we can just hear them alone. I booted up “Bohemian Rhapsody” & played it for them. Oh, the glory of Roger Taylor!
Whenever I play those though, I wonder: “What drum overhead mic placement did they use??”
There are many ways to capture those thunderous skins in the studio. It can leave you uncertain if you’re not familiar with all the methods.
And even if you are familiar with them… that doesn’t mean you understand them well, or know what the best use of them are.
But fear not! Today, we’re going to examine all the ways I’ve ever used, and heard of, that will make your mic’ed kit sound amazing!
You ready?? Let’s rock!!!
Dermatologist-recommended!
First off, some friendly “skins” advice:

- No matter which method below you use for recording drums, none of them will produce good results if your mics suck. It’s imperative that you purchase mics that are (at least!) not noisy, are EQ’d appropriately for drum frequencies, and can handle the SPLs (Sound Pressure Levels) that drums throw at you.
- I’m not saying that these are the only methods to use for drum overheads. I’m just saying they’re the most popular. At the very least, they’re the methods I’VE used to sonic success in my own recording adventures.
And that counts for something. 😉
You can capture GREAT results from all of these. Which one do you choose? Well, that depends on what kind of percussive sonic landscape you want in the final mix.
I usually decide the Overhead Mic method based on the genre and type of song that’s brought to me, or that I write.
Finally, I have to think Bart Stevens and Wade Jaynes, former engineers at Schnee studios, who were the first ones to teach me all about overhead mic placement.
They, along with many other recording engineers and fellow musicians in my past, have all contributed to my knowledge of this art form.
Or is it a science?
Truth be told,…… I think it’s both.
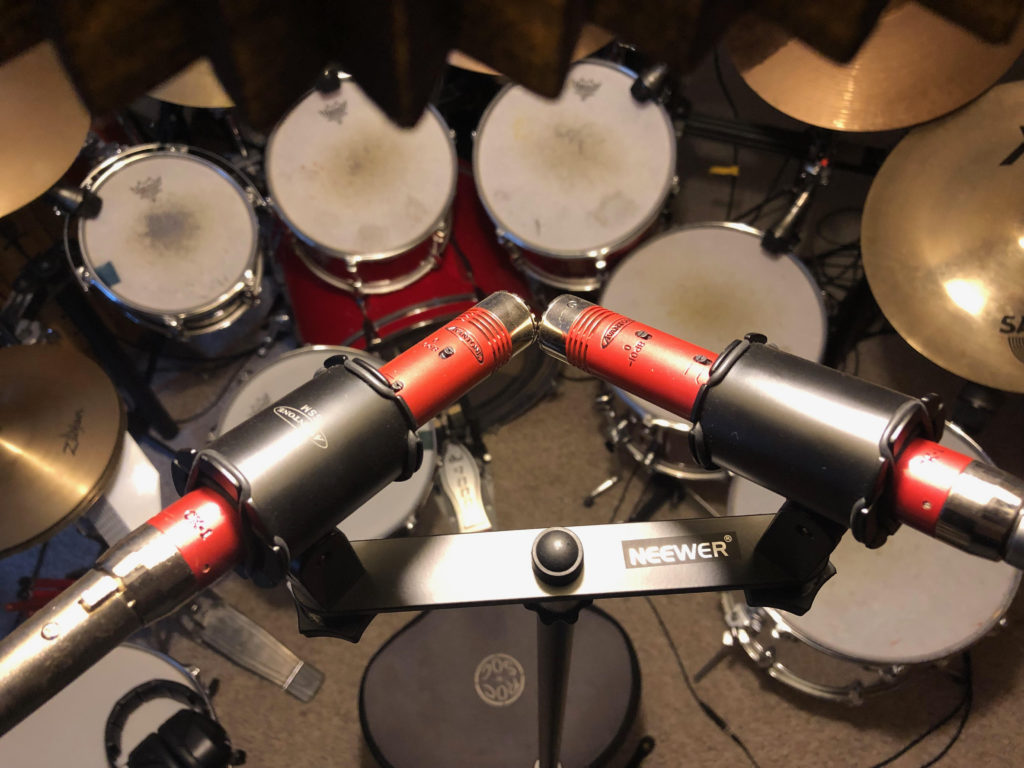
X/Y or “Coincident Pair”
This is the method that was de facto approach we set up when I worked at Schnee Studios in L.A. It was always our starting point, and honestly… I never saw it changed.
(That doesn’t mean that, for some sessions for some Producers, that it wasn’t. I just never witnessed it changed to another configuration.)
If you’re just starting out and beginning to explore Overhead setups, start here. You’ll almost always get very usable result (if you use decent MICS, that is).
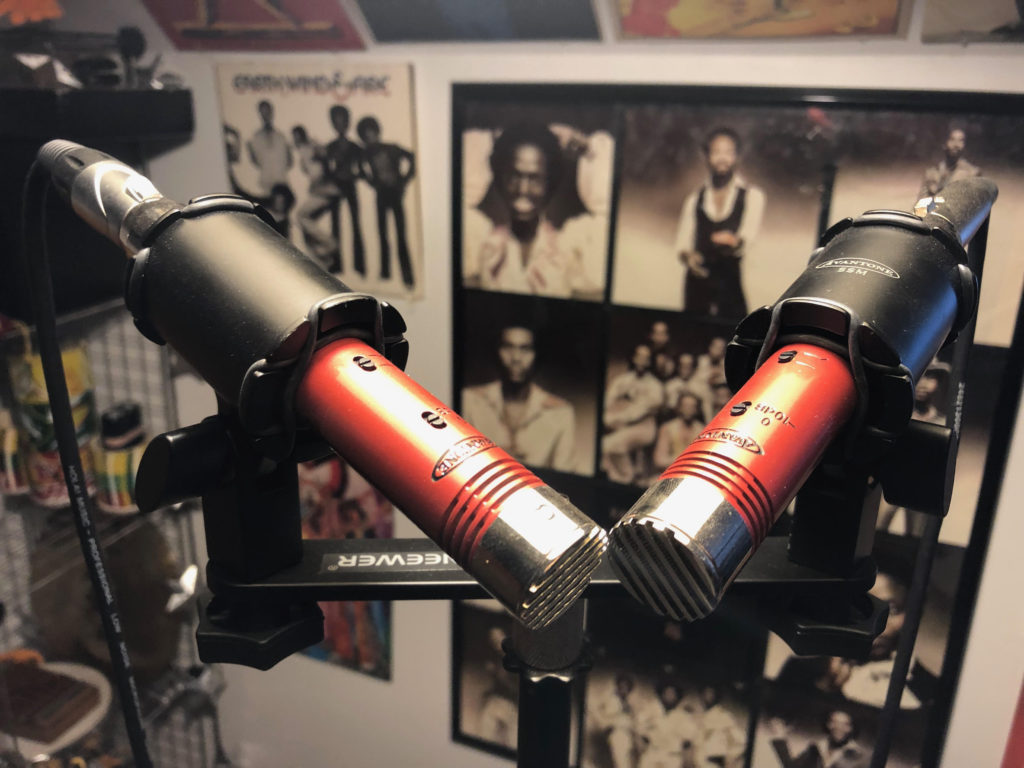
“Coincident” just means that the mic capsules are close together.
Here your X/Y “how to”:
- Put two mics on two separate boom mic stands next to each other (or use a stereo mic bracket).
- Place the stand(s) such that the mics hover above the snare as you play. Sometimes I’ll also put them just behind and above my head and that produces good results too.
- As you sit on the drum throne, the mic on your RIGHT side should be angled toward the LEFT side of your kit. The mic on your LEFT side should be angled toward the RIGHT side of your kit. This produces a “V” shape, with the top of the two mics at around a 90-degree angle from each other.
- The HEIGHT of the mics should be such that they don’t point beyond the kit (picking up too much room), or so close that the whole kit isn’t dynamically balanced and even when you hear it. I find 6 & a half feet to do it for me, but I’ve got a large kit. YMMV.
PROS:
Clear kit sound. Nothing should end up sounding “muffly” or “tinny” or at dynamic extremes with this set up.
Good mono compatibility. This is because the phase correlation in X/Y is exceptionally balanced. To verify this, sum the kit to mono. You should find no sign of being “out of phase” (signal droppage due to wave cancellation). If you know your mix will be played on a single speaker in many venues, this would be a good choice.
Easy setup. This is especially true if you buy THIS STEREO MIC BRACKET that I use in all my sessions).
Perfect sound for “supporting role”. Choose this technique when the drums aren’t really going to be highlighted. They’re there, but not a focal point. The balance will serve you well.
CONS:
Medium stereo image. If you want your kit to S – P – R – E – A – D more in the mix, this is not your best alternative. But if a standard, tight Pop mix is what you need, go no further… this IS the droid you’re looking for! lol
Finally, if you wanna play around and explore a bit with this method, try increasing or decreasing the ANGLE of the mics in relation to each. MORE than 90-degrees should give you a wider stereo image. LESS than 90 will probably sound more direct, and narrower.
Spaced, or “A/B”, Pair
Another very common method of overhead mic placement is the Space, or A.B., pair. Basically, you’ve got one mic for the left side, and one mic over the right.

PROS:
WIDE kit sound. With the mics being quite far apart, you’ll naturally get significantly different areas of the kit picked up. This equals a more spread out impression.
Easy setup. Two mics. Two boom stands. End of story.
Perfect sound for more “in your face” drum arrangements. Choose this technique when the drums need to be heard. Or at least not hidden.
CONS:
Uncertain mono compatibility. You’ll have to be much more vigilant about phase issues in this technique.
Use your ears and make sure, before you press record, that you’ve tested for phase. If your mic capsules are equidistant from the snare drum there shouldn’t be a problem.
Confirm this by getting out your measuring tape and verifying the numbers. Put one end of the tape in the center of the snare drum, and stretch it out to both mics. If the distance is the same, you’re in business.
Also, you’ll need to make sure that the distance of the mics from your kit is allowing a balanced impression to be heard. You MAY have to hit your CYMBALS lighter with this method, as your mics will be closer to them, AND close to the same height.
Typically, you’ll find with the A/B pairing that toms will be louder on one side and the snare and hi hat will definitely be louder on the other side. This is natural; it’s how you hear them with your ears! But if you don’t like that discrepancy, go to another method.
The higher above the drum kit you go, the more room sound you’ll get. But it won’t ever be like the Mid/Side method at least!
Where you point the mic is also going to really make a difference in the final sound. The mic on your left should really be pointed at the snare. The one to the right I usually fudge between the kick and the floor tom.
What works better for your kit?? Liiiiiisten and you’ll find out. Remember: I I S G, I I G!
(If It Sounds Good, It Is Good!)
Oh, and I find if I’m going to use this technique I switch from pencil, small-condenser mics to a couple large-condenser mics instead. Gives me… I dunno, just more depth. And really helps the kick to come out more.
Finally, if your mics allow for it, switching from a hyper-cardiod or super-cardioid polar pattern to something wider, like Cardioid or Omni, will give you and even BIGGER sound.
I recommend if you go Omni though, that you use a Jecklin Disk to provide the best focus and “shadow” for both mics. Buy one HERE for an arm and a leg, or check out this video to see how make your own!… MUCH more inexpensively:
As always… watch for wave gremlins and check your Phase. Those beasts will curdle your audio milk!!!
Mid-Side
Next, we come to a method that will deliberately be listening to your room ambiance!
So, if the room you’re using to record drums in is, well… not that great, you’ll want to probably skip this method. But then again, isn’t everything audio worth trying? At LEAST once??
The only demand this set up makes on your studio is that one of your mics MUST be a FIGURE-8 mic! Without that kind of mic, you won’t be able to properly capture a Mid-Side recording.
The Figure-8 mic will be picking up, almost exclusively, the REFLECTED SOUND of your kit.
Here your Mid-Side “how to”:
- Place a Cardioid mic TEN FEET out or so OUT from your drum kit. Point its capsule right at the snare.
- Place a FIGURE-8 MIC above or below the other mic. Turn it so it’s 90-degrees off axis (facing the SIDES instead of the drum kit!).
- The HEIGHT of the mics is usually a foot or so above where your cymbals sit. But as always, try different heights and see what most brings YOUR kit to life.
That’s it! Not much to it. Now you COULD also add in a close-mic on the kick and snare (I do), but that allows for even more phase issues, so don’t go there unless you know what you’re doing! 😉
Your Center channel mic you’ll pan right to center. This will cancel our any phase issues when you bring the other mic in.
After recording your Figure-8 mic onto one channel, you will then copy that waveform, paste it onto a SECOND channel and flip it out of phase.
Then, panning them hard right and hard left, you end up with a cool-sounding, but still out-of-phase, drum sound. We’ll call these two channels the “Sides“.
Ahhhh, but when you bring UP the Center channel mic (the Cardioid that we pointed right AT the kit), all problems are resolved and we have a very rich, interesting percussion sub-mix!
PROS:
Don’t need “Matched Pair” mics. In fact, with this technique, the two mics can be COMPLETELY different, and it can produce excellent results. In my studio, I use one Avantone CK-1 mic and my AT4050 for the Figure-8! If you DO use the same mics, however, you’ll find their LEVELS to be much more in line with each other.
Ensures mono compatibility. For the same reasons as X/Y.
Easy setup. Shouldn’t take long IF you are familiar with this technique of recording drums.
Ability to alter “width” of kit sound at mixdown. By bringing the AMOUNT of the Figure-8 left & right signal up, or down, you can cut or boost the perceived “width” of the kit, and/or how much of the ROOM you want in the final sound. Talk about flexibility!
CONS:
Medium + stereo image. Just like X/Y, this will give you generally more “medium” kit sound size. The difference from X/Y though is that you’ll be able to dial IN more room, or width, with the two channels of the figure 8 mic.
Watch it though, because the more of the room sound you dial in, the more indistinct and less direct-sounding your drums will be. Adjust your faders to the song, as always.
Finally, to make it easy to process at mixdown, I always bus the two side channels to their own separate stereo bus. Doing that allows you to adjust the two Side Channels, and thus the perceived stereo width, with just one fader. Nice!
ORTF! WTF?!
At first glance, you may think I just texted “Rolling On The Floor Laughing” too fast.
If only! That one little juxtaposing of the first two letters gives us something totally different… and you may not think it’s that funny.
Try THIS title on for size: “Office de Radiodiffusion Télévision Française“.
Small wonder they switched to just using the acronym ORTF – I studied French and even I THINK that’s awkward & unwieldy!!
Regardless, over the great Atlantic, that French broadcasting company stumbled upon this re-tweaking (what they deemed an improvement) of the X/Y method we looked at earlier. They were supposedly going for the distance a human has between two ears. They figured it might sound the technique WE hear naturally.
Guess it worked! Other countries heard about the technique and soon we had yet another studio tool to keep in our audio toolbox (which, for me, has a Van Halen sticker on it. LOL).
It’s actually not that much different. Specifically cardioid microphone capsules are still angled about the same, & pointing in the same general area.
The difference is that, instead of the capsules being side-by-side, almost touching like in X/Y, the top of the mics are exactly
6.7″ (17cm) spaced apart. AND the mics are angled AWAY from each other at a 110-degree angle.
Looks like this:
PICTURE
Sometimes you’ll also hear this referred to as the “Side-Other-Side” configuration.
PROS:
Kit spread sounds wider than X/Y. This is, obviously, dependent on your success in setting it up correctly, but generally speaking you’ll get a bigger side-to-side impression with the ORTF set up, but without losing the important center of the kit.
Tends to “hear” less ambient room sound. This certainly depends on how close or far from the kit you place the mics, but, all things equal, you’ll get less room ambiance than X/Y. The further away, the more kit blend, but also the higher the risk of “room bleed”.
Can produce mono-compatibility. For the same reasons as X/Y… IF done right.
Easy setup. Two mics again. We’re not building Rome here.
Can use the same microphone mounts as X/Y Method. You’d just swing them away from each other instead of towards each other.
CONS:
Can cause comb filtering. Because the mic capsules are farther away from each other than in X/Y, you’ve got more of a chance to botch it when it comes to Phase. But, really, with careful measuring, this shouldn’t be an issue.
Works best with matched pairs, or at least the identical type & model. Not a hard and fast rule, but whenever I record this technique I use both my CV-1 mics for the job. But then… I absolutely LOVE those mics, so… no surprise there.
So… IS it an improvement?? Maybe. Depends on what you’re after.
If done right, this set up can absolutely make a kit sound pretty dang sweet. Of course, it always helps if you start with the best SOURCE, like playing a DW Ivory Ebony 7-piece Collector’s Kit!
Sorry… little gear lust there… 😉
Though this method tends to work best at close distances, the distance, angles and spacing can always be tweaked to make it optimized for YOUR drum set, with YOUR specific room acoustics. The approach should always be… set it up as diagrammed, then adjust to taste.
Recorderman
No, it’s not a new super hero in the Marvel Comic book world.
(Tho’, actually… that would be pretty cool!)
This drum overhead method was created in 2003 in a session for the band ‘Hazy Malaise” at the Village Recorders studio in L.A. The engineer for them, Eric Greedy, pitched an idea to his producer, Eric “Mixerman” Sarafin, that he wanted to try.
Mr. Sarafin agreed, and the session tracks turned out GREAT. Since the Producer was known as “Mixerman”, he said,”Hey, Greedy… you should be “Recorderman”!”
And thus not only an Overhead Mic technique, but also a nickname and method name was born!!
The goal was to have the Kick and Snare sit squarely in CENTER of the stereo field when listening to two overhead mics.
The big surprise tho’ is that they also used a snare mic AND a kick mic as booster mics. It was never intended to be only a 2-mic technique.
Also, this is the perfect method to use when the drummer plays in an expertly BALANCED technique. If they play the cymbals too loud, or hit the snare or Hi-Hat technique too hard compared to the rest of the kit, stay away from Recorderman. It will probably not give you the best results.
Here your Recorderman “how to”:
- Place one Cardioid mic above your snare drum. Some say 32″. Others say just the distance of two drumsticks. Use what works for you. Point the mic capsule right at the snare.
- Place the other Cardioid mic close to your drummers right shoulder. also 32″ from your snare. Point its capsule right at the kick.
- Check that the DISTANCE of the mics from the KICK drum is also the same.
The quickest, easiest technique to do that last measurement, is to:
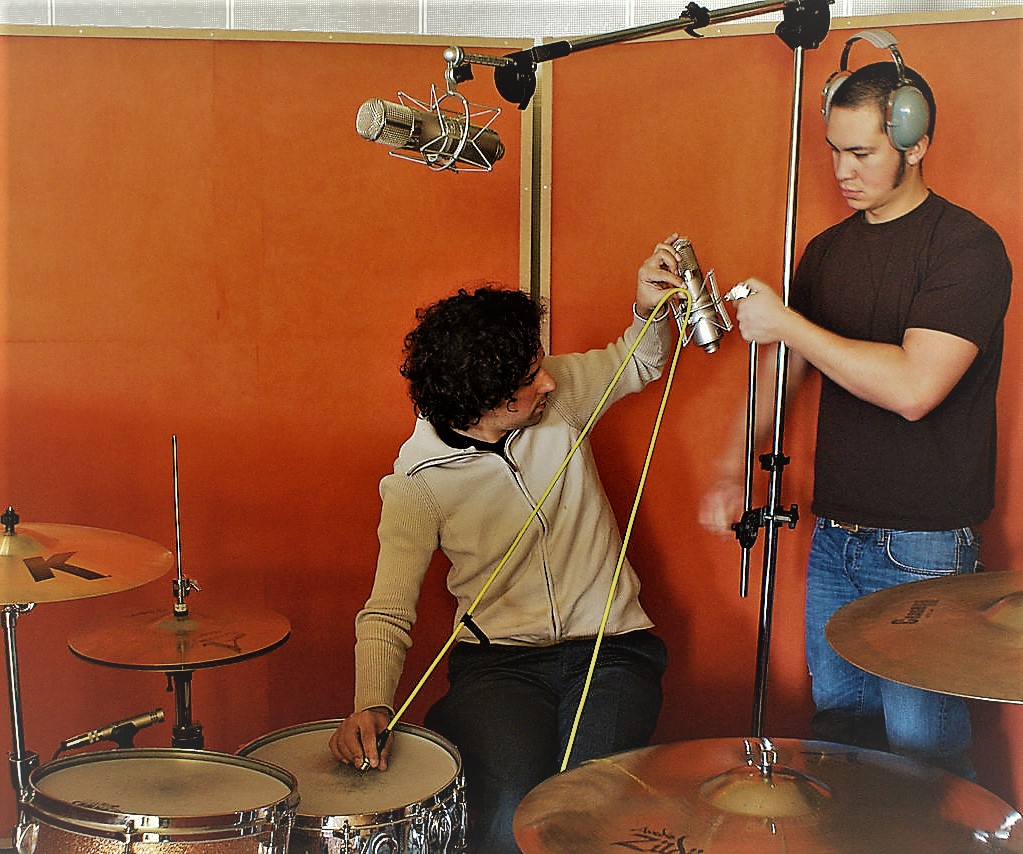
- Clamp down on the end of a mic cable, or bit of long string if you have it, using the kick drum beater. Just keep your foot down so the cable or string stays held by the beater.
- Pull the cable/string up to the overhead mic.
- Hold the cable string there at the overhead mic, or run it over a finger, and bring the rest of it down to the middle of the snare head. Hold that end in place on the snare.
- Now that you have a kind of “A” shape, with both ends secured, gently move the top of your “A” over to the other mic (the over-the-right-shoulder mic). Keep it taut. If it’s too close, or too far away, move the mic so it’s exactly at the top of the “A” shape.
That’s it! Now you’ll have a good overview of your kit sonically, with little phase smearing. Pan the two mics hard left & right, unless you hear a kind of “hole” in the middle of the kit. Then lessen the Pan spread. Choose what sits best in your mix.
If you’re more of a visual learner, check out Charlie’s comprehensive look at how to get everything in place… including your HAIR, in this vid’:
PROS:
Only two mics needed. Haven’t got a large mic locker?? No problem. This’ll give you a good sound.
Avoids mono phase issues in kick & snare. IF you measure right. No slacking. 😉
Keeps kick & snare dead in the middle of the sonic image. Shouldn’t take long IF you are familiar with this technique of recording drums.
Little “Room Sound”. If you want a kit sound that really focuses on the snare, kick and toms, this is a great choice.
A quick fix for “Cymbal BASHERS”! Since the mics are lower than usual, the cymbals volume will be attenuated more than in the other techniques. If a given drummer is just hitting the cymbals technique too hard, try this method. It’ll soothe his savage beast mode in the recording!
CONS:
Matched pair or same mic model is preferable. Otherwise the two halves of the kit will sound different. You CAN, however, get away with different mics. Sound good? Then it is good.
Phase issues on the rest of the kit possible: You may get some smearing in the cymbals or toms tho’. Keep your ears open.
As we saw in Charlie’s video above, you CAN introduce other mics too. Just remember every time you do… you’re playing with sonic Phase Phire… don’t get burned!!
Head-to-Head
So, let’s construct a little cheat sheet here, based on what we’ve learned, that will be our go-to guide for drum kit mic’ing issues:
WIDEST kit sound: A/B
Flexibility at Mixdown: Mid-Side
Best for attenuating cymbal volume: Recorderman
Best Phase Coherence: Mid-Side or X/Y
Strongest, most present Snare & Kick: Recorderman
Balanced Kit Blend: X/Y
Aaaaand… that’s IT!

Well, actually… not really.
There are endless methods for drum overhead mic placement, so don’t think that the methods above are your ONLY options.
But they are the ones that are the most talked about, and that have certainly produced good results on huge-selling, hit-laden albums.
Try different methods for yourself. Move mics around and listen. Create your own perfect pairing!
Who knows? You just might end up discovering a method that will be talked about in THIS POST one day! 😉
Now, go… make… (DRUM) sounds!!
Teaj
Thanks!! We work hard here to offer a fun, positive and detailed look at the gear we play and love. Hope to see you here often!
Thank, Thomas! Always welcome here at SeriousGas!! Hope the O.H. advice
helps you in your drum mic’ing!
Nice blog. The author clearly pointed out the cons and pros about overhead mics on drums.
Youre so cool! I dont suppose Ive read anything like this before. So good to find any individual with some unique ideas on this subject. really thanks for putting this up. this web site is something that I’ve wanted on the internet, someone with some originality finally. Great job bringing something new to the internet!