 A Classic Rock station here in Detroit has a tendency to play the Boz Scaggs song “Lowdown” a lot. I like it; it’s a great song with great players. In fact, most of the backing musicians on that album soon after formed Toto, a band which is still out touring, for a brand new album, right now, forty-one years later!
But we’re gettin’ low down in a different way today. What follows will be the first of a curriculum of posts specifically focused on how to record at home, no matter what your surroundings.
I’ve been recording in my home since 1996, when I successfully recorded my own album within one year. Back then it was using a simple Roland VS-880. Now… I’m an avid (HA!) Pro Tools user. But much is still the same. It’s not so much the price of the gear you have, but how you use it that’s important.
In this first article we’ll start things off looking at the kick drum, and we’ll see if, by the end , we can be inspired to sound even half as good as the late drummer and maestro Jeff Porcaro did on Boz’s bangin’ tune.
Oh, and by the way, I’ll be starting each section of this article with the title of a song Jeff Porcaro played drums on. Just because.
What can I say? I’m an uber fan of his! 😉
“Norwegian Wood”
Yup – Jeff, guitarist Steve Lukather and other leading West Coast studio musicians did a bunch of Beatles covers on an album called “L.A. Workshop“, and they are… well, what do you think they would be? Amazing!
So, we start talking about wood because your house and ROOMS are all made of it, as well as a heck of a lot of drywall. If you’re recording in your home, it’s probable that your room is small, and square. And they probably have hard floors, walls and ceilings.
Unfortunately, this is not the best recipe for recording drums well.
Why not? Standing waves and flutter echoes. These are little audio gremlins that keep attacking your ears long after the original sound source has come and gone, causing certain frequencies to be louder, and others to be softer.
Again, this is not something we want. Instead, we want to make our room as “flat” as possible, where what is played is what we hear, nothing more, nothing less.
In my studio I have irregular shaped rooms -there are even inclinations throughout, so my bounce factor is quite small. Even so, I still use bass traps in the corners and gobos around the kit to optimize my signal clarity and keep the gremlins at bay.
The question you must ask is, “Is my room optimzed for drum performance and recording?”.
If you only have the small, square rooms with hard surfaces, check out this article by my absolute favorite pro audio resource, “Sound On Sound”. It has many answers and options to your dilemna. If you still have questions, leave them in the Comments section and I’ll be here for ya.
Once you’ve fixed your bounce problems, we can move on, to…
“I Won’t Hold You Back”
Probably my favorite ballad Toto ever performed. I could put this one on loop just for the guitar solo.
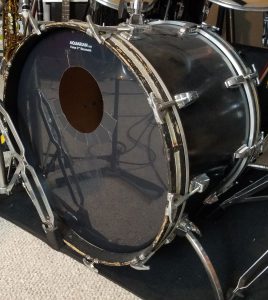
Hopefully you have acquired a DRUM KIT, including the kick, that doesn’t hold you back. Because if your kit isn’t up to snuff, no matter how you record it it’s just not gonna sound great.
It’s funny, ‘cuz I was just watching Toto’s guitarist, Steve Lukather, talking about his experiences as a session guitarist on other people’s material. Sometimes, he said, he had to “polish the t#@d’, referencing something that should be left in the nearest commode. Leave it to Steve to put it in such refined terms! lol
What he’s saying is that often the raw material (the song) was pretty bad, and they had to try and make it sound better somehow. As a purchaser of gear, you never want to do this; you never want to try to compensate for an instrument that just sounds bad.
To avoid that, always buy the very best drums you can for the money. And always play them, and ask yourself, “Do these sound good? Can I be powerful and subtle on them? Are these heads fresh or old? Are there enough for me to perform in the style I prefer?”
If you don’t have a great kit, at least put new heads on them. This often will take a mediocre-sounding kit and turn it into a really recordable dynamo. Have you changed your heads recently? In the last year? At all?? This alone could make all the difference.
Not sure which heads to buy?? Go here. It’s where I go. ‘Nuff said.
“Nobody Does It Better”
James Bond, anyone? This soundtrack tune was a winner for Carly Simon, and Jeff provided the laid back, subtle rhythm bed on which Bond could get the girl. Proof that being an excellent musician isn’t all about flash.
The song makes a bold statement: “nobody does it better”. It’s saying there’s not another choice that will yeild better results. Only the best for Carly.
So, are we applying the same fastidiousness to our drum MIC SELECTION? If you only have a couple drum mics, then you’ll have to just go with what you have. But if you’re serious about getting good sound, you’re going to have to think long and hard about which mics you’re going to put on which drums. ‘Cause not all mics are created equal.
Most are in agreement that the least amount of mics you need for a drum kit is three: two overhead mics to pick up the whole kit, and one kick drum mic.
 From there, the sky’s the limit. I personally have a 8-piece drum kit and every one of them is mic’ed, as well as two overhead mics, two “room mics” that are about ten to fifteen feet from the kit, and an extra low frequency mic on the kick that we’ll look at later. That’s a total of 13 mics! Do I always need ’em all? No, but sometimes I do. And that’s when it’s great to have them!
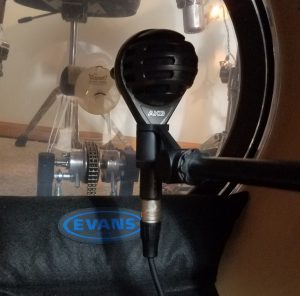
My best, currently, are the AKG D112 mic for kick drum; the CAD TM211 mics for toms; the TSM 411 for snare drum (I like it better there than the sm57) and for overheads the Oktava 319 mics.
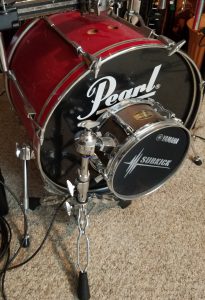
I want to mention a special mic here that I use all the time when recording drums that is not common, but probably should be: the Yamaha “Subkick“. This extremely useful mic looks like a little snare drum, and comes with a stand that holds it on its side so that the drum “head” is against the kick drum head hole. It picks up frequencies most mics can’t in the very low spectrum and, let me tell you, the results are amazing!
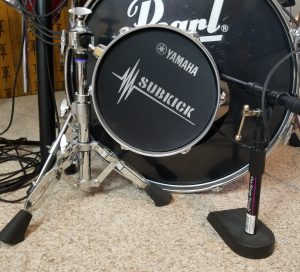 I was actually never satisfied with my raw kick sound until I got the subkick; that’s how important I think it is. Now that I have it I never feel like my kick is lacking in the mix in any way. Neither do I have to add EQ anymore to fill out the bass frequencies. They’re all there aplenty! In a phrase: one of the best studio investments I’ve ever made. Check it out.
My mic collection has increased and improved over the years, as must yours, but I’m still not done by any means! I have goals of replacing my overhead mics, for example, for a better matched pair. And my tom mics I dream of replacing with Sennheiser 421 mics. Oooooh, they are sooooo goooood….!!
If possible, try to test out as many mics as you can on your kit. I’ve borrowed quite a few from fellow engineers and listened to them. It’s a good education and it helps keep you familiar with the best “toys” in our crazy little playground.
In short, always use the best you can afford until you can upgrade. You won’t regret it.
“Get Closer”
A classic Seals & Crofts tune that Jeff grooved (as usual) flawlessly. And its title tells us what we need to do now to really get a great bass drum sound – get down there, closer to the heads and beater, to test and find the very best MIC PLACEMENT!
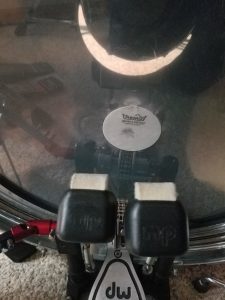
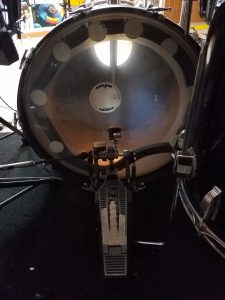
When I’m preparing the drums for a session, you will always find me on the floor in front of the kick drum, perfecting the placement. There is not one way to mic the kick drum. Here are some options engineers, including me, frequently use:
- mic facing straight at beater, inside
- mic facing beater but angled out, inside
- mic facing area around beater, inside
- mic pointing away from beater (to the sides or reverse-faced), inside
- mic at varying distances from the batter head, inside
- mic at varying angles, OUTSIDE
- mic at 45 degree angle, near edge of head, OUTSIDE the BATTER HEAD.
I find most times I’m facing the mic at the beater, however I change the distance often, and sometimes face the beater off-axis, at an angle from the side. At times I’ve kept it outside, but most times I have it in.
How do I know which is best? I ask my son to sit at the kit and play some “Rush” while I try different placements. I record each one. Then, after I’ve tried all that I want, I listen back to the recordings and see which mic placement makes the kick sound… awesome!
Does this take time? Yup. Sometime over an hour or more for all the drums. But it must be done if you want to find your best sounds. I personally don’t want mediocre; so I take the time to test my options, knowing I will be dressing the song with superlative sounds because of these simple efforts.
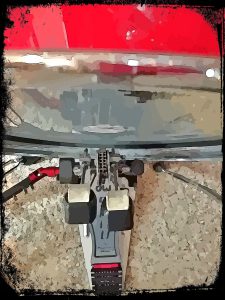
For further kicks (yuk-yuk-yuk!) let’s listen to a recording of one mic, my D112, placed in different places in and around the kick, and see which angle tickles our musical fancy most. Here is the order I’ve recorded the takes in:
- D112 facing beater, inside, 5 inches
- D112 facing beater but angled out, inside, 5 inches
- D112, facing beater, inside, 10 inches
- D112, REVERSED, facing straight at beater, inside, 5 inches
- D112, REVERSED, facing straight at beater, inside, 10 inches
- D112 facing beater, OUTSIDE, 3 inches
- D112 facing beater, OUTSIDE, 3 inches, REVERSED
- D112, 45 degree angle, edge of head, OUTSIDE the BATTER HEAD
- D112, 45 degree angle, edge of head, OUTSIDE the BATTER HEAD., REVERSED
- the Yamaha SubKick
Whadja think? Got a favorite? Mine’s definitely take three, but I could still use five or six with some EQing.
It just goes to show ya, taking the time to find the best placement is always worth it, because it makes your music sounds its best!
“Beat It!”
 If you don’t know what artist Jeff did drums for by this song title… well,… you are a musician, right?? It’s Michael Jackson, yo!
Anyway, your biggest take-away from this post should be that no matter what room, drum or mic you have, the placement you choose will be a huge determining factor in your final sound. You must take the time to try the different angles, the different distances, to ascertain where your best sound lies.
If you put in the due diligence that great music deserves by doing these things, you will be maximizing the potential of your studio, regardless of how much or how little you have invested in it.
It all comes down to your ears. If it sounds best when you compare, it is best.
Let me know how these insights improve your songs. Did you learn something new? Will you now try something you’ve never attempted before? Does this post have you G.A.S.-ing for a new mic or drum??!!
Happens to the best of us. lol
By the way, if you’re curious about the other hundreds of tunes Jeff Porcaro played on, check out this site. You’ll be amazed. For example, take a guess who played the drums on Pink Floyd’s “Mother”, off of “The Wall”. Hint: it wasn’t Nick Mason!
Stay tuned for part two, where we’ll look at the toms and explore what our options are there. Until then… I’ll just be still trying to get that “Rosanna” shuffle down!!
Now, go… make… sounds!!
Teaj