The Best Guitar Stool – Baby, Got Back??!

woman-singing-seated

As musicians, we practice our instruments & our stage craft for years, sometimes decades, to make sure we can put on a great show.

But let’s face it: sometimes… we play gigs where the focus isn’t really on us.

Instead, it’s on the audience’s meal… or some public speaker… or the host or focus of the party, or…

You get the picture. We’re background, not in the spotlight.

At those times, we all need support. And I’m not talking about a gracious family member or friend. I’m talkin’ LITERAL support… for your BACK SIDE!!

The best stool for a musician is one that works with the appropriate types of gigs. It’s the chair that is portable enough for you. Light enough for you. And comfortable enough as well.

Got a gig chair like that? Still looking for one that meets those criteria?

Have I got good news for you… !

The Chair!

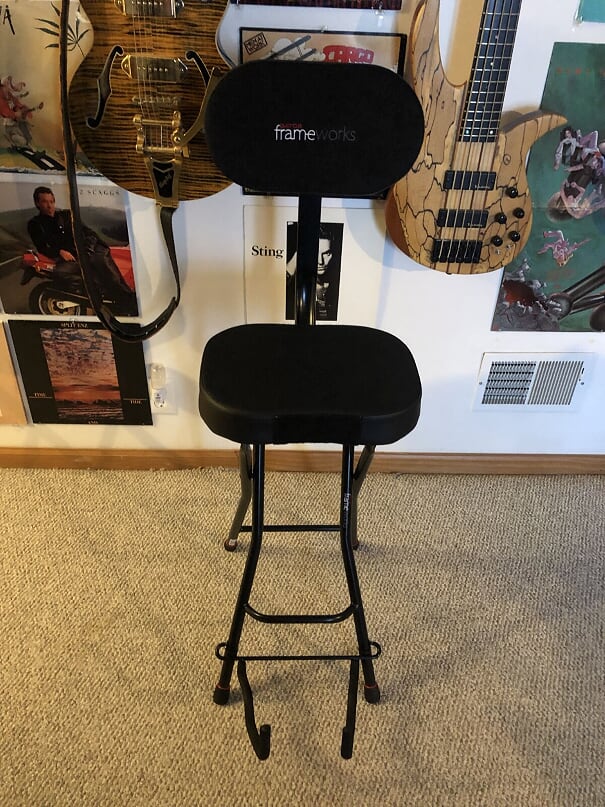
I first saw the “Gator Frameworks Combination Guitar Stand and Seat” at Guitar Center a couple years ago. Immediately, I was struck by its small stature, foldability, and integrated guitar stand.

Not to mention it was under $70! Definitely a deal!!

Now, I’ve had a great gig chair for over a decade now that I really like. I bought it at Art Van, a local furniture store.

It’s gone with me for dozens and dozens of gigs and always stays as solid and dependable as the day I got it.

BUT… it’s heavy. And it takes up a lot of space in my SUV because it is not foldable at all.

Which is why I bought the Gator!

The pic below shows you where I keep my old dependable seat now – in the recording booth!

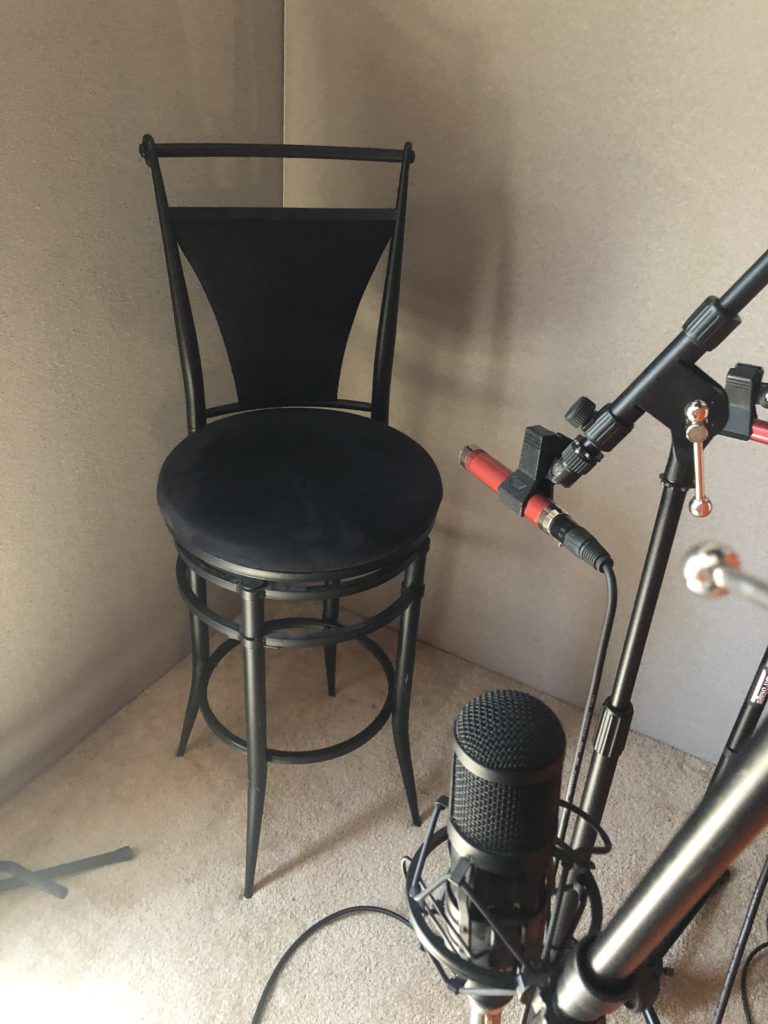
It’s perfect for keeping me right where I need to be for the mics to pick up my acoustic tracks well.

If you already have a quality gig cart, like the ones LISTED HERE, then maybe a portable, light throne isn’t so much an issue.

But if it is…

… here are the Specs:

Weight: 13.2 lbs

Weight Capacity: 300 lbs

Material: 7/8″ steel tubing

Length: 14.3″

Width: 14″

Height: 44″

Seat Height: 28″

Go, Gator, Go!

For a complete run-down of how great Gator as a company is, and how long they’ve been making great products, GO HERE!

In a nutshell, Gator has been around since 2000 when Jerry Fred and his daughter Crystal Morris opened the company in Tampa, Florida.

Later in 2018, they bought a big manufacturing plant in Fort Wayne, Indiana.

Then, in 2013, they announced their new “Frameworks” line of stands and supports, which gives them an expanded way to serve the needs of the gigging musician on a budget. Which is most of us!

Finally, I was surprised to learn today that they even made themselves even MORE unsinkable by acquired Levy’s Leathers Ltd., one of the world’s most respected names in quality guitar straps, in 2018.

I’ve personally got at least three straps by Levy, like THIS ONE that I bought for a concert last year that I did. One of the softest, but most well-made straps I’ve ever felt over my left shoulder. Good choice, Gator!

Today, they’re still at it, making trustworthy, solid accessories for all our many musical adventures. I personally have bought 4 or 5 Gator cases and stands over the years and they, to this day, are in great shape. Now that’s great gear!

The Fold!

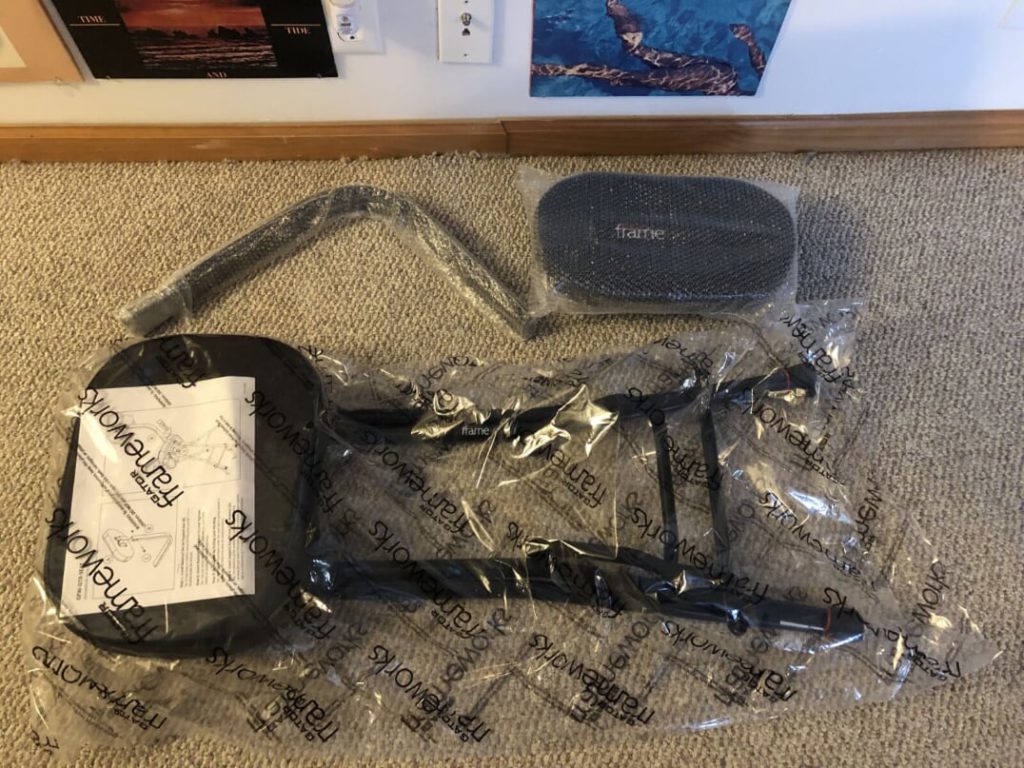
Without question, one of the best things about this chair is that it folds up into a very compact size.

I can’t state enough how much I’m enjoying hauling this chair around as opposed to my old one. It hardly takes up any space in my vehicle when I’m going back-and-forth to a gig. That means I have room for… what else… MORE GUITARS! LoL

I have noticed that some things that fold overtime wear out and break easily, especially where the folding mechanisms are in place.

The Locking Ring

I’m not finding that to be the case with this chair. It has not become rickety or loose at all in any place, and there’s no sign of wear or tear on any of the joints.

Wish I could say that about most of my old mic stands!

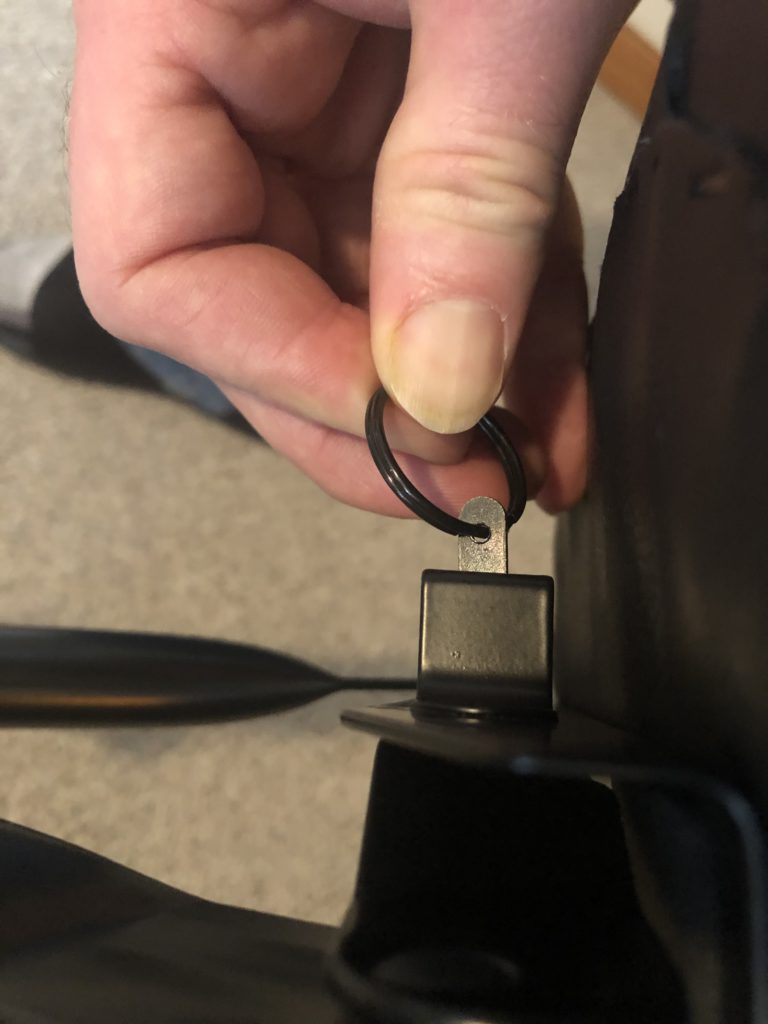
To fold the chair into its cool, compact flatness, you’ll need to pull out the catch ring that is under the cushion.

It’s easy to miss; the first time I tried folding it up for a gig I couldn’t, and kept wrestling with it ’til I noticed what impeding my progress!

The Cush’!

Is it comfortable? You bet!

I will say however, if you are a person who has a, well, let’s just say… a GENEROUS posterior, you might want to opt for another chair. Why? This seat is not very wide. It’s 14″ across at most, which is less than your average chair out there.

If you flaunt a more “normal” tush, or have an aerodynamic runners body like I have (read that SKINNY), then you shouldn’t have a problem.

But if you’re more a “plus-size back side”, I’d probably look elsewhere. The seat capacity of this chair is 300 pounds anyway, so if you’re approaching that girth, it might not be wise to test its limits!

Unassembled & new outta the box!

Also, the cushion itself IS comfortable, but it is NOT overly “cushy”.

What I mean by that is… it’s not going to be like “Grandma’s Feather Bed”, to quote John Denver. Neither will it feel like your Tempur-pedic mattress, your down-filled pillow, or your college dorm bean bag chair!

When you sit on it, it feels solid. You don’t sink down much at all. So if you’ prefer the ‘Memory Foam’ kind of support, “… this is not the droid you’re looking for.”

I think it’s perfect for gigs though. I’ve noticed that my behind doesn’t get tired after 2 or 3 hours servin’ up my hot licks and croonings to the crowd. I don’t find myself squirming, in other words, and THAT… is saying a lot!

The Stand!

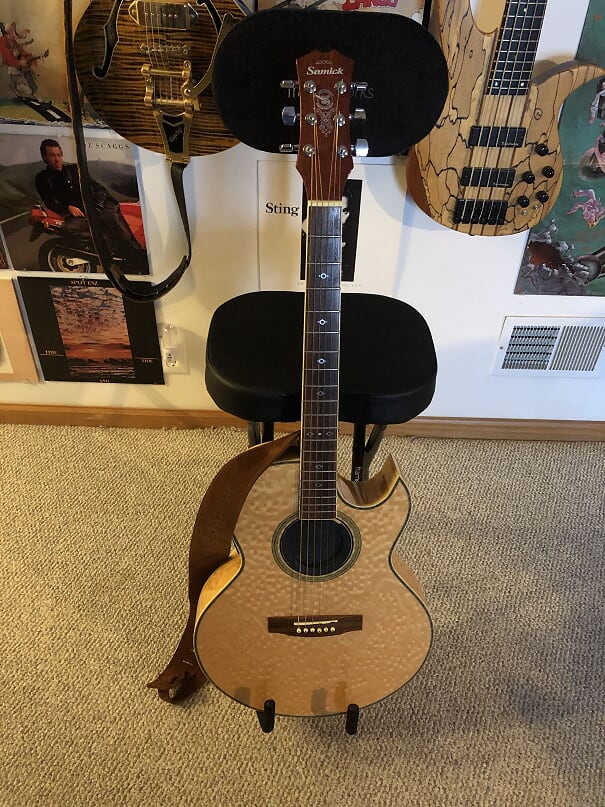
And now we come to one of the prime features of the seat: the guitar stand!

We all know, as gigging musicians, that the less we have to carry into our gigs, the better.

Because this chair comes with its own built-in guitar stand, we no longer have to bring a separate one! Yeay!

If you play more than one guitar at a gig (which I do because my many alternate tunings!) then it’s a moot point.

Still, it’s great to have the two together. Haven’t seen that in any other chair.

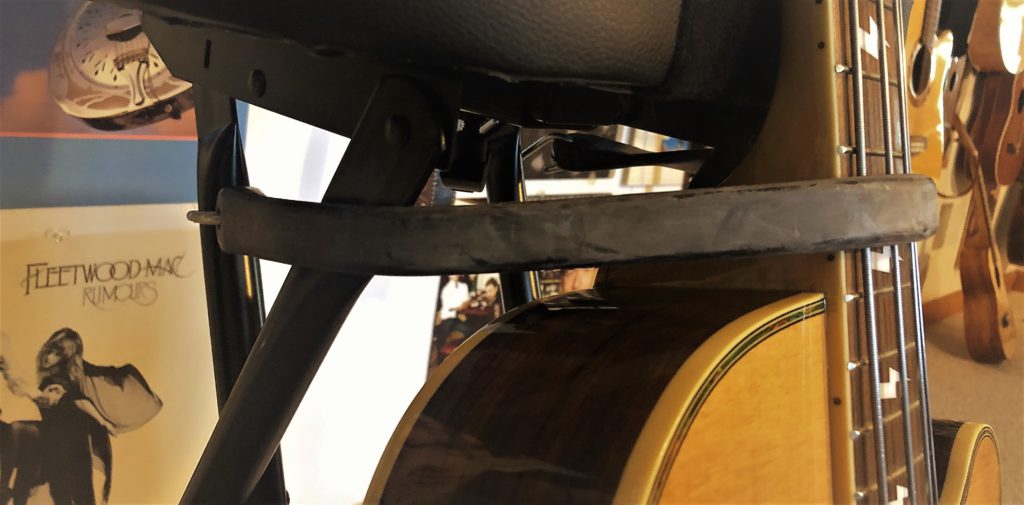
Is the stand is stable? Yes.

Is your guitar or bass guaranteed to never get knocked over? No.

Your neck and headstock will be lightly resting against the indentation at the front of the seat cushion. This keeps your guitar or bass from wanting to tip over pretty well.

IF, however, your large, loving, drunk Uncle who came to see you runs up to hug you and ask for “Freebird” (again) and manages to hit your chair like the Titanic to an iceberg… your instrument could fall.

Now, I’ve even lightly run into the chair myself a couple times, and my guitars were never even close to falling over.

If you’re like me though, you don’t want to take any chances. So here’s a quick and easy fix that I use:

Attach a simple BUNGEE CORD to both sides of the stool, underneath the seat cushion. This will hold your instrument in place perfectly should it be jostled.

Not only does it work like a charm, it keeps anyone from just kinda wandering up and taking your axe for a test drive when you’re off schmoozing the blonde who came with your college buds.

(Which is why they’re givin’ you the stink eye, btw. ) LoL

The Back!

The back on this chair is optional. You don’t have to use it if you don’t want to.

The Backrest bracket

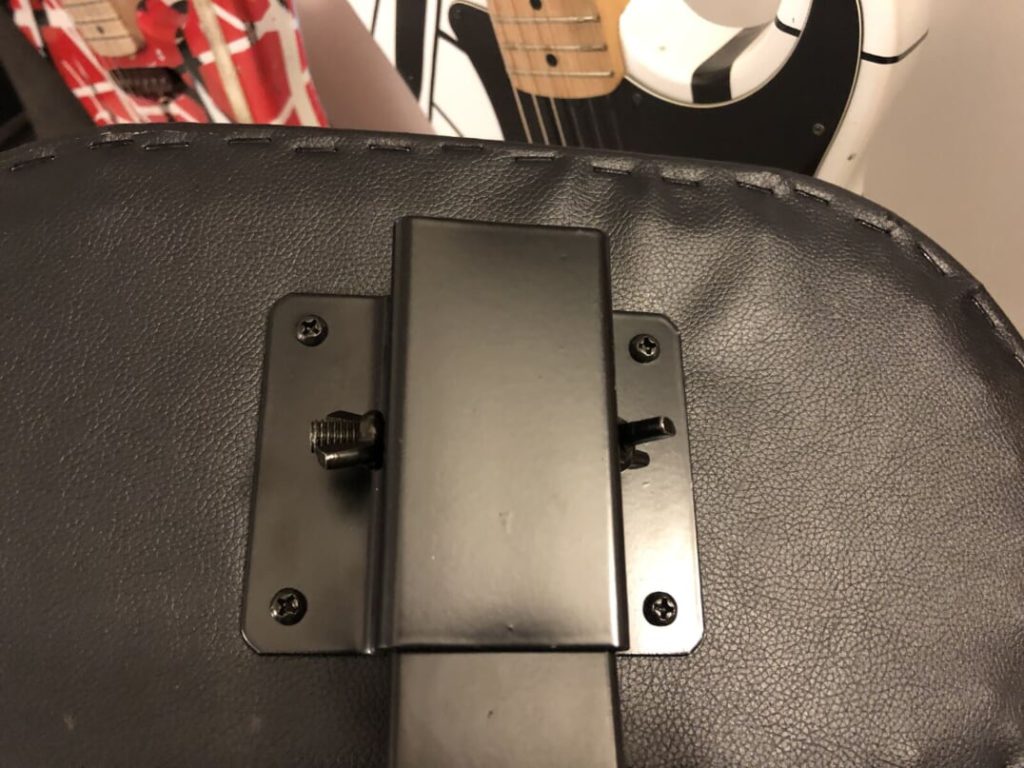
It’s easy to take off and put back on. Two simple brackets, one under the cushion and one on the back of the backrest, are where you attach the provided backrest bar.

Voila! Your lumbar thanks you.

I have to mention, while we’re on the subject of the back rest, that I really enjoy the way this back rest does not go up very high.

When I gigged with my old chair, I could never rock or lean back when I was physically getting into the music. The backrest was so high that it kept my back too stabilized, all the way up to my neck.

With this chair, I find myself being able to rock forward and backward… to move more with the music, and let my body express the groove as well as my playing and singing. I really like that.

I never suspected that that would even make a difference until I got this chair and noticed it during a gig that I was moving more in my torso well grooving out of tune while grooving out a tune.

The back rest is the same solid foam as the cushion. It’s not soft, but neither is it too hard. It’s just right to keep you going through a night of splendiferous entertainment!

Your concerts ARE splendiferous, right?? 😉

The Lift

Chair on shoulder, instrument in hand!

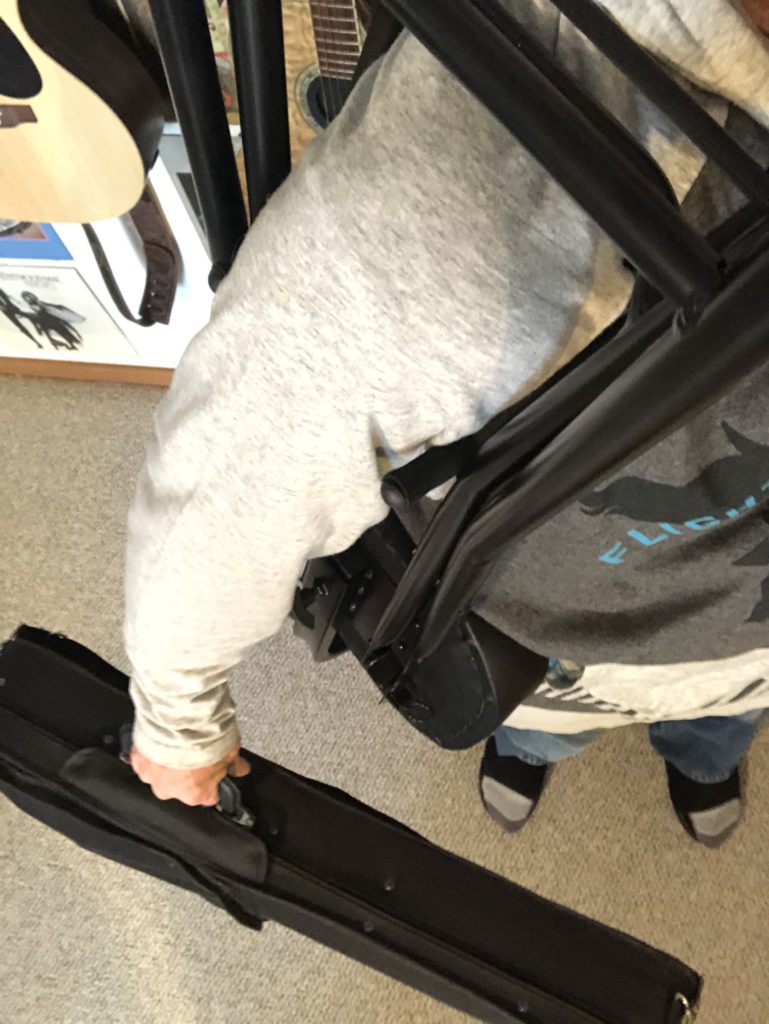
At 13.2 pounds, this seat is light as a feather. Compared to others I’ve used, it’s hardly noticeable, weight wise.

Taking this chair to any gig is as easy as singing “Stairway to Heaven” in the shower. I know because… I’ve done it many times! LoL

This gig stool is also easy to transport by hand. What I typically do, as you can see in the picture to the left, is put it, folded up, over my shoulder, while I carry a guitar or other gig tool in my hand on the same side.

The bar laying on my shoulder isn’t the most pleasant feeling, but it’s not THAT heavy, and for the couple minutes it takes to get to the stage – it’s worth all the benefits this seat provides.

The Mystery!

Okay, so (this just makes me laugh)… there’s one inexplicable addition to this fine seat. Maybe you can help me…

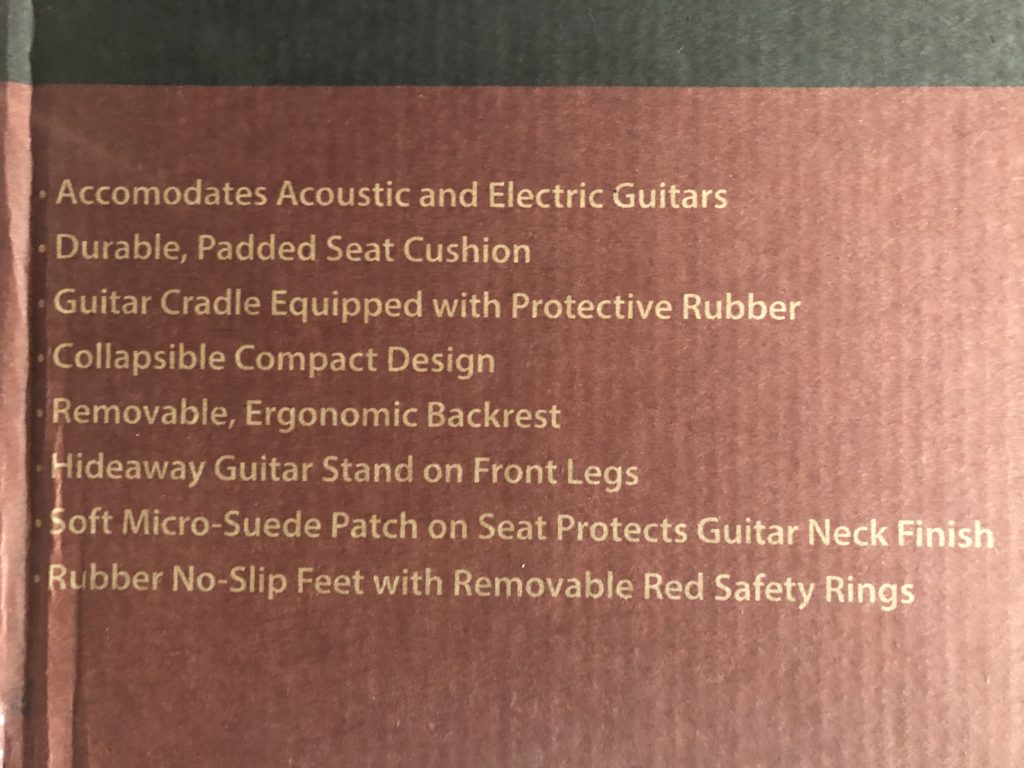
The box says that (as you can see from the pic above) this stool comes with:

“Removable Red Safety Rings!”
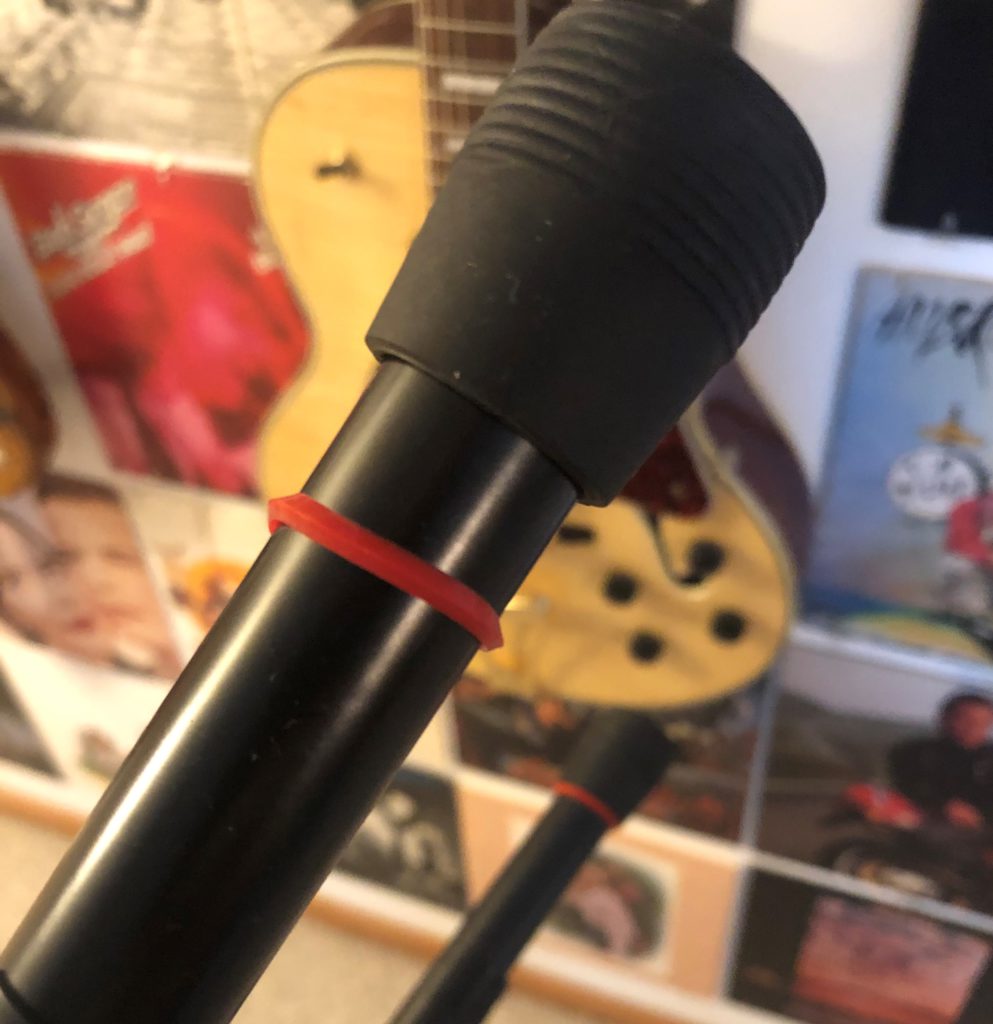
Um… what??!

Can anyone tell me why having red rubber bands near the bottom of my chair legs is gonna keep me safe??

And from WHAT??! If a totally sloshed bar patron comes lunging at me ‘cuz I played a song his ex-girlfriend liked, do I shoot him in the eye with one??!!

Honestly… I haven’t a clue! LoL

Your Seat of Power!

So there you go – a way to inexpensively make sure you have the best seat in the house wherever you may play next… giving you the comfort and power to knock ’em dead with your music!!

If you’re in the market for a great gigging chair, and you play basses or guitars of any kind, this stool will keep you comfy as you keep the peeps rockin’…

Or at least enjoying their restaurant meals. LoL

Remember to check the weight restrictions, as well as the seat size to confirm that it’s going to be a great fit for you.

So whaddya waitin’ for?! CLICK HERE and get some CLASS for your A… uh… rear quadrant. Lol

Now, go… make… (comfy)… sounds!!

Teaj

Free Audio Plugins – Neutron AND Ozone both!!!

You read that right. We couldn’t wait to share this with you all!

We’re musicians too. We know the beauty of “Free”!

So jump on these before they’re gone. I already got both of them!! Lol

iZotope Neutron 3

The website called “PluginBoutique” is now giving anyone who wants it the awesome Neutron 3 Elements Software (PC/Mac Digital Download).

All you have to do is enter the discount code PBSCNE in the code blank before you purchase!

Also you must be register on the website, but that’s no biggie ‘cuz it’s free and you get to hear more about other pieces of great software.

So whatta ya waitin’ for?!!

CLICK HERE TO GET NEUTRON FREE!!!!

iZotope Ozone 9

Our good friends over at “Sweetwater” obviously have a GREAT relationship with iZotope, since they are allowing us now to get a great MASTERING plugin set called Ozone 9 Elements (PC/Mac Digital Download).

This time you’ll just put in your usual contact info and you’re emailed a download link instantly.

And when I say instantly, I mean just that. As soon as I finished pushing the purchase button I went to my email and the download link was already waiting for me.

Now that’s service!!

Anyone else doin’ their own mastering like I do?? Then get some SERIOUS help with this amazing plugin:

CLICK HERE TO GET OZONE FREE!!!

Got Mine!

Some of you skeptics may be asking, “Is this legit??”

The answer is an unequivocal YES – it totally is!

I just frenetically jumped online when I got the news on both of these. I instantly got my own copies, and now… I’m studying up on how to make my next mixes and masters even BETTER with their use!

So you also want to investigate how to improve your final tunes, these two plugins could really take your songs to the next level

IF you learn how to use them well, of course. 😉

SO PSYCHED!!!

Others Got Theirs!

Some have already written on the SlickDeals site about their own snagging of Neutron:

Eric Freeman downloaded his and said, “Great deal. The element versions of the plugins are considered “paid” iZotope products even if you got them for free. This will allow you to get the cheaper “crossgrade” price if you want to upgrade to the full versions or get more products in a bundle! The Music Production Suite 3 crossgrade goes on sale pretty frequently…”

CelticMoose grabbed the deal then told us, “These plugins are even useful for podcasting FYI… I use Nectar Elements and RX 7 Elements. iZotope makes good stuff.”

And finally, ECJWZ got it and, in his audio glee, said, “There has never been a better time to make music. Ableton and Pro Tools have 90 day free trials, and Voltage Nucleus modular synth is also free!”

A Quickee

Not much to today’s post… except what we need – the link to FREE-dom!!

Use the extra cash you saved to get yourself some OTHER gear, and make these quarantine days your most prolific in years!!

And if you use our links? It helps pay for our website. That’s a big helpf, so thanks for your consideration. 😉

Let us know here at SeriousGas if you get these iZotope plugins, what you think of ’em, and how they’ve changed YOUR mixes.

In the meantime… I’m firing’ up Pro Tools, baby!

Now, go… make… SOUNDS!!!

How to Record Music – Gear Glimpses #1: “Ellen”

Hey, everybody! It’s been a while.

D’ja miss me?! 😉

I’ve been crankin’ away in the gear shed, workin’ hard to bring my music to life, and I’m ecstatic to say…

It alive!! LoL

After years of prep, research, performance and education, I’m finally publishing my art. Feels good, lemme tell ya.

So I thought it’d be fun, and insightful, to show those of you wondering how to record music all the GEAR I used to do it.

a-studio-for-recording

As I release each song I’ll put up a “Gear Glimpse” article so that you can see get a 1st-hand glimpse of exactly what specific musical tools went into them. Knowing that could add to the aural landscape of (potentially!) YOUR music.

So let’s get at it, shall we?!

The Song

My first released tune this year, under my project name “The Abacus Path“, is “Ellen“, a song I wrote in Amsterdam about a handicapped girl and her desire for freedom.

Check out the official music video here:

The Acoustic

The most important part of the musical arrangement for “Ellen” is what I wrote the song on – an acoustic guitar.

Now, when I was in the Netherlands I only had a simple classical guitar to write on. But when the time came to record it, I was back in the States and picked up my Taylor 310 guitar that I owned at the time to track with.

Basically, it’s one of Taylor’s lower-end models – not the cheapest in its arsena. but certainly under $1,000.

It’s your basic Dreadnought acoustic, with Spruce top/Sapele sides & back, made in Mexico, from 2003 if I remember right.

I thought the Taylor sounded great in a live setting. In the studio though, I was never satisfied with its sound. I had to EQ it a lot to get it to my liking in a mix, and I ALWAYS had to slam a high-pass filter on it to decrease the bass frequencies. What you hear on the recording is that process.

I ended up selling this Taylor since I didn’t like that pronounced low-end bump that it always gave me. Instead, I had a local luthier, Mr. Mike Franks, hand craft THIS GUITAR for me that turned out wonderfully. It’s now one of my favorite instruments in the recording studio.

Interestingly, the acoustic double-stop slides that you hear at the very beginning of the tune, I recorded this year using a different guitar – my Martin X-Series “Grand Performance” 20th Anniversary GPCX1AE Acoustic.

During mixdown, I decided that the start of the song needed something besides just a drum fill, so I spruced it up quite a bit using acoustic, keys, drums and just the right amount of delays and effects.

The Bass

I always play the bass on my tunes as well, and I have to tell you… this was the most elusive bass line I have EVER composed. It took almost a week to finally find the bass line that brought “Ellen” to life in the right way. I even brought in my producer to help me, which I have NEVER done on any other song.

Why? No idea, but we ended up totally scratching everything we’d tried on a normal bass up to that point, and just for kicks, trying a SYNTH BASS on it.

Unbelievably… it was JUST what it needed.

So, believe it or not, the low tones are grooved in this tune by a simple synth bass patch on the Kurzweil 2500, a remarkable flagship synth back in the day.

k2500, k2500x keyboard

It’s the only song I’ve ever used synth bass on, and I still can’t believe that’s what we ended up with.

As the old saying goes though: “If it SOUNDS right… it IS right.”

The Drums

In the late 90s when this cut was first tracked, electronic drum kits were first making their big debuts, and we wanted to see if they could survive the scrutiny of studio ears with some of my material.

Roland-TD-7-drum-kit

To that end, we set up a Roland TD-7 Electronic Kit in the studio and brought in a local skin-wacker, Mr. Brian Geiger, to facilitate the bouncy beat.

I hire drummers like Brian if I feel a song needs some rhythms that are too “tricky” for me to pull off without a LOT of practice. Sometimes it’s just a real time-saver to bring in a player who’s only done drums their whole life. They’ve got a MUCH larger technique arsenal than I do. That was the case here.

Instead of using the standard Roland sounds that came in the TD-7 module however, we opted to let the kit trigger some more high-end drum kit samples that resided in the Kurzweil keyboard. They just sounded more realistic than what the Roland module provided.

As for cymbals, we used actual REAL cymbals. We just didn’t think the sampled ones sounded real enough back then. As I recall, I believe Brian brought in Zildjian cymbals for hi-hat, 2 crashes and a ride. Not sure of the models.

The Sax

Doug-Cassens

A brilliantly gifted sax player here in Michigan named Doug Cassens laid down the saxophone for us. WOW, is that guy melodic. Every little riff he’d sing out was gold. I had such fun placing his improvisations throughout the song.

And his solo?? Get outta town!! He knocked it outta the park!

He used a Selmer Mark 6 Alto Sax for this particular tune. I own a Selmer Mark 6 TENOR myself, so I knew when he got out his axe that this was gonna be a sweeeeeeet session.

Doug continues to play as always, but now he’s relocated to Florida with his “Doug Cassens Band”.

I guess frostbite and winter doesn’t thrill his horn techniques. LoL

Find out more about Doug here on HIS WEBSITE.

The Vocals

At the time of this recording, I really only had one good vocal mic: the Oktava MKL-2500 Tube Mic.

Oktava-MKL-2500-mic

I found it at Guitar Center when they’d decided to no longer carry the Oktava brand, so they were blowing out these mics on clearance for peanuts. I think I paid less than $400 for it, out the door.

I noticed it had a slight hum so I called the Oktava USA headquarters and asked about it. They told me they knew exactly why it was doing that: they’d unfortunately had bad parts shipped to them by a different country by one of their suppliers.

Because of that (and to try to facilitate a better reputation here in the States) they offered to fix it free of charge for me. They’d put in all new electronics and make it, according to the CEO I spoke with, “on par with a Neumann U87 in its sensitivity, inherent noise floor and color.”

Well, that’s a high bar to promise! But I had nothing to lose so I shipped it off to ’em and waited.

When I got it back it was indeed like a totally different mic. Wow, did they do a great job. Quiet, warm, sensitive. I’ve sung hundreds of vocals on it and it’s always delivered right on-the-money.

Until I got my AT4050 (my favorite way to capture my voice) I used the Oktava exclusively. These days, I pull it out if I need a warmer approach to a song, especially if the production is sparse and I don’t have to cut through a thicker mix.

The background vocals were done on the fly, at a remote location, with simple SM58 mics. Just goes to show you that you don’t HAVE TO buy expensive gear to get professional results. As Clapton so aptly put it, …

“It’s in the way that you USE it!”

The Piano

My good friend and uber-talented keyboardist, songwriter, arranger, programmer, singer and just all around incredible DUDE, Mr. Sid Howard, threw in some tasty synth bits for this song.

He used a Modeled Electric Piano Instrument called “Lounge Lizard EP-3” to call up a great emulation of an electric piano. Great choice for this tune, as the E.P. never goes out of style and has a retro, but “classic” sound.

loungelizard3

E.P. virtual instruments tend to be sample-based, but Lounge Lizard, is different in that it goes the route of physical modeling for its sound production. A much more difficult way to go, but they’ve got it down in spades.

If you’re looking for accurate Fender Rhodes and Wurlitzer emulations because you don’t have the real things (they DO take up a lot of space, after all!), then buy Lounge Lizard will do it for ya. BUY IT HERE — you won’t be disappointed!

The Glock!

Way back a few years I managed to pick up a gaggle of awesome music instruments for peanuts. It was a VERY happy day in my musical life. Check out the story HERE.

One of my best purchases that day was a simple but incredibly useful Glockenspiel. I only bought it because it was so cheap and I thought, “Eh.. maybe I’ll find a way to use it.”

Glockenspiel

Did I find ways!!! This glock has been on SO MANY recordings of mine. I absolutely love it. For doubling melodies, strengthening hooks, bolstering vocals… it’s such a complementary tool in the studio I don’t know now how I ever lived without it.

I have two different sets of mallets for it: one with rubber heads, and one set with brass heads. They give me two very different transient attacks which helps me further choose which is “just right” for a given tune.

I find that a REAL glock is much better than just calling one up on your synth or software. It’s like a real piano – the way the notes & frequencies combine in the air adds harmonics that you just don’t get from a keyboard patch.

So if you’ve been wanting a quick, easy way to add some compelling, uplifting and interesting ear candy to your mixes… get yourself a glockenspiel. Its uses are myriad and its sound…? It’s like smiles in a bottle! 😉

The Percussion

Percussion arsenal

To underscore the groove, and add some levity and push to the emotion of the tracks, I dug out a tambourine, a pair of egg shakers, and a set of claves.

You’d think I was tracking Bossa Nova music! LoL

I tend to play all my own percussion tracks. I’ve played drums for years, so there’s no problem staying in the pocket.

Plus, I have a really big suitcase full of every kind of percussion toy you can think of, so not only do I have lots of options…

I also can pull out the exact percussion used later if I want to change it or fix something in the mix.

You can see the percussion I use most of the time here in THIS ARTICLE.

Bottom line: if you’re not using little percussion elements to liven up your mix and keep it interesting… you’re missing out on a very powerful tool in your music!

The Software

For you recording buffs who want to really know the intricacies, I originally recorded “Ellen” on the Roland 2480 hardware unit. Kickin’ it ol’ school, dawg!

Roland VS2480

In recent years I transferred those tracks to my Pro Tools “Ultimate” software so I could finish the mix, and master, in the box.

Pro tools

For reverb I used a plug in by UAD that emulates VERY well the good ol’ Lexicon 480L preset called “Ballady Hall” that I tweaked, mostly by cutting the lows and highs a bit.

Keeping the reverb mostly in the midrange to me makes for a less muddy and/or harsh mix.

The Music

To keep up on all the music that comes out of my studio for “The Abacus Path”, check in on OUR WEBSITE HERE for all the latest news.

The Abacus Path

During this time of quarantine and trying to keep safe from the nasty Corona virus, it’s more crucial than ever to let your songs be heard.

So go cut some tracks… lay down some grooves… and make our fragile world a much better place because of your music.

It might just be the thing to keep someone going when they’re giving up hope.

So, go… make… sounds!!

Teaj

“Gear Head Bangs!”, Gig 1

Today is a special day here at SeriousGas.com, and not only because it’s Valentine’s Day, the worldwide day of LOVE, desire and knee-trembling fulfillment…

It’s also a new day for G.A.S.-y comedy!!

Get your Phil’ of Laughter

I’d like to introduce my good friend Philippe Stuart to you all. 

He’s an exceptionally creative soul and a wonderful visual artist. I first discovered his talents at the fitness center we both work at, and have been more and more impressed the more I see of his works.

Soon, he’ll have his own website to share his incredibly detailed paintings and drawings, but for right now… we’re gonna showcase his creations here!

Ha-Ha-Haow about some MORE GEAR?!

Our new goal together is to create all-new bits of “Gear-Love” comic laughs, in honor of our shared affinity for music gear and instruments. Philippe has a quick and erudite wit, so finding just the right visuals to tip us into ROFL peeks into  communal equipment lust takes him little effort.

That said, we all at SeriousGas thank him for his excellent contributions to our site, and to G.A.S. sufferers everywhere. I know you’re gonna wanna tune in whenever he drops a new cartoon pane that feels our pain…

Get your P

And now… without further adieu… 

I introduce to you the very FIRST installment of…

“Gear-Head-Bangs!”

(Drop the mic)  LOL

Teaj

“Sweet Love”

My Kala Ukulele – Play That 6-Pack On The Beach Song!!

If today’s title has you thinking of crackin’ open a cold one in a hammock under a shady palm on a sandy white beach somewhere next to the rolling, rhythmic, waving ocean, well… there’s nothing wrong with that! 

But it’s not what I meant. LoL

I’m talkin’ about what many of us aspire to that’s located around our own personal “naval academy”…

I’m talkin’… ABS of STEEL!!

Why do I want to play a song about being super-FIT on my Kala ukulele?? Ahhh, therein lies a tale…

Work it, baby!

Because of the economic downturn of 2008, a lot has changed… for MANY of us.

“Music Corner” in my office!

I, for example, have taken on a great position at a local fitness spa due to the departure of the music and acting/film work that used to be here in the Detroit region.

I’m an avid runner, so it’s a good fit for me.

Being the type of guy who incorporates music into pretty much everything I do, my methods at the Club have proven no different. Pretty much everybody I’ve spent time with there has heard me play a song.

And most of the time… it’s on my Kala ukulele!

I chose it for two good reasons:

  1. The uke is small and doesn’t take up much room in my office, and
  2. No one can resist the urge to smile and feel good when someone is playing uke in front of them!

Both have proven to be true, so much so that I’m asked all the time to play it for any & every possible celebratory reason the upper management can come up with.

In short – I’m the go-to music dude.

Where I lock up the Kala each night, safe and SOUND! lol

The fact that the uke also quickly and effectively lowers defenses and puts people in a great mood also REALLY helps my bottom line. Simply put, when people are in a good mood… they spend more!! LOL

So, yea, my Kala uke shall always remind me of endless conversations about fitness, health, exercise and striving for that elusive 6-pack…

… the one that you CAN’T get in the “Chains” section at Target! 😉

Spec’ it!

Let’s first take a look at what this fine uke consists of…

The Kala KA-FMTG Tenor Ukulele Specs:

SIZE: Tenor

TOP: Solid Sitka Spruce

BACK & SIDES: Spalted Maple

BINDING: Maple

SOUNDHOLE ROSETTE: Abalone

NECK: Mahogany

FRETS: 18

FINISH: Gloss

FINGERBOARD: Laurel? Walnut? Rosewood?? It’s been made with all of ’em!

INLAY: Dots

HEADSTOCK: Standard

TUNERS: Die cast chrome, sealed & geared

STRINGS: Aquila Super Nylgut®

BRIDGE: Rosewood

ELECTRONICS: N/A

NUT & SADDLE: Graph Tech NuBone®

COUNTRY OF ORIGIN: China

Measurements:

Overall Instrument Length: 26.125″

Scale Length: 17″

Body Length: 11.75″

Number of Frets: 18″

Width at Upper Bout: 7″

Width at Lower Bout: 9.125″

Width at Waist: 5.5″

Body Depth: 3.12″

Fingerboard Width at Nut: 1.39″

Fingerboard width at neck/body joint: 1.8″

Watch it!

If we take a look at just the visual appeal of this FMTG model by Kala, it immediately says, “I’m not your ordinary, run-of-the-mill ukulele!

The wood on it is beautiful. It is Spalted Maple. “Spalted” is just a fancy word for the dark grain ribbons that emphasize where the wood has started to decompose, actually.

But fear not! It’s not going to stink or break apart from age! It’s strong, solid and much more interesting pattern-wise than new, fresh, still-growing Maple. Or at least I think so.

Now for a little controversy…

(Buckle up… it’s about to be a throw-down!!)

If you follow THIS LINK to the description of this model as it’s being sold TODAY, you’ll notice it says that it’s made of “Flame Maple”.

Sorry, but no. There’s no way that’s flamed Maple. Not even close.

I own the instrument, plus I’ve looked at all the pictures in all ads for this instrument online, every store I could think of, so I think I can say, with good authority, that the back and sides look nothing like Flame Maple at all. They are clearly SPALTED Maple.

Even the KALA WEBSITE HERE shows that it’s clearly Spalted.

To give you some idea of how to tell the difference between Spalted and Flamed Maple, let’s use pictures.

First up is a REAL Flamed Maple Uke, also made by Kala:

And here’s another flamed maple uke, this time made by Ibanez:

Now here’s a close-up of the spalted wood sides on the Kala KA-FMTG:

See the difference? It’s pretty obvious, right?? So don’t be fooled by some who are selling this instrument and calling it “flamed Maple”. It’s not. You can see for yourself.

Another way to tell the difference is price: spalted Maple is pretty easy to find, comparatively. It’s just dying Maple trees! And since there are a lot of those in the world at any given time, the price point of the instrument shouldn’t be that high.

But Flamed Maple?? That’s much more rare. To cut a growing Maple open and find the wet, dappling appearance of “flames” inside only happens in about 3 in 100 trees. That’s why we always pay more MONEY for true flamed Maple.

Check out a more detailed description of it in THIS POST by Ed Roman Guitars. Nice research, Ed!!

Science hasn’t figured out yet what environmental conditions cause “flaming” to happen (if it even IS environmental), but one thing’s sure: the better-looking the pattern, the higher the price. The best flamed Maple wood is often priced at 3 to 4 TIMES the cost of normal Maple!!

Which is probably why the striking PRS Electric guitar seen below sold for just under TEN THOUSAND DOLLARS!!!!

Would YOU pay more for FLAMED MAPLE??


With all that flaming controversy behind us though, the thing to really remember about this uke, despite its (to me at least) false advertising, is that it’s really beautiful, classy, unique and an especially tasteful, elegant approach to having fun with ukulele music.

Whatever you wanna call it, that wood is GORGEOUS!!

Hear it!

If we’re talkin’ tone, I’d don’t think I’d be able to find a better-sounding uke in any other brand in this price range. It projects well (for an ukulele!), and charms the listener with its clear, tropical whimsy and un-muddled frequency response.

Because it’s a TENOR ukulele, it’s a few inches bigger than its cousins, the Soprano and the Concert ukes. That means you’re going to get a better bottom end out of it.

Is its bass response like a guitar’s? Heck, no. Too small a body. But FOR A UKE, it really projects well and provides a little more beef than usual.

How ’bout the sustain?

Well, I did a little test of how long my ukes kept ringing after I strummed a chord, and here are the results:

  • the Mike Franks Soprano Ukulele: 8 seconds
  • the Kohala Baritone Ukulele: 11 seconds
  • the Kala Tenor: 14 seconds!!

How ’bout them Hawaiian apples!!

I’m not surprised, since it’s top is made of Spruce wood, which, for centuries, has been the tone wood of choice for soundboards (the top piece of wood)… and not only for ukes, but especially for guitars of all makes and models!

Spruce always provides good volume and strong attack for an instrument’s tone. Plus, whenever you see its clear, bright color and look, remember that a big part of its historical appeal is that Spruce’s tone is known to only improve as years pass, making it a great instrument for the long-term, since it’ll only sound better with time!

Ukuleles as primarily high-pitched instruments don’t have a wide frequency range, but a Spruce top will certainly help all those high notes project better than other more dense, hard woods you could buy for less.

Ukulele Collection of Ukulele dude!
So many Ukes… so little time!!

Oh, and they didn’t put a ton of GLOSS on top of the Spruce either, which can deaden the sound. They kept it thin, and I think that’s why the wood “speaks” so well and has such great sustain.

Since electronics are absent in this model, you’ll need to watch who you play with and how. This uke will absolutely give you good volume when playing with other instruments…

… unless they’re electric! Then all bets are off and you’ll need to either install a pickup or, as I do, just put a mic in front of it leading to a P.A. system or amp.

And beware the electric guitar player’s volume knob!! BEWARE!!!! lol

In a coconut shell? This breezy little beach singer will capture the attentions of every surf-craving ear with its effortless sunshiny sounds and songs!!

Tune it!

One of the WORST things I’ve found in ukes over the years is the terrible tuning mechanisms. Even in higher-priced models, I’ve played them and within SECONDS, the tuning has changed yet again.

Very frustrating. And not how you want to spend your time playing.

Kala chose well for this instrument: the die-cast chrome tuners they chose for the FMTG really keep it in tune well!

I know this because just about every time I go to play it for a new customer or friend, I don’t have to adjust the tuning at all, and that says a lot.

Nice job, Kala!

Hold it!

One of the really cool things I like about this particular tenor uke is that I don’t need a strap to play it. Two reasons:

  1. It’s lightweight (unlike, say, a guitar) so it doesn’t want to fall that much, and
  2. How it rests on my body & it’s shape makes it sit and fit snugly and perfectly against my own voice-strengthening 6-pack.
CJ with Uke
My youngest son, rockin the Kala Uke!

(Well, OK, maybe not quite a 6-pack. I think I can make out, uh… two. LOL)

If you’re an adult player, you’ll be happy to know that tenor ukes tend to have a little more finger space than the smaller ukes.

If you have normal to larger-sized fingers this is a much better choice for you than, say, a Soprano. The fret spaces get smaller as the instruments do.

It can get to be like the “garbage masher” scene in Star Wars if you’re more Chewbacca-sized. 😉

Another addition that sets this particular uke apart from the rest in its price point is the inclusion of Fret Markers on the side of the neck.

Most ukes have these markers on top of the neck, but hardly any do on the side. These little visual reminders really help a beginner to learn about and get quickly to different positions on the neck.

Position-dots-on-uke-neck-side-
Fret markers!!

Finally, this puppy came from the factory with a great set up and ready to play. The action is EXCELLENT. Definitely the easiest uke to play that I’ve ever had. Kala obviously were meticulous about the construction and decisions concerning bridge, nut and neck options.

Definitely performance-ready, and with a sunny disposition to boot.

I know a lot of other musicians who could learn from that. LoL

Stand it!

I bought my Uke Stand way back when, before Amazon was the juggernaut that it’s become.

Mine comes from the Met Opera Shop and fits this uke PERFECTLY. It’s nice and snugly held by the arms, but not so much that I have any trouble getting it out. Couldn’t ask for a better fit.

Check that out HERE AT THIS LINK.

These days tho’, Amazon makes it easier, and cheaper. Because your uke doesn’t weigh much, it’s not prone to tip, so a simple stand like the one I use is just fine. Here’s Amazon’s version of it:

Now, if you’re playing live, then you would need something WAY more sturdy. For when that guitar player comes over to adjust his volume knob…

Case it!

If you’re gonna pay anything over $100 for ANY instrument, do yourself a favor and get a good case for it.

I learned the hard way that a “gig bag” is NOT enough if you’re playing out at all.

(A moment of silence, please, for my Jackson “Dinky” Electric guitar with a broken neck…)

I use TKL brand cases, since they have a lifetime 24/7 warranty program. When you’re touring & gigging, that’s important. If you’re doing that too, check out the TKL WEBSITE HERE.

If you don’t anything so industrial, guaranteed and, thus, expensive, then simply go with this “no name” case on Amazon for those of you who do NOT play out on gigs:

And this one by KNOX for those of you who’ve practiced enough such that now EVERYBODY wants to have your tropical flair onstage with them:

Either way, you’ll be protecting your investment. Trust me – in the long run, you’ll be glad you did!

Size it!

This is a Tenor Ukulele, so it’s on the larger end of the spectrum for size.

You can get other options that are smaller (the Concert and the Soprano size) if you really want even MORE of a Hawaiian ukulele sound.

The Ukulele Family!
The Ukulele Family!

I like the Tenor because it gives you the flavor of a ukulele but also resonates with more lower frequencies to widen the tonal palette over its little cousins.

As always, it’s horses for courses – decide what you’re gonna use it for mostly. If you want that instantly recognizable ukulele sound, get a “Concert Ukulele“.

But if you want something a little less bright, maybe a uke you could use in a band setting more, then a Tenor is a great option.

Or, better yet… be like me and buy ONE OF EACH!! You’ll LOVE THEM ALL!!!! lol

Buy it!

In Hawaiian pidgin, “kala” means money

I think when it comes to Kala brand ukuleles, “kala” means you’re saving it, not losing it. Kala brand ukuleles are awesome ukes for incredibly reasonable prices and I recommend them whole-heartedly.

Below are links to the places I buy from all the time that I trust implicitly: Amazon and Sam Ash. Since the price is the same for each, just pick your favorite, and soon… you’ll be in strum-happy heaven!

UKE IT!!!

With a full FIVE STARS rating on Amazon by those who’ve purchased it, it’s clear that we have a real winner here in the Kala Ukulele.

Best tenor uke for under $300?? It just might be!

I can certainly vouch for it. Love how it looks. Love how it plays. Smiles when it sounds!

Now I just gotta add some electronics to it so I can put it through a P.A. system on the beach and GET ALL THE PEOPLE DANCIN’!!! LoL

If you’re wanting a fuller-sounding ukulele that is NOT beginner-grade, but still won’t break the bank, the Kala FMTG is a fantastic choice. Get it, get some sun tan lotion, and the world’s beaches are your oyster!

With that, I say “Aloha kakou”, my friends!! Here’s hoping we play, sing and clink cold ones with our toes in the sand somewhere soon!

(And if you wanna show off your 6-pack abs with some tropical flair, well… go for it…

I’ll play my Kala while you flex.) LoL

Now, go… make… sounds!!

Teaj

Drum Overhead Mic Placement – Snatchin’ Skins From All Angles!

My son came home from school with his buddies the other day, walked up to me and said, “Hey – play us some of those multi tracks!”

I knew just what he meant. I have a number of recorded multi-track versions of some awesome Classic Rock hits. They’re amazing to listen to…

Roger Taylor!! (Photo: Flominator)

Especially the drums! We often bring the other faders down so we can just hear them alone. I booted up “Bohemian Rhapsody” & played it for them. Oh, the glory of Roger Taylor!

Whenever I play those though, I wonder: “What drum overhead mic placement did they use??”

There are many ways to capture those thunderous skins in the studio. It can leave you uncertain if you’re not familiar with all the methods.

And even if you are familiar with them… that doesn’t mean you understand them well, or know what the best use of them are.

But fear not! Today, we’re going to examine all the ways I’ve ever used, and heard of, that will make your mic’ed kit sound amazing!

You ready?? Let’s rock!!!

Dermatologist-recommended!

First off, some friendly “skins” advice:

  1. No matter which method below you use for recording drums, none of them will produce good results if your mics suck. It’s imperative that you purchase mics that are (at least!) not noisy, are EQ’d appropriately for drum frequencies, and can handle the SPLs (Sound Pressure Levels) that drums throw at you.
  2. I’m not saying that these are the only methods to use for drum overheads. I’m just saying they’re the most popular. At the very least, they’re the methods I’VE used to sonic success in my own recording adventures.

And that counts for something. 😉

You can capture GREAT results from all of these. Which one do you choose? Well, that depends on what kind of percussive sonic landscape you want in the final mix.

I usually decide the Overhead Mic method based on the genre and type of song that’s brought to me, or that I write.

Finally, I have to think Bart Stevens and Wade Jaynes, former engineers at Schnee studios, who were the first ones to teach me all about overhead mic placement.

They, along with many other recording engineers and fellow musicians in my past, have all contributed to my knowledge of this art form.

Or is it a science?

Truth be told,…… I think it’s both.

X/Y or “Coincident Pair”

This is the method that was de facto approach we set up when I worked at Schnee Studios in L.A. It was always our starting point, and honestly… I never saw it changed.

(That doesn’t mean that, for some sessions for some Producers, that it wasn’t. I just never witnessed it changed to another configuration.)

If you’re just starting out and beginning to explore Overhead setups, start here. You’ll almost always get very usable result (if you use decent MICS, that is).

Coincident” just means that the mic capsules are close together.

Here your X/Y “how to”:

  • Put two mics on two separate boom mic stands next to each other (or use a stereo mic bracket).
  • Place the stand(s) such that the mics hover above the snare as you play. Sometimes I’ll also put them just behind and above my head and that produces good results too.
  • As you sit on the drum throne, the mic on your RIGHT side should be angled toward the LEFT side of your kit. The mic on your LEFT side should be angled toward the RIGHT side of your kit. This produces a “V” shape, with the top of the two mics at around a 90-degree angle from each other.
  • The HEIGHT of the mics should be such that they don’t point beyond the kit (picking up too much room), or so close that the whole kit isn’t dynamically balanced and even when you hear it. I find 6 & a half feet to do it for me, but I’ve got a large kit. YMMV.

PROS:

Clear kit sound. Nothing should end up sounding “muffly” or “tinny” or at dynamic extremes with this set up.

Good mono compatibility. This is because the phase correlation in X/Y is exceptionally balanced. To verify this, sum the kit to mono. You should find no sign of being “out of phase” (signal droppage due to wave cancellation). If you know your mix will be played on a single speaker in many venues, this would be a good choice.

Easy setup. This is especially true if you buy THIS STEREO MIC BRACKET that I use in all my sessions).

Perfect sound for “supporting role”. Choose this technique when the drums aren’t really going to be highlighted. They’re there, but not a focal point. The balance will serve you well.

CONS:

Medium stereo image. If you want your kit to S – P – R – E – A – D more in the mix, this is not your best alternative. But if a standard, tight Pop mix is what you need, go no further… this IS the droid you’re looking for! lol

Finally, if you wanna play around and explore a bit with this method, try increasing or decreasing the ANGLE of the mics in relation to each. MORE than 90-degrees should give you a wider stereo image. LESS than 90 will probably sound more direct, and narrower.

Spaced, or “A/B”, Pair

Another very common method of overhead mic placement is the Space, or A.B., pair. Basically, you’ve got one mic for the left side, and one mic over the right.

PROS:

WIDE kit sound. With the mics being quite far apart, you’ll naturally get significantly different areas of the kit picked up. This equals a more spread out impression.

Easy setup.
Two mics. Two boom stands. End of story.

Perfect sound for more “in your face” drum arrangements. Choose this technique when the drums need to be heard. Or at least not hidden.

CONS:

Uncertain mono compatibility. You’ll have to be much more vigilant about phase issues in this technique.

Use your ears and make sure, before you press record, that you’ve tested for phase. If your mic capsules are equidistant from the snare drum there shouldn’t be a problem.

Confirm this by getting out your measuring tape and verifying the numbers. Put one end of the tape in the center of the snare drum, and stretch it out to both mics. If the distance is the same, you’re in business.

Also, you’ll need to make sure that the distance of the mics from your kit is allowing a balanced impression to be heard. You MAY have to hit your CYMBALS lighter with this method, as your mics will be closer to them, AND close to the same height.

Typically, you’ll find with the A/B pairing that toms will be louder on one side and the snare and hi hat will definitely be louder on the other side. This is natural; it’s how you hear them with your ears! But if you don’t like that discrepancy, go to another method.

The higher above the drum kit you go, the more room sound you’ll get. But it won’t ever be like the Mid/Side method at least!

Where you point the mic is also going to really make a difference in the final sound. The mic on your left should really be pointed at the snare. The one to the right I usually fudge between the kick and the floor tom.

What works better for your kit?? Liiiiiisten and you’ll find out. Remember: I I S G, I I G!

(If It Sounds Good, It Is Good!)

Oh, and I find if I’m going to use this technique I switch from pencil, small-condenser mics to a couple large-condenser mics instead. Gives me… I dunno, just more depth. And really helps the kick to come out more.

Finally, if your mics allow for it, switching from a hyper-cardiod or super-cardioid polar pattern to something wider, like Cardioid or Omni, will give you and even BIGGER sound.

I recommend if you go Omni though, that you use a Jecklin Disk to provide the best focus and “shadow” for both mics. Buy one HERE for an arm and a leg, or check out this video to see how make your own!… MUCH more inexpensively:

As always… watch for wave gremlins and check your Phase. Those beasts will curdle your audio milk!!!

Mid-Side

Next, we come to a method that will deliberately be listening to your room ambiance!

So, if the room you’re using to record drums in is, well… not that great, you’ll want to probably skip this method. But then again, isn’t everything audio worth trying? At LEAST once??

The only demand this set up makes on your studio is that one of your mics MUST be a FIGURE-8 mic! Without that kind of mic, you won’t be able to properly capture a Mid-Side recording.

The Figure-8 mic will be picking up, almost exclusively, the REFLECTED SOUND of your kit.

Here your Mid-Side “how to”:

  • Place a Cardioid mic TEN FEET out or so OUT from your drum kit. Point its capsule right at the snare.
  • Place a FIGURE-8 MIC above or below the other mic. Turn it so it’s 90-degrees off axis (facing the SIDES instead of the drum kit!).
  • The HEIGHT of the mics is usually a foot or so above where your cymbals sit. But as always, try different heights and see what most brings YOUR kit to life.

That’s it! Not much to it. Now you COULD also add in a close-mic on the kick and snare (I do), but that allows for even more phase issues, so don’t go there unless you know what you’re doing! 😉

Your Center channel mic you’ll pan right to center. This will cancel our any phase issues when you bring the other mic in.

After recording your Figure-8 mic onto one channel, you will then copy that waveform, paste it onto a SECOND channel and flip it out of phase.

Then, panning them hard right and hard left, you end up with a cool-sounding, but still out-of-phase, drum sound. We’ll call these two channels the “Sides“.

Ahhhh, but when you bring UP the Center channel mic (the Cardioid that we pointed right AT the kit), all problems are resolved and we have a very rich, interesting percussion sub-mix!

PROS:

Don’t need “Matched Pair” mics. In fact, with this technique, the two mics can be COMPLETELY different, and it can produce excellent results. In my studio, I use one Avantone CK-1 mic and my AT4050 for the Figure-8! If you DO use the same mics, however, you’ll find their LEVELS to be much more in line with each other.

Ensures mono compatibility. For the same reasons as X/Y.

Easy setup. Shouldn’t take long IF you are familiar with this technique of recording drums.

Ability to alter “width” of kit sound at mixdown. By bringing the AMOUNT of the Figure-8 left & right signal up, or down, you can cut or boost the perceived “width” of the kit, and/or how much of the ROOM you want in the final sound. Talk about flexibility!

CONS:

Medium + stereo image. Just like X/Y, this will give you generally more “medium” kit sound size. The difference from X/Y though is that you’ll be able to dial IN more room, or width, with the two channels of the figure 8 mic.

Watch it though, because the more of the room sound you dial in, the more indistinct and less direct-sounding your drums will be. Adjust your faders to the song, as always.

Finally, to make it easy to process at mixdown, I always bus the two side channels to their own separate stereo bus. Doing that allows you to adjust the two Side Channels, and thus the perceived stereo width, with just one fader. Nice!

ORTF! WTF?!

At first glance, you may think I just texted “Rolling On The Floor Laughing” too fast.

If only! That one little juxtaposing of the first two letters gives us something totally different… and you may not think it’s that funny.

Try THIS title on for size: “Office de Radiodiffusion Télévision Française“.

Small wonder they switched to just using the acronym ORTF – I studied French and even I THINK that’s awkward & unwieldy!!

Regardless, over the great Atlantic, that French broadcasting company stumbled upon this re-tweaking (what they deemed an improvement) of the X/Y method we looked at earlier. They were supposedly going for the distance a human has between two ears. They figured it might sound the technique WE hear naturally.

Guess it worked! Other countries heard about the technique and soon we had yet another studio tool to keep in our audio toolbox (which, for me, has a Van Halen sticker on it. LOL).

It’s actually not that much different. Specifically cardioid microphone capsules are still angled about the same, & pointing in the same general area.

The difference is that, instead of the capsules being side-by-side, almost touching like in X/Y, the top of the mics are exactly

6.7″ (17cm) spaced apart. AND the mics are angled AWAY from each other at a 110-degree angle.

Looks like this:

PICTURE

Sometimes you’ll also hear this referred to as the “Side-Other-Side” configuration.

PROS:

Kit spread sounds wider than X/Y. This is, obviously, dependent on your success in setting it up correctly, but generally speaking you’ll get a bigger side-to-side impression with the ORTF set up, but without losing the important center of the kit.

Tends to “hear” less ambient room sound. This certainly depends on how close or far from the kit you place the mics, but, all things equal, you’ll get less room ambiance than X/Y. The further away, the more kit blend, but also the higher the risk of “room bleed”.

Can produce mono-compatibility. For the same reasons as X/Y… IF done right.

Easy setup. Two mics again. We’re not building Rome here.

Can use the same microphone mounts as X/Y Method. You’d just swing them away from each other instead of towards each other.

CONS:

Can cause comb filtering. Because the mic capsules are farther away from each other than in X/Y, you’ve got more of a chance to botch it when it comes to Phase. But, really, with careful measuring, this shouldn’t be an issue.

Works best with matched pairs, or at least the identical type & model. Not a hard and fast rule, but whenever I record this technique I use both my CV-1 mics for the job. But then… I absolutely LOVE those mics, so… no surprise there.

So… IS it an improvement?? Maybe. Depends on what you’re after.

If done right, this set up can absolutely make a kit sound pretty dang sweet. Of course, it always helps if you start with the best SOURCE, like playing a DW Ivory Ebony 7-piece Collector’s Kit!

Sorry… little gear lust there… 😉

Though this method tends to work best at close distances, the distance, angles and spacing can always be tweaked to make it optimized for YOUR drum set, with YOUR specific room acoustics. The approach should always be… set it up as diagrammed, then adjust to taste.

Recorderman

No, it’s not a new super hero in the Marvel Comic book world.

(Tho’, actually… that would be pretty cool!)

This drum overhead method was created in 2003 in a session for the band ‘Hazy Malaise” at the Village Recorders studio in L.A. The engineer for them, Eric Greedy, pitched an idea to his producer, Eric “Mixerman” Sarafin, that he wanted to try.

Mr. Sarafin agreed, and the session tracks turned out GREAT. Since the Producer was known as “Mixerman”, he said,”Hey, Greedy… you should be “Recorderman”!”

And thus not only an Overhead Mic technique, but also a nickname and method name was born!!

The goal was to have the Kick and Snare sit squarely in CENTER of the stereo field when listening to two overhead mics.

The big surprise tho’ is that they also used a snare mic AND a kick mic as booster mics. It was never intended to be only a 2-mic technique.

Also, this is the perfect method to use when the drummer plays in an expertly BALANCED technique. If they play the cymbals too loud, or hit the snare or Hi-Hat technique too hard compared to the rest of the kit, stay away from Recorderman. It will probably not give you the best results.

Here your Recorderman “how to”:

  • Place one Cardioid mic above your snare drum. Some say 32″. Others say just the distance of two drumsticks. Use what works for you. Point the mic capsule right at the snare.
  • Place the other Cardioid mic close to your drummers right shoulder. also 32″ from your snare. Point its capsule right at the kick.
  • Check that the DISTANCE of the mics from the KICK drum is also the same.

The quickest, easiest technique to do that last measurement, is to:

Guy Sternberg and Florian von Keyserlingk, in Berlin, Germany, measuring for the “Recorderman” technique!
  1. Clamp down on the end of a mic cable, or bit of long string if you have it, using the kick drum beater. Just keep your foot down so the cable or string stays held by the beater.
  2. Pull the cable/string up to the overhead mic.
  3. Hold the cable string there at the overhead mic, or run it over a finger, and bring the rest of it down to the middle of the snare head. Hold that end in place on the snare.
  4. Now that you have a kind of “A” shape, with both ends secured, gently move the top of your “A” over to the other mic (the over-the-right-shoulder mic). Keep it taut. If it’s too close, or too far away, move the mic so it’s exactly at the top of the “A” shape.


That’s it! Now you’ll have a good overview of your kit sonically, with little phase smearing. Pan the two mics hard left & right, unless you hear a kind of “hole” in the middle of the kit. Then lessen the Pan spread. Choose what sits best in your mix.

If you’re more of a visual learner, check out Charlie’s comprehensive look at how to get everything in place… including your HAIR, in this vid’:

PROS:

Only two mics needed. Haven’t got a large mic locker?? No problem. This’ll give you a good sound.

Avoids mono phase issues in kick & snare. IF you measure right. No slacking. 😉

Keeps kick & snare dead in the middle of the sonic image. Shouldn’t take long IF you are familiar with this technique of recording drums.

Little “Room Sound”. If you want a kit sound that really focuses on the snare, kick and toms, this is a great choice.

A quick fix for “Cymbal BASHERS”! Since the mics are lower than usual, the cymbals volume will be attenuated more than in the other techniques. If a given drummer is just hitting the cymbals technique too hard, try this method. It’ll soothe his savage beast mode in the recording!

CONS:

Matched pair or same mic model is preferable. Otherwise the two halves of the kit will sound different. You CAN, however, get away with different mics. Sound good? Then it is good.

Phase issues on the rest of the kit possible: You may get some smearing in the cymbals or toms tho’. Keep your ears open.

As we saw in Charlie’s video above, you CAN introduce other mics too. Just remember every time you do… you’re playing with sonic Phase Phire… don’t get burned!!

Head-to-Head

So, let’s construct a little cheat sheet here, based on what we’ve learned, that will be our go-to guide for drum kit mic’ing issues:

WIDEST kit sound: A/B

Flexibility at Mixdown: Mid-Side

Best for attenuating cymbal volume: Recorderman

Best Phase Coherence: Mid-Side or X/Y

Strongest, most present Snare & Kick: Recorderman

Balanced Kit Blend: X/Y

Aaaaand… that’s IT!

Well, actually… not really.

There are endless methods for drum overhead mic placement, so don’t think that the methods above are your ONLY options.

But they are the ones that are the most talked about, and that have certainly produced good results on huge-selling, hit-laden albums.

Try different methods for yourself. Move mics around and listen. Create your own perfect pairing!

Who knows? You just might end up discovering a method that will be talked about in THIS POST one day! 😉

Now, go… make… (DRUM) sounds!!

Teaj

The Martin Anniversary Guitar – Gettin’ Spacey With My OWN Oumuamua!

Several billion years ago… a massive, powerful explosion in space occurred.

It scattered hot cosmic shrapnel in all directions…

Cold, primordial shards hurtling towards staggeringly distant star systems…

Carina Nebula

… and it tumbled its way… TO US!!

What does this celestial body’s immense trek have to do with a Martin Anniversary Guitar??

Read on, ye music-making Earthling… !

Stage 1: The Mission Plan

I had a big concert of my own material coming up this past summer, at a sweet venue, and I decided I needed…

My (formerly!) two best acoustics!

… what else??! A new GUITAR!!!

(Big, important concerts seem to ALWAYS provoke a bout of serious Gear Acquisition Syndrome!!! LoL)

Because this concert would be filmed AND digitally recorded, I knew that I needed to play guitars that sounded better than any I’ve ever played.

The only question was: how could I accomplish this??

The first thing I did was to play the same couple tunes upon every acoustic guitar that I owned (around ten of ’em).

After that, it was pretty evident that my Mike Franks acoustic (examined HERE) and my Ibanez Exotic Wood guitar (see my article on it HERE) had the best overall sound and responsiveness. That was no surprise, really, since they are the ones I usually grab whenever I want to play!

Joe Walsh playing an Ibanez EW
Joe Walsh playing an Ibanez EW (Courtesy)

The Franks guitar I had hand-crafted towards my own specifications though, and it was made to be a “recording guitar”, and not one that had the stronger, more bass-enriched tone I need for LIVE playing.

So, the choice was clear – Joe Walsh & I have the Ibanez for a reason… it’s a great-sounding, and killer-looking, acoustic!!

Stage 2: Comparison

Just a SpaceX has been testing, comparing and vetting rocket parts and technology for the last decade or more, so I needed to also compare my best “audio ship” with all the rest out there.

It was the only way I could truly step up my audio game. ‘Cuz, you know… it’s about that SOUND, baby!

So, with my Ibanez EW in hand, I headed out to Guitar Center. My main man Scott, in the Guitars Department, did me a solid by unlocking quite a few of the more expensive guitars that were cordoned off in a separate room.

“Only the brave of wallet may enter here! Penny-pinchers, BEWARE!!!” 😉

I guess I shouldn’t have been surprised, but it took me well over an hour to finally find a guitar that sounded better than the one I had.

(Photo: Alessio Bragadini)

I must’ve played at least 30 guitars. Probably upwards of 50. I’d play my Ibanez first, then play the same thing on another axe.

Time after time… I was disappointed.

Stage 3: the Discovery!

Full Frontal!!

But then, it happened! It was a sudden, immediate, insanely-surprising departure from all the other “ho-hum” guitars I had put through their paces. I picked up a Martin “Grand Performance” 20th Anniversary guitar and began to play.

And the difference? It was slap-my-face incredible!!

As soon as I coaxed the first notes and chords out of this Martin acoustic, it was immediately apparent that it was blowing away everything else I had played that day.

This is one impressive guitar. So much more the surprise too since… it was NOT among the most expensive. I played acoustics in there that were upwards of two GRAND and they didn’t sound as good.

But wait – I realized that I had only played it acoustically. What about the electronics?? I thought to myself, “Yea, that’s probably where it’ll suck.”

So I plugged the high-quality 1/4″ Monster cable I had brought with me into the little mixer there, plugged in my Ibanez, and played a couple riffs and chord sequences from my tunes.

Then, expecting a let-down, I plugged in the Martin instead, and strummed.

Stage 4: the SOUND!

“DUDE!!! YEEEEESSSSSS!!!!”

The way this Martin spoke through the sound system was, headstock-to-strap-pin, superior in every sense. It was captivating. Nuance-enhancing. Even. Perfectly balanced EQ-wise. Rich and attractive-sounding.

I noticed that it sang technique subtleties like it was speaking and understanding my own personal musical language. It made all my other acoustic purchases before that sound like stuttering, stumbling newbs!!

In short, I was blown away.

All the acoustics I then A/B’d with it… sounded pathetic in comparison. Even my Ibanez EW suddenly was missing a presence, and large swaths of frequencies, by comparison.

Remember too, that this was on a tiny, little acoustic amp that Guitar Center had in that room. I could only imagine how amazing it was gonna sound zippin’ through the Bose system, worth thousands, the night of my concert!!

I’d done it. I’d improved my tone immensely. I’d found… my new best stage friend!

The GPCX1AE – an Acoustic ROCKET!

Here’s the specs rundown of this remarkable instrument:

That’s one beautiful backside!

Body

  • Name: Martin X-Series “Grand Performance” 20th Anniversary GPCX1AE Acoustic Guitar
  • Body type: Grand Performance
  • Cutaway: Yes, at 14th fret
  • Top wood: Solid Sitka Spruce
  • Back & sides: Macassar Ebony wood HPLs (high-pressure laminates)
  • Bracing pattern: Sitka
    5/16″ Scalloped, with 1/4″ Tone Bars, X-braced
  • Body finish: Hand-Rubbed Top
  • Pickguard: Black
  • Rosette: Mother-of-pearl pattern w/ Multi-Stripe

Neck

  • Neck shape: Performing Artist with High Performance Taper
  • Nut width: 1-3/4″
  • Fingerboard: Morado (Bolivian Rosewood)
  • Neck wood: Select Hardwood
  • Scale length: 25.4″
  • Number of frets: 14 clear of the body, 20 total
  • Neck finish: Hand-rubbed Satin
  • Neck width @ 1st fret: 1 3/4”
  • Neck width @ 12th fret: 2 1/8”
  • Neck circumference @ 1st fret: 4.5”
  • Neck circumference @ 3rd fret: 4 5/8”
  • Neck circumference @ 12th fret: 5”

Electronics

  • Pickup/preamp: Yes
  • Brand: Fishman Sonitone Electronics
  • Configuration: Soundhole-mounted preamp
  • Preamp EQ: 1-band
  • Feedback filter: No
  • Tuner: No

Other

  • Headstock overlay: Not specified
  • Tuning machines: Chrome Enclosed Gold Gear
  • Bridge: Morado
  • Saddle & nut: Compensated White Tusq, White Corian
  • Number of strings: 6
  • Special features:
  • Accessories: None
  • Case: Sold separately
  • Country of origin: Mexico

Stage 5: String Theory

As soon as I got my new Martin Guitar home, I took the strings off that Guitar Center had on her.

I then oiled the guitar neck with my favorite orange oil, polished her up well, and put on my choice of new strings: the Ernie Ball “Paradigm” phosphor bronze acoustic strings.

I had found in playing electric guitar that the Ernie Ball “Paradigm” strings had MONSTER tone, and a powerful low-end that always stayed present, but never got muddy.

They became, through my test (which you can read about AND hear by going HERE) my go-to strings for playing electric guitar LIVE) my go-to strings for playing electric guitar LIVE.

So I figured I go the same route for acoustic. In the past, I’d always used Elixir “Nanoweb” strings for my acoustics, but I felt like they just weren’t giving me the “oomph” I needed, tho’ they did keep good time for a loooooong time, which is nothing to sneeze at. 😉

Once the Paradigm strings were put on this Martin, it sounded even better. And that’s saying something!

Stage 6: Mission Parameters

After letting it sit for a whole day to let the strings sink into their tuning, I returned and started testing it for the gig.

Martin inner badge

Would it stand up to the rigors of audio and technique I’d put it through??

The way I did this was to actually perform every song through my sound system, with each guitar I’d use, and singing through the exact mic I’d use that night (the Shure GLX-D Wireless Headset mic).

Every time I played the Martin for a song (as my ‘standard tuning’ guitar) I sounded the best I’d ever heard. I couldn’t believe the EQ and responsiveness of this guitar for the price I paid, which was less than $700!!

Tho’ non-musicians won’t “get” this, you and I both know how much having “the right tool for the job” can make the difference. If we, as the players, are inspired by how our instruments sound… how much more will the audience be??

Stage 7: We Have Lift-off!!

Finally the night of my concert came and my Martin acoustic did indeed give a “grand performance”.

Every song sounded great. The Bose sound system at 20 Front Street, the venue for the concert, really brought my guitar & I to life.

Teaj in concert

With just a skosh of reverb that the sound guy put on my voice and the Martin, the overall sound performance was my best yet; I don’t think my voice/instrument combination has ever sounded so balanced, so complementary… so good!!

(I know this, by the way, ‘cuz I have the recordings. Can’t wait to share those with you soon!)

There are a couple other things I really liked about this guitar playing live that I need to mention:

1) All the seams on the guitar are ROUNDED, instead of being 90° sharp. I really like this. The guitar didn’t dig into my front or side as acoustics can do. It just felt more comfortable.

2) This is the first guitar that I’ve ever bought that doesn’t have a gloss finish. I have to say, I think I’m I’ve come to prefer the more natural feel of real wood, without all the gloss on top of it.

It doesn’t feel slippery. Instead, it feels, well… like real wood. It’s been sanded… but not too much. You can still feel a “wood-y” texture on it that I really like.

3) Also, the electronics of the instrument were clean, easy to reach during performance, and interpreted all the frequencies the guitar was putting out quite transparently, even when I got to heavy strumming.

4) The “High Performance Taper” neck on this beauty is helpful for playing up and down the neck, as I do. The fingerboard width starts at 1-3/4” width at the nut, then expands to 2-1/8” width at the 12th fret. Great for upper soloing or high chord shapes.

But the BIG difference I had to get used to immediately is the back-of-the-neck shoulders – they’re MUCH beefier than any acoustic I own, or have played.

What that means is you notice a lot more wood in your palm down near the nut. Like how a Tele feels bulkier than a Strat, to use an electric simile.

As you go UP the neck, however, these ‘full flanks’ dissipate, and are much more scalloped down to, what I’d call, and electric guitar neck, like a Strat at the 12th. Martin calls this their “Performing Artist Neck Profile“.

I’ve come to really get used to this feel, and live in concert it just felt more SOLID through all my chord progressions. If you like really THIN necks though… this is not the Droid you’re looking for! LoL

5) The best is for last: the overall tone of this guitar is beautiful. Right after I first got it, I tested it against ALL my guitars back home, and found that I still preferred the Martin’s sound over all my others for playing live. My Franks guitar still is the best acoustic for recorded acoustic sound, but that’s to be expected, since that’s what I had it built for!

Taped wires for quieter performance

Oh, and lest you think I found PERFECTION, well… I did have to tape the inside electronics wires down to one of the braces because you could hear them occasionally bouncing around inside. I move a lot when I play, so those wires were causing all kinds of unwanted sonic artifacts.

But, hey, a quick slice of gaffer’s tape and… all was well. If that’s the only negative to be found, I think you’ll agree – that’s nuthin’!

My summer concert was a victory on many levels, but one of the best reasons I feel like I “conquered” that night is because this Martin X-Series acoustic brought out the best in my material…and in me!

From Space… to Brace!

So, again… what does all this have to do with space debris???

Well, on 19 October 19th, 2017, astronomers at a Hawaiian telescope discovered the first confirmed object from another star system to visit our solar system. It was named “Oumuamua“, which in Hawaiian means “a messenger that reaches out from the distant past.”

Some thought it’s an alien ship. Some say it’s just an asteroid. Others think it’s a comet that’s lost its shimmery mojo!

Here’s a quick TED Talk on it, in case you missed the galactic hubbub:

Regardless of what it is, it’s the first discovery of its kind, and that’s’s pretty cool. Now that it’s off, heading away from our Sun, we can only wave it goodbye and continue the wide-eyed speculation.

Well, we can do a little more, actually. I named my guitar after it!!

I noticed right away when I picked up my particular Martin guitar that on its back, near the middle, was a very cigar-shaped circle of wood grain.

My Oumuamua grain guitar!

Since I had just seen Oumuamua in the news, it immediately sprung to mind: “Hey! It’s that alien ship thing!!”

So, yea, my Martin is affectionately named “Oumuamua”. Whenever I play it, I know that it ALSO is a ‘messenger that reaches out from the distant past’… from when I first wrote the song I’m playing!

That’s one of the magical things about songwriting – whenever you play something you’ve written, even decades later, you are taken right back to that place & time in which you composed it.

So take us, Martin… take us back! Across light years of sound, cosmic chord clusters, through the dark and light matter… to where songs find a home within us… and without us!

A New Benchmark!

This particular Martin Anniversary guitar has made such a difference in my sound, I’ll never get rid of it. It’s just that good. To investigate, follow this link:

As I go forward, I’m sure to be testing every acoustic that stirs my interest against this unique beauty.

I already have a trip planned to a little town in Coshocton, Ohio which, unbelievably, has a store that’s sold the most preeminent acoustics in the WORLD.

I’m specifically heading there to test this Martin against some of the world’s best.

And you KNOW I’ll be sharing THOSE results with you!! 😉

In the meantime, I hope YOU have an instrument that inspires you on to bigger and better creations. If not, hitch your wagon to the stars and blast off on a focused star TREK!

You may find your songs, and your sound, going where you’ve never gone before. 😉

Now, go… make… sounds!!

Teaj

Teaj in the storm-fields!