 Teaj
Teaj

Love MUSIC GEAR?! Then you've got Serious G.A.S.!!
Teaj

You’ve heard it before; you’re walkin’ the sidewalk somewhere, maybe downtown, and a car goes by that has the music up so high you know their ear cilia is getting as fried like KFC chickens.
Interestingly though, the only thing you can hear is that big, low rumble of the bass frequencies rolling past and through you, and bouncing off all the buildings all around.
The power of those deep frequencies. Pretty impressive.
If you want to learn how to play a bass guitar, you’ve probably already felt that power, and wanted to feel what a high it is to play low. I feel you.
I began playing the bass lines to all my songs early on and I wouldn’t have it any other way. I often bring in guests to play on my material, but not on the bass. There’s just something veeeeery special about that frequency range…
Along with the drummer, you are the glue that keeps a song chuggin’; you’re the foundation upon which is built the most impactful songs ever written and produced.
So the first thing you should do before you even pick up the instrument is this: start training your ear to hone in on the bass and the drum sounds on any song you hear. Listen to how they work together. The kick drum and the snare are the two biggies for the bass to complement, so especially zoom in on the interplay between those three.
You can be listening for these things anywhere, anytime there’s music on. Start the habit now. It’ll come in handy when you start practicing, and it’ll make you a better musician because instead of focusing on your fingers all the time you’ll be listening to what you’re playing, and how it gels with the rest of the musicians.
Since you’re interested in playing a bass guitar, I’m going to assume you have one (if not, SEE THESE BEST BUYS ON BASSES and get one), and I shall assume it’s a normal four-stringed model. There are many other variations but let’s stick with what’s simple to begin.
Sit down and set your bass on your legs, ready to play. The neck and headstock should be pointing off to your left.
If you’re left-handed, it’s the opposite, but in that case you should have a specially made left-handed bass.
Look down at the four strings of your bass. The one closest to your head is the lowest string. Some might be tempted to call it the “highest string” since it’s the one closest to the ceiling. When naming our strings, we don’t go by ceiling proximity; we go by the notes of the instrument.
Play the lowest string. Now play the three others. Do you hear how the notes are getting higher the closer you get to the floor? Did you notice as you played higher that the strings grew thinner? The thinner the string, the higher the pitches.
I will now give you the notes of the open (non-fretted) bass strings, lowest to highest (closest to your head, to farthest from your head). They are:
E
A
D
G
These are the notes you will hear if you are not touching the neck at all, not pushing down any notes (called “fretting”). You must memorize what these open strings are. Do it now. Keep reminding yourself every day until you can recall it perfectly and instantly.
If you need a funny acronym to remember them, try these:
E very
A ardvark
D igs
G rubs
Or, if you’re not a zoologist:
E mpires
A lways
D ie
G rudgingly
Or, if you’re not into history:
E njoy
A ll
D ream
G ear
Or finally, if you’re a songwriter who loves his gear like me:
E very
A rtist
D evelopes
G. A. S.!!
Now go ahead and play all four open strings, low to high, and then high to low. Say the letter names as you play them.
If you do that every day for 5 minutes, for two weeks, I bet you you’ll never have to do it again. We humans are very predictable; if we repeat something over and over, we get really good at it.
Which is why I don’t practice turtle juggling. :-p
Your next big step, to get you really playing easily as soon as possible, is to memorize the Chromatic Scale. What’s that? It’s every note that we use in music! Don’t worry – there aren’t that many; only twelve tones comprise our whole music system. Easy-peasy. Here’s the outline:

Couple of things to notice:
To make it easy, let’s start with “A”. It is the first letter of our alphabet, after all. With that in mind, let’s state the Chromatic Scale out loud. Like this:
As you can see, when we get to “A” again, it starts all over. Get it?
When you know this, and ongoingly practice it on your bass, you will be able to find any note on your bass quickly and easily. Why is this important? Music is made up of chords, and if you ever play with others they’ll tell you what chords they are playing by name (like “B”) and you’ll have to match that.
If you don’t know where “B” is, you’ll be lost. And they’ll notice. And they might not call you again. So let’s not let that be our story.
Practice speaking the Chromatic Scale out loud a lot, until you know it so well you can’t possibly make a mistake. You can do this anywhere, anytime.
You’ll also need to practice with your instrument. Here’s how:
If, for example, I choose to play my D string, I would play it open and say “D”. Then I would finger the first fret, play it, and say “D sharp, or E flat”. Continue this way up the neck, following the map of the scale above, and you are ROCKIN’, my friend!!
Quick note: when fretting a note, place your finger between the frets (metal lines on the fretboard). If you put your finger on the metal you won’t get good tone at all.
Remember, the more time you spend doing this, the quicker it will become easy. We all want easy, so just put in the time and you’ll soon be able to keep up with other musicians and get to even more fun stuff a lot faster.
Now let’s look at how this applies to chords of real songs on the stream site right now!
Each note that you play can be the “tonic“, or the “root” note of a chord.
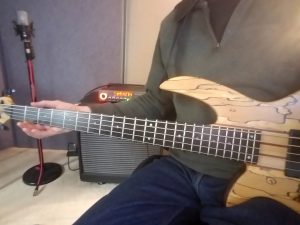
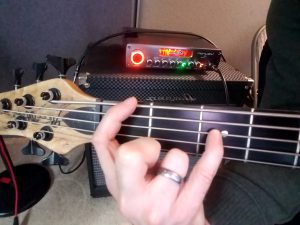
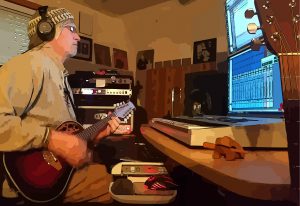
If the chords of a song start with “F” (which is what I’m playing in the picture to the left), and you fret the note “F“, you will always sound correct!
The root is the most important note, and it’s easy to play because it’s the same letter as the chord name. Love it when things are that easy!
Now go to some site like http://www.guitarchords247.com, or if there’s music books lying around, open them up, find songs and play the root notes that match the chords you see for that song.
I’ve had days doing HOURS of this, and it taught me so much about songs, technique, ear training… the works! Try to play the whole song through, because as a musician you’ll have to play whole songs, not parts.
Now we’ll get tricky! Heh, heh!
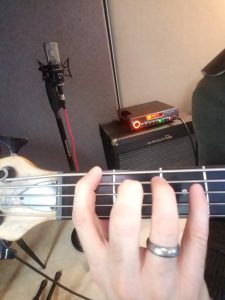
Whenever you’re on a chord, playing a root note, you can almost always throw in the “fifth”. Where do you find the fifth? Up two frets, and over one string. Here’s me playing a root note (F) and its fifth.
I know songs where the bass player plays fifths incessently. They are VEEEEEEERY commonplace, so get to know fifths as soon as possible. Just toss it in where it rhythmically fits with the groove of the song.
Hey! Haven’t I seen this note before?! Well, yes, you have. It’s the same note as the tonic note.
An octave is a note by the same name further up or further down musically. This next extremely popular note to throw in is just the root note, but higher. Let’s see how we fret the octave above our root note:
Now you are really empowered. Why? Because on almost any chord you read from now on, you have three different notes to play with that will be correct to play.
How will this help? Well, the biggest reason is it will make your playing a lot less boring. Imagine if all you did was pluck on the root note for seconds (or, God forbid, minutes!) on end. That get’s old pretty quick. Having these three options in your arsenal for any given chord will keep you harmonically interesting and rhythmically experimenting, which means no boring music!
Adele must be a bass guitar fan, ‘cuz, man… that’s what we do best!
Lastly, you’ll probably have more excitement during your practice times if you actually plug into an amp.
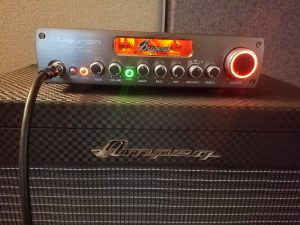
I plugged my Bass Mods bass into my Bugera “Veyron” amp head and Ampeg 15″ cab for this lesson.
You’ll be able to hear a lot clearer how things sound through an amp, plus you can listen for sloppiness and eliminate it much easier when you’re amplified. Play clean, or don’t play at all! 😉
If you practice what I’ve given you here, and apply yourself to the mental tasks as well as the physical, you will be having SO much fun SO soon… and that’s what it’s about.
Never let music be boring. It’s a wonderful gift and most everybody can do it if the right steps are taken.
Got questions? Lemme know in the comments. I’d love to hear from ya! Until then, you know what I’ll be doing:
“Rollin’ in the deeeeee – eeee – eeeep. Playin’ on my baaaa – aaaa – aaass… !
Now, go… make… sounds!
Teaj


The lights.
The hundreds of voices.
The instruments across the stage, positioned just so in front of a backdrop you’ll probably never see again.
Fan faces that remind you of how your own must look – excited, hopeful, grateful.. wired!
All part of going to a concert to see one of your favorite musicians, right?
This is, after all, what got us into music and gear in the first place: the music itself!
The artist and accompanying machinery are always secondary to the songs he, she or they created. It’s about what those tunes do to us, how they change us, where they give us new insights, when they cause us to really feel something, and how they become a part of our life… that’s what always has mattered.
All these things are an apt montage of how I have been impacted by the music of Bruce Cockburn. Since being introduced to his repertoire in Europe in the late 80s, I have bought almost every album he ever made, and let me tell you… he’s made a lot!
Last month he released his THIRTY-THIRD album, entitled “Bone On Bone”! Prolific much?! Not only did I buy that (of course), but this past Friday night I saw him again live, as he performed to a sold-out, packed house, a fleeting number of his most favoured songs, as well as quite a few stellar new creations.
Before the show began, I took some time to take a quick glimpse at the gear he used for the night. Not only did I want to personally know how he pulls off these epic, unforgettable tunes – I knew you would too. Come take a peek with me!
Bruce has played many guitars over the years, by many companies: Larrivée, David Wren, Fender, just to name a few. Some he grew tired of, some he traded for ones that were more conducive to his particular technical demands as he developed them, and some were even lost in a fire.
At Friday’s concert though, he performed live primarily on:

Because I saw at least two acoustic guitars with double inputs on them being used, it appears that Bruce is still using the Fishman Prefix Pro Preamp and Pickup Systems to hone his live sound. This basically takes the sound of his pickups through one jack (usually wet), and the sound of an internal Audio-Technica condenser microphone (usually dry) through the other. Then whoever is at the mixboard can choose either one, or blend whatever mix of the two Bruce thinks appropriate.
This setup is no accident; it showcases his beautiful fingerpicking methods extremely well. His playing style has carved a timeless, unique niche for himself within modern music. It’s pretty mesmerizing watching him too, especially if you’re a player. You’ll spend half your time or more trying to distinguish what tuning he’s in by the strange fingerings he’s forming, and the other half watching his right hand picking techniques which vary but are always technically advanced.
His Dobro has the same mic/D.I. setup. He did specifically, however, install a Telecaster pickup in it which he prefers the sound of for his dry monitor mix.
His electric 12-string, the Fender Electric XII from the late 60’s, is a curious thing. It has a slight droop at the end of the headstock which is a different shape than Fender has ever used on other guitars, so at first I didn’t know what it was!

It looks a little weird, admittedly. But the sound, as witnessed by hundreds of us at the concert, is amazing. This guitar was also made in a 6-string model, the Fender Custom Maverick (thanks, Mark!). Guess how much both of these guitars are going for these days? Well over three grand!
Hey, if anyone deserves an expensive, well-made instrument, it’s Bruce!
As for accoutrements, Bruce typically uses Martin Marquis light-gauge strings and Kyser Quick Change capos. Like myself, he writes songs in alternate tunings a lot, so capo clarity and string intonation are very important and not to be taken lightly.
Like most of us, Bruce uses effects to round out his sound. This concert was definitely no exception. On the floor was a very long string of pedals that he worked quite a bit throughout the show. Though I didn’t get to go up on stage to look, I did for sure see the following:
Bruce engaged all of these during the concert except the Nose pedal, I think. Can’t be certain ‘cuz I was kinda into his playing, ya know?
These pedals are a small part of the reason, but truly, I don’t think I’ve heard more dynamic diversity in any concert ever before. His performance ran the gamut from soft, single=guitar ballad all the way up to his closer which was a Pink Floyd/Hendrix take on his classic song “Stolen Land”. If you know the song, trust me, you’ve never heard it like this! Feedback, guitar noises, loud chord swells… none of us expected it and that was part of the rockin’ charm!
Oh, and it looked like he was running most everything through one Fender amp at the back of the stage. Couldn’t see which model, but it appeared to be a Fender.
The band was great! Joining him on this tour are:
All three of them are featured on the new album. And, yes, John Aaron is Bruce’s nephew, in case you’re wondering.

I was seated by John, the bass player, so I could clearly see his system: two Aguilar bass cabinets with an Aguilar amp on top. Just the bottom amp was mic-ed. Pedal-wise, he had his Aguilar pedal which controls the amp parameters, an “El Nano” LPB1 Power Booster pedal for giving him that little more bite and overdrive, a boosting pedal from Custom Audio Electronics for upping his dBs , and a couple tuners for his two basses.
John Aaron played accordion a lot during this concert, pillowing in the type of chord beds that a synth pad might typically provide. Every once in a while on the heavier tunes he’d play an electric Tele along with Bruce’s electric, and for the final song he even pulled off a little fiddle.
Guess we know what runs in THAT family. 😉
Gary was too far away for me to see what he played exactly, but, though it sounded awesome, it looked like an assemblage of different things put together to give him a specific set of sounds, rather than one cohesive trap set. I’ve never seen a drummer use bells and Buddhist singing bowls as much as Gary did, but it was fitting for Bruce’s material. Gary played on the latest album and incorporated quite a few of these ethereal sounds on the recording, a nice foil to Bruce’s complicated picking rhythms.
I have to laugh too, because Gary has introduced more G.A.S. into my life from his performance. All through the concert he used a crash cymbal that I ended up really liking and wanting by the end of the night. I think it was a B8 Pro O-Zone Crash. Full of big holes. Visually eye-catching and soundwise it sure grabs ya. Must. Have. lol
For those of you that are familiar with Bruce’s compositions AND are gearheads, here is a complete breakdown of what Bruce used for each song during the performance I witnessed:

If you are a fan, I really hope you got to see this tour. Most of his shows were sold out, like the one I went to, and it’s not often that you get to see Bruce with the full band and hear in a live format the dynamic tonal colors that they add to his already moving material.
The tour that ended February 17, 2018 will certainly be remembered as one of his best, regardless of his struggle against “bone on bone” pain in his fingers.
Now he’s back to performing solo. To see where he’s at for the rest of the tour, check here.
If you aren’t familiar with Bruce’s music, I highly recommend you check it out. Many of his songs continue to inspire me to no end. He’s as incredible as a lyricist as he is masterful in guitar technique.
“The Charity of Night” is probably my favorite album he’s ever done. If you’ve never owned a Cockburn album, start here. It’s one of his personal favorites too. And if you ARE a Bruce fan, but don’t have this album…
… order it right now!!! lol
As I said at the start of this post, the music is what drives the desire for the right gear. After witnessing Bruce pull off more stellar interpretations of his material, it sent me back to my own gear, my own instruments, and before the night was over… another song was born.
I think Bruce would agree: isn’t the best use of inspirati0n to create something that will in turn inspire others? Isn’t that what friends are for?
I say, yes.
Are you a Bruce Cockburn fan? Have you ever gone on a quest to find out exactly what a musical hero of yours uses in their gear arsenal? Are you G.A.S.-ing for any gear right now??! Lemme know in the comments. Share the love, friends.
Now, go… make… sounds!
Teaj

In 1995, I saw an ad that stopped me in my tracks. And my recording world would never be the same.
Funny how that ad so long ago has led straight to this AT4050 review.

But before we go there, let’s go even further back… to dear ol’ high school!
I’d been in marching band since 7th grade, and one day a trombone player named Mike let me borrow an album called “Turn of a Friendly Card”.
It was like I’d entered another world. This brass trumpet boy would never be the same!
I loop-listened the cassette tape (yea, i know) endlessly. It was so captivating.
Both the exquisitely arranged, dramatic layers of orchestral instruments, and the lyrics which showed you scenes and people from some Middle-Earth-meets-King-Arthur country castle, took my imagination into a custody it has never escaped from to this day.
Mostly ‘cuz… it doesn’t want to!
The artist was Alan Parsons, and the reason why I was immediately snared by that ad in ’95 was because Alan’s picture filled most of the page.
He was looking us right in the eye, and extending his own hand to us, mesmerizing us into considering one… black… microphone…
 View of Alan
Alan Parsons was the studio engineer for the Beatles’ “Let It Be” and Pink Floyd’s “Dark Side of the Moon”, two albums that loom gigantic in the pantheon of “best albums ever made”.
After that he turned his attention to his own artistry, and succeeded in anointing the 80s with hit after hit using his own hand-picked musicians, which were different for every song, à la Steely Dan.
Through it all, Alan was the lead engineer. The man knows his gear. Decades of it. If he says a product is good, then you must not be using it right if you didn’t get great results. This is why, when he joined with Audio-Technica to put out the ad you see to the right, I knew it had to be stellar.
And just think: he must’ve suffered through months of G.A.S. throughout his career. That poor man. ;-o

The ad ran for a few years and did a splendid job of knockin’ the AT4050 sales right outta the ballpark – right into the sky’s eye!
Today, Alan’s relationship with Audio-Technica is stronger than ever. So much so that, in 2010 when Alan released his “Art and Science of Sound Recording” series, Audio-Technica was the biggest sponsor. I own this series (yes, it’s awesome) and through it all the 4050 is there, in scene after scene, mic-ing some of the world’s best musicians and bringing songs to life with its versatility, clarity and durability.
Audio-Technica has taken this mic to the bank, no question!
Now that you know how respected Alan is, let’s take a look at some of the specs of the mic that he still utilizes to this day.

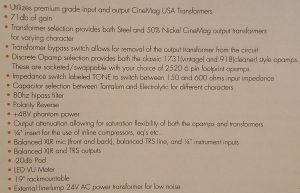
The AT4050, purchased today, includes the following features and elements:
These specifications sound great, but as we know, a mic can have great specs and still sound like… uh, well, nothing pleasant. So let’s sing deeper…
I have used this mic on so many vocals and instruments I couldn’t possibly count them. I love what it does for my voice, which is why it’s one of my top three go-to mics for tracking my vocals.
Recently I did a mic shoot-out here in Schlenk Noyz Studio to put the new Aston Spirit mic through its paces. Shoot-outs are little games we audio engineers like to play where you record the exact same performance on different gear and see how each one delivers. Not only does it provide extremely insightful data that can be used on every session in the future, it’s also… a ton of fun!
If you want to hear the actual sound files from that session to see how the AT4050 fared on both vocals and acoustic guitar (in a word, it still was awesome) then go here.
Suffice it to say that my heavy studio use of the AT4050 has shown it to consistently provide a sound for vocals that really cuts through a pop-produced mix. If I am recording a stripped down piece with just acoustic guitar and voice I will often let my Oktava tube mic warm the waveforms, but even then I still prefer the AT4050 sometimes.
Obviously, we know with any mic that it’s going to suite different sounds better than other. I love the Neumann U-87 on female voices, for example, but on my voice the 4050 sounds better every time. Oh, yea, and it’s thousands of dollars less.
This mic is so adaptable in its quality that no matter what you try it on, I can’t ever see it sounding bad. If you can’t afford the “sell-your-car-to-get-it” prices of some higher end mics, this would be an excellent step in the right direction for you. Most would never know you didn’t use the most expensive, because the majority of the masses don’t have that kind of ear.
Especially if you’re producing tracks with a full band, you really should try this on vocals. Just might become your “secret weapon” of choice.
From bottom to top, I’ve thrown the 4050 on frequencies all along the perceived audio spectrum and have always been pleased with the outcome. That doesn’t mean I use it on everything; I have other mics that I devote to certain instruments because they always flatter. Every mic has a certain “color”, after all, and no one wants the same color every time.
But the point is – I could use the 4050 on everything without fear that I’d get a bad result.
Here’s what I can remember of instruments my 4050 has captured and complemented in the studio:
The only thing I haven’t tried it on is drums, because I already have a large selection of mics for my two kits that I chose deliberately because they are known to drizzle the awesome sauce on drum sounds. The AT4050 can definitely be used for drums tho’, since it has an extremely high SPL rating. Audio-Technica’s site mentions specifically using the mic for drum overheads.

Hmm. I think I’m gonna have to try that soon. 😉
Want another helpful file? You can also hear the 4050 on recordings I made showcasing the new Warm Audio TB12 mic pre (another favorite gear piece of mine) here. Same bevy of mics as the recordings above, but all run through a mic pre instead of D.I.-ed.
If I were, today, in the situation I was back in the 80s, living as a starving artist in L.A. in that little apartment with my band in Reseda, I could have really used a mic like this that can do it all and stand up to the punishment. It’s just proof that you don’t have to spend your college fund to get a mic that will record you in way that sounds great and gets you noticed. I know. I’ve done it.
Well, what more needs said? Obviously, my experience with the AT4050 as a gold standard here in Schlenk Noyz Studio speaks volumes. I love what it does to my voice, and it continues to be in my top 3 mic choices as it has for the last 3 decades.
Combine that with the endorsement of our esteemed Mr. Parsons, and you’ve got a microphone that could just be giving you bubbly G.A.S… RIGHT NOW! Yes?!
Don’t answer me. I already know. ‘-)
Get the amazing Audio-Technica AT4050 right here:

Or, if you’re an Amazon PRIME member, like my family, get with FREE SHIPPING:
When you do, drop me a line and tell me how you’re liking it. Even share a recording. That’s what we do, right?!
Leave your comments below and, as always, if you want some more insight just holler. I could go on about this darn mic aaaaaaall daaaaaaaay….
Now, go… make… sounds!!
Teaj


Rroawg was a cutting-edge cave man.
He always had his ear to the ground, not only to hear if the wooly mammoth’s were stampeding, but also to find out what was ground-breaking, new, inventive.
Oh, sure, he’d had the rock wheel, but that was so… last year.
Now we wanted a better stone roller; one that wasn’t so loud. Or heavy.
“Hmm,” he thought, “maybe it doesn’t have to be stone at all. Maybe… styrene-butadiene copolymer rubber??”
And this, my friends, are how inventions are made. They thrill us! They aid us! They give us pro audio G.A.S., and eventually they lead us… here! The place where we ask Teaj, “So… just what are the best headphones under 100 bucks??”
Have no fears, my comrades-in-ears – we’re all cheapskates to some extent, so let me introduce this current guide to saving a little cash (in some instances, a lot of cash) on studio headphones.
The music scene is constantly evolving (some would say ‘DE-volving’, but let’s not get side-tracked!) and as it does we need to be aware and choose the tools that make us the most effective in the current audio environment.
You wouldn’t let your clients see you using five inch floppy disks for your computer now, would you?
Um, if you would, I have a Mac II that I think you’d really be interested in…

Anyway, in this article we’re going to concentrate on what the current headphones are that really deliver in a studio scenario. The ones you’d use for either mixing or tracking audio.
Studio headphones are unique, and have specific traits that enable us to finish a solid mix or track instruments with a minimum of “bleed”, or sound from the headphones escaping into the mics.
Would you wear your baggy, frayed ten-year-old college sweats out on a date? Probably not the best idea (IF you want to impress your date, that is!).
In the same way, there are many headphones that are far from appropriate in a studio environment when it’s time for serious studio work. So gather up those oh-so-non-professional ear danishes and toss ’em on your sweats in the corner. Time to trade up!
The basic parameters you need to follow for investing in quality audio studio headphones are the following:
Let’s unpack each of those, just to make sure we’re understanding everything clearly, shall we?
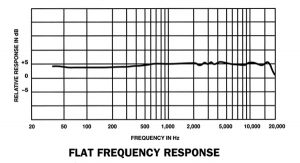
First, for the mixing scenario we want headphones that go from 20Hz to 20k Hz, or beyond, because that is the best-case-scenario spectrum of human hearing.
Most of us don’t actually hear all that because as we age we lose some definition in some areas, especially above 16 kHz.
This also happens when we allow ourselves to be subjected to environmental noise (lawn mowers, leaf blowers, loud & long concerts, etc.) that causes loss of upper register sensitivity as well.
But, still, we want to mix so everyone can hear the song well, including those youngsters with excellent high frequency hearing. For that reason, we want the full human hearing spectrum available in our cans.
If you’re tracking you don’t necessarily need this response, tho’ for bass players and drummers I still give them extended full-range cans so the low bass response is not curtailed.
Flat frequency response is again something desirable when mixing. Headphones with this are not going to cut or boost certain frequencies, or bands of frequencies.
If any kind of audio gear DOES boost or cut frequencies automatically, what we hear becomes ‘colored’; “artificially enhanced”. It’s not really an accurate version of our mix! We want to hear exactly what we recorded, with only the effects that we put on.
Buying flat frequency response headphones will give us that “true” reflection, more or less.
Now, I don’t think I’ve ever seen any piece of gear with an absolutely, straight flat frequency response, but, like you see beneath, several options on this list come reeeeal close.
Opposite that, if you’re tracking you don’t need flat frequency response, but I still like it when I’m playing. Call me spoiled. lol
Closed-back headphones have a membrane that secludes our ears so we are only hearing what is fed into them through the cord; they eliminate, or at least attentuate (turn down), noises that occur in the environment you’re sitting in.
Is your dog barking in another room because he heard the 13 kHz frequency you just played through your monitors, like mine is right now? With closed-back headphones you probably won’t hear it.
Because of this though, they also tend to produce ear sweat, since there’s no air circulation happening. And bass frequencies tend to get trapped in the cup and exaggerated, so for this reason they’re not typically used for mixing, but I’ve still known people that have done it.
Closed-back headphones are also the go-to choice for tracking music, since they help minimize bleed into the mics.
Open-back headphones, on the other hand, lets in a bit of the world around you.
So your basic question must be “Is there a lot of noise I need to isolate myself from where I do my audio work?” If the answer is “yes’, then go for the closed-back option. If not, don’t worry about it.
Most engineers I know, including myself, use open-backs for mixing. Studios tend to be quiet, and open-backs tend to be more comfortable and less ‘sweaty’.
Almost all headphones feel fine when you first put them on, but it’s how they feel, say, after 10 minutes, 30 minutes… AN HOUR, that really matters. I’ve spent days trying to get a mix right, and hours playing to get a tracking session done. Headphones play an integral part in my confidence of my final product. Because of that, comfort over the course of time is crucial.
Finally, a lot of engineers forget to check on the length of the headphones cord before buying, and wind up a little short of their monitoring port. This can be remedied by then buying a headphone extension cable, but… why not get it right the first time? Also, some don’t like coiled cabling (me) and prefer straight. Know your preference and choose accordingly.
Circum-aural headphones fit completely over your ears, surrounding them. Supra-aural, on the other hand, sit on your ears, which can be more fatiguing after a while if the pressure is great. This differs headphone to headphone.

With these criteria in mind, I now give you my top five current picks for dependable, appropriate mixing headphones that won’t break your bank.
They could, however, cause you to be eaten by a T-Rex in a Jurassic Park movie… ‘cuz you’d never hear him coming! But at least you’d save some cash! 😉
If you choose to go the closed-back route, these are ones I see often. They’re quite pillowy and comfortable, tho’, as I mentioned, the sweat factor can kick in depending on the time you spend in them and the, um, animation, shall we say, of the performance.
I know of plenty of studio that have these and use ’em often. They’re a good choice.
I’ve owned a pair of these since the 90s. They’re are circum-aural, meaning they cover the outer ear completely. Because of this, they are extremely comfortable to wear, even for long durations.
Their ten foot cable length always rocks. I’ve never had to buy an extender for these for any client. Love that.
One niggling little issue with them is that their 55 Ohms rating is higher than a lot of other headphones, so you’ll find that you’ll have to turn these UP quite a bit to match the level of other headphones on this list. It’s that minor inconvenience that causes me to not use them as much.
If, however, these are the only ones you’ll be using for a given task, they have a good sound, are comfortable for long periods of time, and because they’re only semi-open, you ears won’t drown in sweat.
These are the least expensive on our list today, and only recently have been touted as a viable option for mixing and monitoring in the studio. They are VEEEEERY similiar to the AKG model, so much so that suspect legal action had to at least be considered, but still… their specs and reputation help them hold the line.
One consideration is that these are the heaviest cans on today’s list, ranking in at over a pound. Doesn’t mean they’re not still viable, but keep it in mind. Weak neck, anyone?
I have not yet seen these in professional studios but home studios around the globe are raving about them, so they must have merit. I plan on picking up a pair myself this week. Once I do, I’ll update this post with more specifics.
This company and these headphones are new to me, but I can’t ignore the awesome reviews theyr’e getting everywhere I looked, especially from people I respect in the business.
The company speaks specifically about working hard on the porting so as to provide excellent stereo imaging and impressive depth of sound. From what I can see, they’ve developed quite a few fans in the last couple years by doing exactly that! No lack of five stars for these puppies.
I saved the best for last. I’ve had three or four pairs of these through the decades and they are still my go-to mixing cans.
I also see these headphones being used in more studios than any other. A good sign of a dependable, workhorse set of cans.
Incredibly flat frequency response, comfortable and light, they have helped me mix hundreds of songs. They are supra-aural, which means they sit on your ears rather than around them (although if you’re a KID that’s probably not the case!).
I only have one negative thing to say about these: after a few years the plastic-y covering on the foam starts to flake off. Common issue. It obviously doesn’t affect the sound at all, but they just don’t look at nice.
If you don’t like finding the little black flakes around, then just buy a new pair. They’re inexpensive, remember?! Otherwise, just keep using them, like I am. Right now. With a mandolin. 😉
So there ya go: five great options for studio headphones under 100 dollars!
Obviously, later, you can move up to more expensive models, as I have, but, hey… ya gotta start somewhere, right? Pick up one of these now and at least you won’t be rollin’ on a rock wheel anymore. lol
Lemme know if you’ve used any of these yourself and what you think. Or if you have questions, throw ’em my way and we’ll find the answers together.
In the meantime, you’re here ‘cuz you need cans under $100. I’ve shown you the best. Go for it!
And, go… make… sounds!!
Teaj


Below my studio… where right now the Warm Audio TB12 mic pre is glowing warmly… is an art gallery.
It’s strewn across the walls of our Master Bedroom downstairs.
The various masterpieces have a plethora of themes, imagery and names:
“Frog Dissection With Worm and Bone”.
“Vortex Birthday”.
“Drago Lava Showers in Wishbone Glade”.
“Mellow Marshie and His Bouncing Arm”.
All of them are classics.
Why?
Because all of them were done… by my kids! Before they were 10!!
How many thousands of these masterpieces have been brought to light due to the rainbow wonders of their ever-ready box of 152 crayons?
Could such brilliant life glimpses have ever materialized without that magic colorful case??
Nay, say I! No way.
So, in the same vein, when you find a piece of studio gear that is as creative and versatile as Crayola’s world, what should you do??
You buy it, dude!!
Warm Audio’s TB12 “ToneBeast” Microphone Preamplifier is exactly that kind of wonderful, and today we shall look up close and personal at how it performs in the studio and catch of glimpse of what the color of fun sounds like.
Let’s do this!
So what W.A. set out to do was take some of the best vintage components of the past, put ’em in one unit, and add additional parameters that provide versatility beyond what the original legends did not have. In this unit they installed the famed Jensen 918 op amp for clean but strong signal transparency and the esteemed 1731 op amp from Melcor that appeared in the 60s for other hues and tones that present a more ‘vintage’ timbre. Both these components have for decades provided the oomph needed to make countless hit records. Now we get it too, but with more!

The unit’s basic architecture is based on API’s classic 312, which has helped to shape the sound of American classic rock music for decades. Like the 312, the TB12 has strong midrange which delivers a strong pronounced sound for whatever you feed into it. Many are saying this is a monster for rock vocals, and I’d have to say I see what they mean, but if you need the softer, cleaner side it has that too, tho’ not as pristine as, say, a Grace Audio piece.
It’s fall here in Michigan so as a November treat I have picked this beauty up to help me track some edgier stuff that I want to have ready for the new year. So far… this thing is delivering the goods with diversity like the color spectrum. Couldn’t be happier.
I’ve never worked with a mic pre that is such a Swiss army knife of possibilities. There are a lot of component options in this here orange box, and whatever notch on the gamut you want to cut or boost, with the TB12 you will find the appropriate subtle or conspicuous option that will take you right there.
There are dozens of ways of toning and shaping your signals in this thing, and I can see years of pleasure ahead, trying out new combinations with new clients, new voices, different instrument decisions. It really is like the Ultimate Crayon Case, and did I mention… I love to draw!
Probably the most pronounced circuit is the one attached to the “Gain” knob. Wow, does that thing snarl! It is the least subtle parameter on board; if you want some serious saturation effects for, say, electric guitar or bass, you will find it here in spades. I found plenty for me even at only halfway dialed in.
We’re not talkin’ digital distortion here; rather, the usable, desirable kind, from early Clapton-y type distortion all the way to obvious rock out fuzz. Can’t wait to add some to my “Van Halen-y” songs!
The output pot makes sure you can turn down the extra dB that the Gain knob produces so you can keep the good distortion you’ve dialed in at the preamp stage without any digital clip nastiness. Very intuitive layout; simple and effective. With this kind of setup, thinking of it like a subtle guitar amp would be too far afield.
Warm Audio’s unit is so versatile, in fact, that some engineers are using the TB12 simply as a saturation generator, for sound designing and as an effects insert during mixdown.
W.A. made sure they used only quality components in the TB12’s construction so this unit could still be giving you stand-out recordings for years if not decades to come. Good to know they’re lookin’ out for us engineers that don’t have a multi-million dollar budget. Thanks, Warm!
Another notch in their versatility belt comes from the fact that they included two insert ports on the back of this unit. So if you want to insert a compressor or EQ in between the op-amps (where your desired tone is created) and the output transformers (which increase or decrease the level to where you want it) you can do so. I personally wouldn’t do any EQ-ing up front since the unit has its own high-pass filter, but I definitely would try throwing an 1176 on there for some subtle awesome compression while recording. Better than a kick in the head, right?!
Okay, here’s a little favorite thing of mine about the unit that I wish all modules and outboard gear had: Each button has its own red LED status light. What’s the big deal with that? I’ll tell you: when I’m singing at the mic or across the room for any reason I an immediately know what I have engaged on this unit with just a glance. Those little lights ROCK!
My other favorite thing? The two transformer options. They really provide such different, obvious shades of useful coloring that it sends the adaptability quotient of this piece right through Wonka’s glass ceiling! My favorite is… well, I’ll tell you soon. 😉
Those that know gear, not only today’s but yesterday’s vintage options, have pretty much unanimously agreed that to get this much versatility AND this high quality of components in one unit at this price is surprising. We all would expect to pay more for what the TB12 offers. Yet another reason why I had serious G.A.S for it for months!
The next best unit that allows this kind of tonal flexibility is the Universal Audio 710 Twin Finity preamp, but the price difference is significant: the 710 retails for $799, as opposed to the TB12’s $599.
So, as usual here on SeriousG.A.S., I have recorded bits of our theme song with the TB12 with its parameters set differently with each pass. This way you can hear exactly how each engaged circuit manipulates the sound. For the best results, as always, play these files through a great pair of mix headphones or through some high quality studio monitors.

First off, let’s listen to the many different ways a lead vocal can sound through this beauty. The parameter change sequence is as follows:
Next, here is a solo synth line I put over the verse chords, so we can hear how instruments fare with the parameter changes. The sequence is as follows:
Could you hear the differences?? I definitely could, sitting here in front of my Event studio monitors. Even engaging the Capacitor Switch that they said would be so subtle made a noticeable change in certain frequencies.
My favorite for the voice would probably be take 8. So rich, thick and chocolaty – YUMMMMM!!
For the synth, it really depends on what else is in the mix, but hearing it alone I do like take 7. If I decided to change the production and rock the song up a bit take 9 added that little bite to the timbre that would be appropriate, since on that take I dialed the saturation up nicely.
Well, I hope you enjoyed that very detailed look into one of the best mic pre options out there right now. I doubt you’ll enjoy it as much as I did RECORDING it, but… I’m sure the joy comes through. ;-0
To sum it all up, I have to say that I hesitate looking at the TB12 as just a mic pre. You can effect sound through this piece to such varying degrees that its almost an effects unit, tho’ not quite.
If you want a clean, clear and transparent mic pre that doesn’t color your sound at all, you can get that by engaging the “Clean” capacitor setting and leaving the rest alone. But if you want to color your sound, to whatever degree you desire, then you’re going to LOVE this mic pre. It has incredible sonic variety, as you’ve heard now in the files.

I personally can’t find any negatives about this unit. Online I only found one complaint, from a guy who didn’t like that the LED level meter was way too bright.
Uh, ok.
Since my racks are to my left and right under my recording desk it doesn’t bother me in the slightest. I suppose, though, if you’re going to have it right in front of your face it might be an issue. Do lights bother you? Didn’t think so.
Thanks again to David Borovoy in the Pro Audio department of Guitar Center, Southfield. Where would my G.A.S. be without him?!!
Final word? Get this mic pre. You won’t be sorry and we can swap pre settings. What could be better?!
Now, go… make… sounds!!
Teaj
(Editor’s Note: Charlotte continues tutoring us for a second time in how to “make a song” today. You guys really liked her first entry, so let’s see what other genius ideas she’s got… this time about the writing of the tune and music!)
Salutations! Charlotte here again. Teaj said you appreciated my last post about how to make a song (read part 1 here), so he invited me back. Thank you for your kindness. I’ll try to be as effective this time as last!
 Today we are going to concentrate on writing the actual music of your song, not the words. The melody of your tune and the chords that back it are your main concerns, and must be there in order to “sound right”. But how do we choose in a world of hundreds of chord and melody choices? What even are those choices? Good questions, and they have simple answers really, at least when you’re starting out.
Before we discover the simplicity of it all, let me catch any fears you might have in my web, roll them up and stuff them in a dark corner. Question not your ability to write music. I’m going to crawl out on a limb (which I do often anyway) and say that composing music is not hard. No, really. You can make it complex if you want, but it doesn’t have to be. So just relax into this lesson with me and by the end… you’ll be cranking out lovely melodies and interesting chords in no time.
Let’s go!
Can you count to seven? You can? Then you will have no problem understanding how to write popular music in this day and age. It is as simple as comprehending where it all begins: the major scale!
The Major Scale has seven different notes. Every song you hear is based on one or more major scale. When we play a major scale we usually also throw in another note at the top – this eighth note is just a repeat of your first note. For example, if we start on the note “C”, our major scale is this:
C – D – E – F – G – A – B – C
Notice how that last note is the same as the first one. It’s a repeat. But there are only, again, seven different notes. That’s all. Easy, right?
The major scale will probably sound familiar to you. One famous song that uses a major scale is the “Doe, a deer, a fe-male deer…” tune from “The Sound Of Music”. I like that show. So many good melodies and lyrics. Some excellent songwriting there, friends.
I want you now to go to a piano or keyboard now and play the C major scale. Keyboards are great for songwriting and learning music theory since you can see clearly all the notes you are playing, and not playing. Start on the “C” note. To find it, locate a group of two black keys anywhere around the middle of your keyboard. There are also groupings of three black keys but we don’t want those right now. Once you’ve found a group of two black keys, the white key adjacent to them on the left is the note “C”. Here’s picture to help:

Now that you have your starting note, “C”, go ahead and play, going to the right, all the white keys, until you get to the eighth note up, which will be “C” again.
Now play it in reverse, going down, until you reach the “C” note you started on.
There! Did you get it? Great. Keep playing that every once in a while until you can do it without thinking. The sound of the major scale should be so ingrained in you that you can sing it, anytime, anywhere.
Some confusion can be found whenever anyone mentions a song having a specific “key”. What does this mean??
Again, it’s really simple. The key of a song is the designated seven notes that you will use in a song. And what do we call those seven notes?? You know. The major scale!
For example, you just played the C Major Scale. If we want to start writing the music for a song, we could use that scale to do so. since the name of the scale is C Major, what key do you think we’d be writing in? The correct answer is… “C”! Whatever your major scale name is, that’s also the name of your key.
Simple, isn’t it?
Here’s a good bit of information to know too, just to round out your expertise on the subject: There are actually twelve different notes total to choose from in the musical tradition of Western Countries. If we counted all the white AND black keys on a keyboard we’d find only twelve different notes. Here is a picture of all twelve, starting with white key A and ending with black key G# (say that “G sharp:):

All these notes are repeated again and again as you go up or go down on any instrument. Once you reach G#, you start over again with “A”. Repeat. Repeat. Up and down. Easy peesy.
When you choose a certain key to write a song in, however you only use… how many of notes, again?? Right – seven is correct. That’s why songs can be in many keys, because we can choose many different combinations of seven notes among those twelve total.
So, this word “diatonic”… what is it and how does it relate to songwriting? Well, it just means “the chords or notes that are specific to a given key or scale.” And how many of those are there?? Riiiiight,… seven.
Seven notes. That’s it. Out of a total of twelve different notes to choose from, a given key only uses seven. And we call those notes the “diatonic notes”. Think of them as “the right notes” for a given key. So, for example, in our key of “C” from above, what are the diatonic notes for the key of “C”?
Just like before, they are:
C – D – E – F – G – A – B
Now the fun begins! It’s time to designate the seven diatonic chords that go along with our key. These will back up our melody and make it sound really wonderful. Chords are a group of typically three or more notes sounded together at the same time. Our major scale we played one note at a time. Chords we play by pushing fingers down simultaneously, so we hear multiple notes, not just one.
To figure out what these seven chords are, we’ll use the formula that is always the same. Any and every key you choose will use this diatonic formula. That’s why writing is easy; there are few rules to remember in diatonic-land. Here is the formula:
Notice that there’s really only two choices: major chords and minor chords. What do those terms mean?
First, let’s examine the MAJOR chord. Emotionally, this group of notes sounds bright and happy. Wanna write something to make people smile? Put a lot of major chords in it. Technically, it is performed by playing a root note, a third, and a fifth. Thus, it will have three notes total. The third is found by counting up from your root note FOUR white and black notes. Then, from your third, count up THREE white and black notes to find your fifth.
Now let’s put that theory into practice for some cool-sounding music! Since we began in the key of C, we will start on the first note, “C”. This is our root note. Put the thumb of your right hand on C.
Now count up from “C” four white and black notes. Play that note with C. You are now playing your root (C) and the third of the chord (E).
Now count up from “E” (the third) three white and black notes. Play that note with C and E. You are now playing your root (C), the third of the chord (E). AND the fifth of your chord (G). Congratulations – you’re playing your first real chord!
Here is what our “C chord” should look like:

Wow. We’re making exceptional progress here. Let’s keep going!
We must now designate the chord built on the second note of our major scale. This will be called our “two chord”. Why? Because we’re building it off of the second note of our major scale. Makes sense, doesn’t it?!
The two chord is always a MINOR chord. Emotionally, a minor chord sounds dark and sad. Depressing songs love minor chords. Think Pink Floyd. Technically, It also has three notes total: a root note, a third, and a fifth, just like before. The difference is our third is a half-step, or one black or white key, DOWN from where it was for the major chord.
That means we will count up from your root note THREE white and black notes. Then, from your third, count up FOUR white and black notes to find your fifth. See how that is the opposite of what we did for the major chord?
Putting that theory into practice, we will start on the second note in our major scale, “D”. This is our second note. Put the thumb of your right hand on this D.
Now count up from “D” three white and black notes. Play that note with D. You are now playing your root (D) and the minor third of the chord (F).
Now count up from “F” (the minor third) four white and black notes. Play that note with D and F. You are now playing your root (D), the minor third of the chord (F). AND the fifth of your chord (A). Here’s what the chord “D minor” should look like:

Congratulations – you’re playing your first real minor chord!
Now all you have to do is continue up the major scale and construct either a major, or a minor, chord upon each of the remaining 5 notes. You will then have the “seven diatonic chords for the key of C”. Here’s a secret for the key of C: your hand will stay in the same shape for all seven chords. Just move up your hand, keeping the same shape, one note at a time and you’ll get all seven chords right.
Make it a point to listen to how the major chords sound bright and the minor chords sound sad. Get to know this difference so you can pick out major and minor chords in songs you hear elsewhere.
When you finish making all 7, you should have, according to our diatonic formula:
Put these chords together with any repeats you want, as many times as you want, in whatever order you want. If you think it sounds good, then it’s right! I recommend having three different chord progressions: one for a verse, one for your chorus and one for a bridge to your song, but you can also just go with a verse and a chorus section if you want.
Once you’ve composed two or three chord progressions that sound good to you, record yourself playing it, with your phone or some other device. Now you’re cookin’!
Next, let’s create a good melody to go over those chords. Play your recording of your chord progression for your verse. If you’re good at improvising with your voice, go ahead and create your melody that way. If you’re not good yet at singing spontaneously, just play around with your diatonic notes (the seven major scale notes) until you have a melody that you think sound good over your verse chords. See? It’s not hard at all.
If you have already written words, then try to sing or play a melody that fits them. If, for example, you want to sing “My baby, he reflects me like the wa – a – a – ter”, then you’ll need that same amount of notes for each syllable, which in that sentence is thirteen. They can be all different notes, or only some different and some repeated. You probably don’t want a melody consisting of just one note over and over because, well… it’ll sound a little boring, ya know?
Remember, just like your diatonic chords, you can play any combination of your diatonic notes to create a melody too. Any! Since those white keys are all in the key of C, all of them will sound “right” in most cases.
As you compose, don’t stress about it either. Enjoy this experience. Who you are right now will automatically let you know what sounds good. If you write tomorrow or next year, your senses might lead you another way. Whatever. It’s all good. Breathe in life. Breathe out music. Breathe in music. Breathe out life.
Keep repeating. 😉
Next, continue playing your recording and create a good melody to go over the chords of your CHORUS section. This melody should be different from what you composed for the verse. This helps give the song variety and keeps people from being bored by hearing the same thing over and over.
If you composed chords for a Bridge section, then by all means create a different melody over those chords as well.
You now either have a completely finished song, or you have composed all your music and just need to put words to your melody and you’re done! Way to go!! Not only do you now know how to compose in the diatonic key of C, you understand why everything fits together, and that’s quite a feat.
 If you’re like Teaj and I, you will find this process so magical and fulfilling that you’ll continue with it your whole life long. Keep doing it and the more time you invest in it the better you’ll get. It’s like anything, right? Practice makes progress. Hmm. I’ll have to spin that one into my web this week!
Thanks for stopping by. Let us know how this and our other articles have helped you, and if you have any questions, as always, drop us a line in the comments section.
Here’s to hearing your songs in the top 50 someday soon!
Now, go… spin… songs!
Charlotte