You hide. You avert. You spin. You distract people from it.
But the truth… will… OUT!
So finally, here I will set the record straight. Let the chips fall where they may. As Sting said:
“If this was all correct
the last thing I’d expect…
The Prosecution rests.
It’s time that I confessed….”
For years, I was too SCARED to mix!!
There. I said it.
At last… my day in court is done.
My conscience is clean. lol
The Daunting Taunts!
There’s no denying it: learning how to mix songs is a huge, daunting task. It encompasses SO much, and it’s less about what you do and so much more about what you KNOW. Much of the time, it can seem like even considering doing your own mix elicits nothing but mocking laughter from the pro audio engineer pantheon of greats.
I know that feeling well. I let others mix my material for years mostly because of respect: I had read numerous books about the top producers and mix engineers in our industry and they were such giants of great audio production that I thought there’s no way I could ever approach their skill level, let alone reach it.
But finally, a few years back, I took the bull by the woofers… ohp, I mean the horns. I decided it was time. I would put the work in to really become an informed engineer and absolutely know what I was doing. Then… my product would tell whether I could claim success or not.
If you’re here reading this, then you probably are in that same moment of decision: “ein neuer Mond der Entscheidung”, as my favorite film “Wings Of Desire” says… “a new moon of decision”.
Well, I’m here to tell you – YOU CAN DO IT! If you put in the effort to really understand what the different elements and decisions you’ll have to make represent, then you will have the power any great mixer has… the power of strong, effective choice.
Being educated about the myriad of decisions to be made in a modern mix is absolutely crucial, though… IF you want to obtain good results. But where can we go to really get the goods and set us up for success??
Well, any cursory glance at the pro audio landscape will show you that there are, literally, thousands of people or companies that claim that they will shape you into a master mix engineer. YouTube alone offers so many “mix experts” it akin to the number of dandelions that want to pop up through my lawn now that spring is here.
Uh, I mean, now that spring is TRYING to be here. But it’s failing miserably. Buuut I digress…. 😉
Land, ho!
What I thought I’d do today is point you in the right directions. I’m going to share with you three mixing resources that I value more than any others. These three truly rescued me from endlessly treading water on the wide, wild ocean of mixing options and brought me safely into harbour after harbour of understanding.
Now, I can sail from Point A (when recording has ended) to Point Z (submitting a final mix for Mastering) with an informed assurance that I will reach the “New World” of a killer mix, without shipwrecks, sickness, mutinies, or abandoning ship.
Unless my wife needs me. Then I’ll have to abandon ship until she doesn’t. lol
The following resources will really give you a firm grasp of what needs to be done, what order it should be done in, and when to say “It’s done!”. I thought of writing my own posts about mixing, but these guys have done such a great job, I could not duplicate their products without Herculean efforts, so… it just makes sense to let them show you the audio ropes!
So let’s set sail, shall we?!
Your First-Class Dinghy
If you are really new to mixing, and will readily admit that you have a LOT to learn, then you’re like a would-be sailor who needs a little experience understanding the water first! Best to get a small dinghy or canoe, and spend some time learning the basics, getting a good grasp on the essentials and how to maneuver within them.
For this, I highly recommend the superb set of videos by esteemed legendary producer/engineer Alan Parsons called the “Science of Sound Recording” series.
I mostly got this set because I’m a huge fan of Parsons. His oeuvre of work speaks for itself, and it shouts, basically, “IN-CRE-DI-BLE!!!”
You won’t find many people who have worked on so many classic albums that still resound on radio consistently to this day. Alan is truly one-of-a-kind.
I can’t say that I learned much that I didn’t already know from these videos from the engineering standpoint. But, saying that, I also come from a long background in pro audio, my most informative years occurring when I worked for Sweetwater Sound, a company long-respected for “knowing their stuff”. We had several weekly seminars and educational meetings to make sure our heads were clearly wrapped around all the ins and outs (literally!) that any audio customer might need help with.
I was, however, thoroughly inspired by the performances, professionalism and ideas Alan presented. Unless you’ve got it all down, this course will give you a bird’s eye view of one of our industry’s icons producing a song, start to finish. This will include not only the mixing stage at the end, but everything before it as well. Because of this, it’s the most comprehensive of all the options I’ll talk about today.
Teaj’s own copy
Now how often do you get to see THAT?!
And speaking of performances, you get to witness some of THE BEST session musicians on the planet laying the tracks down for Alan. If you have any desire to see how Nathan East, Tim Pierce, Simon Phillips, Rami Jafee do their stuff in the studio, as well as hearing interviews from the best musicians, producers and engineers in the industry, like Michael McDonald, Elliot Scheiner, Carol Kaye, Erykah Badu, John Shanks, Jack Joseph Puig!
These days, you get a lot of input for free from YouTube. I totally get that. I’ve availed myself of it times beyond number.
I don’t know if you’d be able to find, however, something this quality and this comprehensive there. I know I haven’t.
So, if you don’t mind investing a bit of coin towards your future in mixing, and you really want professional’s understanding of this art, and science, give Alan’s lessons a try. I spent the cash and don’t regret it at all, and like I said… I even knew most of what he was talking about already!
For more investigation, or to pick it up and start taking in the expertise of a master, GO HERE.
Graduating to a Sailboat
When I first starting using the Internet, I remember thinking, “Man! This could revolutionize teaching. Imagine being able to learn anytime, anywhere, on any subject!!”
Fast-forwarding to today, that prescient thought has been given real terabytes, and now we can learn basically whatever we want, whenever we want, at the click of a mouse.
I’ve tried several tutoring sites and by far my favorite is Lynda.com. Not only do they have an extremely vast selection of topics, but their training courses are not dumbed-down, partial or irrelevant.
I have clicked on (no lie) at least eighteen different pro audio courses on Lynda. I learned so much; I don’t think there was any course that I watched that didn’t provide me with at least a couple insights or ideas that I had not considered before that.
If you watch ALL of the mix-related courses, like I did, you’ll be in a position to be a mix MASTER no matter what song you’re handed. But if you can’t watch ’em all, I highly recommend Bobby Owsinski‘s courses. He knows his stuff and has put together a great overview of everything you need to succeed in a mix.
Also, if your DAW platform is Pro Tools, as mine is, you absolutely can’t go wrong learning from Frank D. Cook. I love his courses! He has such great energy, and his classes are jam-packed with comprehensible but empowering explanations of all kinds of tweaky methods and techniques that will enable you to attack any song mix with confidence and prowess. Don’t leave Lynda without visiting Frank!
Oh, and let’s talk affordability: Lynda.com only charges $25 a month, BUT…. the first month is free. They also allow you to cancel at any time. Put those two together and you now have absolutely no excuse to NOT go immediately there and start learning. Seriously, it’s the best teaching I have found on video, bar none. It blows YouTube away.
So whaddya waiting for?? Go get your degree in sound. Follow THIS LINK to see all her available mixing courses!
Your Ocean Liner of Understanding!
Okay, so those two were an immense help to me when I started doing my own mixing. Now, it’s time to pull out the big guns. I’d like to introduce you to my #1 go-to resource for audio mixing – the one I consult whenever I come up against some aggravating snag regarding mixing technique and need a quick solution. Rockers and rockettes, may I present…
… Mike Senior’s “Mixing Secrets For The Small Studio”!!
I can’t say enough good things about this book. If I were allowed only one resource to see me through the rest of my production career, I would choose this one. If I could only have one book to study from to understand all that I need to be effective in bringing music to life, I’d study this one. If I were new to music production, and needed one “fountain of knowledge” to teach me all the things I’ll need to know in order to become a capable, formidable mixing engineer, I would learn from THIS BOOK!!
Catching my drift yet? lol
Mike has done such an outstanding job balancing audio theory, definition and technique in his ambitious achievement. That’s the most impressive thing to me. Being a private music tutor, I know that teaching is certainly not everyone’s gift; just because someone can DO something well, doesn’t mean they will be able to TEACH it capably. Mike obviously has a gift for teaching, and this book proves it.
Teaj’s copy, with notes!
And lemme tell ya… it’s about time for something like this. I have read some pretty dry and, in the end, exhaustingly useless books in my time (many because I HAD to in college). They spend way too much time describing what something IS but never do a good job telling us HOW to use it effectively. When you’re in the studio with the goal of finishing a song for release, it really doesn’t matter what a piece of gear is called, or the theory behind it – you just need to know how to employ it to make the song ROCK!
Mike knows how to do this and has created what I consider THE final word on the subject. He is so good at getting to the real point we all want covered: “How the heck do I use this thing to make a great mix??!!!”
This book stays right below my main guitar amp, just down a bit on my left side, right next to my main work area. I don’t have to consult it much anymore, but I know if I ever AM in a pinch, “Mixing Secrets…” will probably, quickly, get me out of it.
The only thing this extraordinary tome won’t help you with is working through functions, or malfunctions, that are related to your specific DAW. If Reaper is freaking out, that’s a Reaper issue. If Cubase locks up, you’ll have to call Steinberg. If you can’t find a certain tool in Pro Tools, then Avid is at your beck and call. If it’s DAW-related, contact your DAW manufacturer. If it’s method or technique or tool-understanding-related however, Mike’s got yer back!
The Journey of a Lifetime
Mixing really comes down to two things: knowing what needs to be done next, and secondly, knowing whichbutton, slider or option will accomplish that next thing. The first is simply audio engineering. The second is knowing your own particular DAW inside and out, so that no powerful tool is hidden from your deft, hit-making hands.
With those two pieces of knowledge boundlessly understood, there will be no stopping you on your great, successful adventure of an audio lifetime. New horizons of song accomplishment await you, and knowledge is your motor.
So grab those resources I shared with you today, study your DAW aggressively and go get what’s waiting for ya… progress, triumphal achievement, and a whole lot o’ FUN!
When I look back at the many drum sounds I’ve encountered while performing and studying music, I have to say that the 80s produced the most wide-spread variety of drum sounds and approaches out of all the decades of recording.
There was something in the water, I guess, back then – every engineer and producer seemed to want to try to make the drums sound different than they ever had before.
Gated drums; flanged drums; Simmons drums; MIDI drums; Roto-Toms… the list of twisted drum methods went on and on.
Not that I’m complaining, mind you. That era gave us some unforgettable, shining moments in percussion history (“In the Air Tonight”, anyone?).
But since then, and even during that time, one thing kept happening behind the scenes that many who start recording drums forget to address: the tuning of the drum heads!
If you’re learning how to record at home and want your drums to sound as killer as possible, you must spend the time choosing the right heads that will complement your sound, and then tune them appropriately as well. It will make a big difference in the quality and creativity of sound you get in the final mix.
Wanna know why? Thought you might… !
Why tune?
So, why should we tune our drum heads before a recording or an important gig anyways? Is it really that important??
Yes. Yes, it is.
Now, don’t get me wrong – I’ve played with others before, without fine-tuning my kit from the lugs up, but… they were usually just jam sessions. If it’s a paid job, we want to sound our best.
Here are the main reasons I’ve found to consider your tuning before each gig:
A musical, cohesive kit sound
Choosing appropriate pitch options
Removing unwanted pitches/overtones/buzzes
Getting more, and better, gigs
These four basically come down to one principle: everything we play sounding, at all times, professional. We all want that, right? Having a kit that sounds cohesive, and musically complementary to the gig and songs you are playing, will get you a lot of the way there.
But there’s no one way to tune a kit. One thing, however, is certain: most drum recordings we’ve heard were strategically tuned for the particular song or project; rarely is a kit spontaneously recorded while tuned in random, non-related pitches.
So if you just set up your kit and play, tunings be damned, you’re gonna sound, at the best, a little amateurish in your tone.
And for good reason: for quite a few decades now, our ears have become accustomed to a drum kit being tuned certain ways. We’ve all heard thousands of songs in our lifetimes, and in most of them we’ve heard drum kits that contain tunings that are very specific, thought out, and meticulously adjusted for the recordings.
No wonder, then, that playing or recording a kit with no tuning preparation will leave your audience kinda goin’… “Meh.” Not the reaction you’re going for, I’m sure!
But won’t advanced technique win the day every time over drum sound??
In many cases, no. Your technique might be amazing and flawless, but any of you who have recorded drums in a studio setting know that drummers are not often called upon for really advanced techniques.
Instead, they’re called upon most of the time for tempo consistency, serving the song with the right simple groove and having a drum kit that sounds really good when mic’ed up.
Tuning our drums makes that last criterion come alive, and puts us as players in that upper echelon… the meticulous ones who do all it takes to sound amazing for every session. And that, my friends, is what gets us those magical dreams-come-true… called more gigs!
So just commit to yourself right now to do it; fine-tune your kit for every performance. To do this, you’ll need to factor in right now tuning time, in addition to your usual load-in time. If you don’t plan for it now you’ll forget, so PLAN IT NOW.
Do this and you’ll always be ahead of the game, and you’ll receive glowing reviews from the people that matter: your fans, and your sound mixers.
Isn’t It Good, Norwegian Wood?
Let’s now look at specific ways to tune your drums. The first I like to call “tuning to the wood“. This is a matter of finding the RESONANCE of whichever specific drum you’re working on and dialing the head in to that pitch. In this technique, you’re letting the drums themselves dictate the tuning.
Think about it: drum manufacturers go to great lengths to produce drums that have a good sound. There’s a “sweet spot” for each drum that will make it sound great when set up properly.
Much of this has to do with installing and tuning a drum head on it properly.
Do you know what the inherent good news in that is?? It’s that you don’t actually have to have a kit worth several thousands of dollars to produce a recorded sound that worth a million bucks!
If you take the time to find each of your drum’s innate resonance tones, they’ll sing like Pavarotti, and give you as much drum as you want in the mix without being buried.
(Oh, and as an aside, if you haven’t discovered my article on drum heads and their importance yet, I highly suggest you take that in. You can’t think about how to tune a head before you actually choose which head to get! So read about that HERE.)
So, each drum, based on its size, and material, has its own innate resonant frequency – the specific frequency where that drum will sound the loudest and ring the longest. Where that tone is on the Hertz scale is based purely on how, and with what, the drum was made.
The way we find this is by gradually increasing the tension on a single drum head (the other should be muffled or not on yet) until the clearest, loudest and most sustaining note is found. This is where the drum naturally sings – you’ll hear it.
(One more aside: if you’re really new to drums and need a step-by-step on how to do this, my friends at TunaDrum will walk you through how to put that drum lug wrench to perfect use. Find them HERE.)
If you then tighten the lugs past this specific resonance tension, you’ll notice the sound power and sustain then decreases again. That means you’re moving away, higher, from the drum’s natural resonant vibration.
Do you want your drums to sing with their best voice? Or would you rather they stay choked off? Muffled? Strangled?
Obviously we want to bolster the best out of our kit, so find the resonant tones of your drums. It’s a crucial first step to an impressive final tuning that will sound amazing in the context of a tune!
Song Sung Tuned
So, should we always tune a drum to its resonant tone for every gig or session?? Not necessarily. Every decision we make concerning our drums should be done for musical reasons, not just convenience or cost concerns.
One context for not using the resonant tone method is when we want our kit to tune “to the song“. This is usually done when the drummer, or the tracking engineer (or BOTH!), are hearing that the kit is not musically gelling very well with the other tonal instruments, like the keyboards or guitars.
This is usually because the key that the song is written in is “dissonant” with the tuning of your drums. That just means they clash, i.e…. they don’t play together nicely!
The easiest way to do this as a drummer, even if you’re not up on musical scales, tones and such, is to simply ask the keyboardist or guitarist “What key is this in?“.
\Then, use a drum tuner (lotsa brands out there, just pick one) to match your drums with the key. The key will either be MAJOR or it will be MINOR.
To the left I’ve added for you the breakdown of the three notes (or “triad”) that outline the main chord in each key. Use your drum tuner to match accordingly.
For example, if the song is in “C” (major) then I would tune my toms to the notes in the Chord 1 column: “C“, “E” and “G“.
Whether you tune those pitches ascending or descending (i.e. “C” on top, or bottom) is up to you.
I would probably put the “C” on the lower tom and outline the chord so it’s ascending. But descending might sound interesting too. As I say in the studio all the time, ya never know ’til ya try something, so don’t be afraid to experiment.
Just do your fiddling before the session, because we all know time is money, & no one’s going to want to wait while you guess your tuning – they’re ready to play!
As for the snare, you can choose whichever note of the three you like to match. OR, as I often do, make it a different pitch of your choosing to make it stand out.
For me, it’s all about the song, so I’d try higher and lower pitches to see which one suits the song best. Remember, your snare is your kit’s “soloist”, so its voice must be impressive and complementary.
Your higher toms and snare are the most important. The bigger toms have such lower pitches that they typically don’t interfere as much.
It is not unheard-of in pro studios for the drum kits to tuned to match the first song of the session. Each tom and the all-important snare are tuned to sit perfectly in the key of the song and bolster those pitches for added “oomph” and power. Then, when the next song drops, they adjust from there.
In fact, according to my friend Ross Garfield, whose drum cartage and supply company “Drum Doctors” revolutionized L.A.’s drum session scene in the 80s and is still going strong today, some producers have even called for several drum sets, all with different timbres and tunings, to be delivered for one recording session.
THAT’s how important it was to match the song’s overall vibe.
For the full, SO-insightful interview with Ross, CLICK HERE.
Now, if successful music moguls making millions are doing this… shouldn’t we change our tuning once in a while, to complement the songs we’re playing on?
The short answer: uh…. DUH! Yes!!
He’s A Math-ic Man, Momma
A third way to tune your drums, which is not prevalent yet but is on the rise thanks to current technology, is “tuning to math“.
This approach takes the Hertz frequency scale into consideration and spreads the drum tones out in a spaced spectrum based on how many drums you have.
It’s the most scientific approach to getting a good drum sound, and those with an analytical bent will probably gravitate towards this one naturally.
You will need a drum tuner for this approach, since you’ll need the numbers on the pitch readout screen to match the tuning graphs.
If you use this method, remember that the more drums you have, the smaller the intervals need to be, pitch-wise, between your toms.
The absolute best example I’ve seen of using Hertz mathematics to calculate the pitch positioning of drum heads is done by our friends at “TuneBot”. Talk about having it down to a science!
If a more calculation-based approach floats your rhythmic boat, you’re gonna love their charts and info. I couldn’t do it better, so just follow their comprehensive primer HERE.
This approach uses musical intervals, just like our previous method, but it doesn’t concern itself with matching any particular song. It just spreads the kit out evenly and makes sure it sounds great all by itself.
I personally might use this method to start my tuning, but since everything should be about THE SONG when recording, I’d definitely change it if it clashed in any way with the key once we’ve started run-throughs after set-up.
No Jimi Hendrix in the Drum Room Please
I love Hendrix. His skill. His showmanship. The way he brought feedback to the forefront of guitar playing. Amazing.
But in the studio, I find feedback to often get in the way of a good mix, especially regarding drums. Perhaps you, like me, have found yourself bothered by these things:
too long of a resonance ring on the toms
too loud of an overtone on the snare
snare wires buzzing when a certain tom is played
‘sympathetic vibration’ of another drum
These are all things that we usually can fix by changing our tuning. It’s a trade-off tho’, because if you fix one of those problems by changing your tuning, you will probably lose the perfect resonance of one or more of your drums.
So should you just slap a gate on the offending drums instead?
Maybe. It depends on what’s more important to you as the tracking engineer/producer. Your job is to get the very best sound out of those drums for the song at hand.
So, put on a gate. Does that improve the sound within the tune? Or, instead, change the pitch of the offending drum. Does that improve the sound within the tune better? Or worse?
As with everything, (why yes I will say it again!) it’s all about the song, not the drum. So only make, and keep, a change that makes the overall song sound better. Otherwise, you might as well just be recording a “solo drums” record!
If you work with (or ARE) an engineer who prefers keeping the drum tunings the same on all tracks, song to song (what I don’t advise), then sure… set your tunings the way you like and make sure you’re monitoring that they’re staying that way throughout all the recordings.
I will say, though, that if you choose that ‘easier path’, you’re missing out on some wonderful opportunities to foster incredibly pleasing, symbiotic interplay between the drums and the other tonal instruments.
Especially considering how the overtones on drums ring out, the potential for impactful, congruous washes in your room mics, IF you tune to the key, is quite high.
The last thing I’ll say about tuning to overcome noises and unwanted ringing is this: most of the time in the studio, I don’t have to bother the tuning at all for this. It’s called “Moon Gels“, baby. Buy these… problems solved!
Calling the Tonal Shots
I have great respect for talented drummers. I know many who are far better than I at the skins.
But in the studio, here’s what I find: very few of them are well-versed in the intricacies of software recording, mixing, mastering… and specifically, what it takes to make drums sound AMAZING in a mix.
Unless you have years of experience actually recording and mixing your drums in the studio, always defer to your tracking and mixing engineer. It’s their job to make you sound as cool as you possibly can, and they probably know their studio tools (compressors, transient designers, limiters, reverbs, gates…) way better than you do.
Take a moment after the first run-through of the song to ask, “Hey – whaddya think of my tuning? Is it complementing the song well?”
Do this, and not only will any problems be addressed and the recording improved, but the engineer’s eyebrows will raise in amazement that a drummer actually asked that question and they’ll forever think you are the bombest of the bomb.
Oh, and you’ll probably get hired again. That can’t hurt either. lol
Stay Tuned!
So, that’s what you need to know about tuning drums. From here, you can go make the type of killer recordings legends are known for… at least from the standpoint of how your drums sound.
As for technique, consistency and groove, well, that’s up to you… and the woodshed. 😉
Stay tuned for more intriguing glimpses into studio & concert life here at Seriousgas, and let us know in the Comments how these tuning techniques work for you, or ones YOU use that are different.
Today’s post comes to you from ‘musician country’ – Nashville, TN!
Almost every year I hit this city, taking in its great musical heritage, learning from its storied past and present, and investigating new ideas, contacts and relationships to help my music forward. It helps to have relatives here too (thanks, brother Steven)!
This year my son Caden is with me, and his friend Tyler, since they’re both on spring break from school. We’ve travelled from Michigan, hitting several musical friends of mine along the way, with whom I do music online. It’s great actually meeting them face to face, not to record but just to hang out and invest friendship which, after all, is more important than music. One of the few things! lol
Mixed in with all our usual luggage and personal items is my G.A.S. Emergency Kit! These are things I must have when traveling, in order to “light the fire”, “stir the pot” and spur me to create new music whenever the opportunity arises.
Now, if you’re here because you were asking yourself what to take on vacation, regarding all the normal stuff, sorry to say your answer’s not here. But if you’re a musician and/or songwriter… well, then check this out – perhaps you relate…!
Happy Guitar Traaaaaaails to You….
Do you have a travel guitar? Have you ever in the past?
If not, I highly recommend to you to get one. Blame it on your G.A.S. Blame it on me. Just do it. It’s sooooo helpful and inspiring, and perfect for when you only have so much room for what other people might consider “non-essential items”. If you’re a guitarist and travel at all, you want, no, you neeeeed… a travel guitar.
Grabbing my Yamaha JR1 before departure!
I personally go with the Yamaha JR1. It’s not marketed as a travel guitar, but rather as a “reduced scale” acoustic guitar for kids.
I find though that it’s just the ticket for getting that “real acoustic sound” (since it is one) in a compact unit. Its spruce top makes for really good top plate resonance and gives me a sound reminiscent of my bigger “adult” guitars back home.
Its dimensions are 33″ long x 12.5″ at the widest part of the body. In its cloth case, this guitar is small enough to fit in the overhead compartment of a plane. It’s also great for driving, since it’s tiny size allows you to fit it easily in anywhere with your other luggage pieces.
Now, you can get other travel guitars that fold up, if you need something even smaller. than the JR1. There’s electric models, other acoustic models, some with hollow bodies, solid bodies… NO bodies! Some acoustic and some you’ll hear only through headphones.
“You want to bring… THAT… on the plane?!”
A myriad of choices, but they are all designed to give you something to shred on that won’t make the airlines rep give you that frowny face.
Yea, you know the one I’m talkin’ about.
For me tho’, the JR1 is the perfect musical travelling companion. And I’ve written maaaaaany a song on it.
Obviously, don’t expect this guitar to give a booming low end. It’s too small to shake the foundation!
Also, I find the strings closer together quite a bit, so when I fingerpick I have to adjust my placement. A subtle but noticeable difference that you’ll have to deal with if you fingerpick as I do at times.
If those two things are acceptable, then you’re good. Give a travel guitar a try. I don’t think you’ll ever go back once you experience how many songs you’ll produce while seein’ the world!
By the way, it doesn’t have to be just for travel. I keep my JR1 in my living area downstairs from the studio and if I have a quick idea I grab it and record on my phone. Never let an idea get away again!
I’ve recorded with this guitar too and gotten a really good final product, though the EQ will differ compared to your typical acoustic. To be honest, it actually sits in the mix better than my bigger acoustics sometimes, especially if in a mix with bass and keys. I don’t have to dial out any bottom end!
Yamaha did a nice job with this one, and tho’ it’s meant for kids… this adult turned out to be a fan!!
In Good Shape-o With a Capo
Let’s face it: if you write in the same keys all the time, no matter how good a lyricist you are… you’re gonna start sounding the same. No one’s music should be boring. We work too hard on these songs, right? So mix it up a bit and use a capo.
The Glide Capo rocks… and rolls!
If you haven’t delved into Capo-Land before, you’re in for a treat. Basically, you can change the key you are writing or playing in by just putting the capo on the appropriate fret. If you’re playing open chords in C, for example, if you put the capo on the FIRST fret, you’d be increasing the key by one half step, putting you in C# or Db. The SECOND fret would increase the key by one whole step, putting you in D, etc.
When writing it adds so much variety to your songs. If you just put the capo anywhere on the neck, you’ll be sounding different than if you play only your regular open chords down by the nut.
I also find my melodies sit differently when I put the capo higher on the neck, because fundamental frequencies of the guitar strings (80Hz to 330 Hz) are now higher, and therefore they interact (and sometimes even interfere) with my tenor voice (80Hz to 330 Hz) more. All that just means… you’ll create differently, and that’s always a good thing.
Guitar capo on fret one
There are a large number of artists that write with capos. The one that springs to mind immediately is Paul Simon. When I was first learning guitar I memorized a lot of Simon & Garfunkel tunes. Most people know these tunes and sing along with gusto when they’re performed. Plus they really force you to have your fingerpicking skills down pat.
James Taylor, Phil Keaggy, Joni Mitchell… heck, even our modern songwriting wiz-kid Taylor Swift slides her capo on all the time. They’re out there if you’re looking, so keep your eyes open.
When I’m on the road, my capo sits in the top shallow pocket of my backpack, right in with my phone. That way it’s always within quick reach if a song idea is at my fingers.
Multiple capo madness!
You can also get really creative and use multiple capos for songs. Phil Keaggy does this. Trying to figure out his material is, because of this, is really hard! I often have to look up videos of him playing to figure out how he got ‘that sound’, only to see… it’s two partial capos placed at different places on the neck. What a trickster!
I have at least 8 different capos to choose from, but when I travel I almost always grab my Greg BennettGlider Capo. I have two of ’em and they work great. They have the added benefit of being able to lower or raise song key by just sliding the capo us or down, without having to take it off. Great engineering there.
So, to keep music fresh and challenge yourself to explore new territories, always throw a capo in your bag. You just never know how your music might groove in new, exotic keys!
Whistle While You… Play?!
I travel with a penny whistle, and as Lindsey Buckingham put it, “I’m never goin’ back again!”
For those that don’t know, a penny whistle is mostly widespread and known for its contributions to Irish folk music. Am I Irish? Nope. My ancestors had their feet solidly south on the European continent, but that doesn’t stop me from really loving to play this exuberant, expressive and contagiously exciting music style!
Practice makes… Irish!
I first became acquianted with Irish folk music through the violin. I was getting a bit tired of only playing classical, so I bought a small book called “Irish Tunes” to throw some diversity into my practice times. Little did I know what awaited me. Within a day of trying it out I couldn’t get enough. These songs are so much fun to play, I just kept wanting to learn more and more!!
But these songs can also be extremely tricky, mostly because of the breakneck speed at which their played a lot of the time. I noticed that on a lot of the tunes, there was this high-pitched flute-like sound that really brought the joy out in the music. A little Google research divulged that the penny whistle was the maker of these bright, happy lines, so I decided to get one and try it out. HAD to be easier than fiddle technique, right?
Well, as soon as I got it (all the way from Ireland, no less!) I was hooked. What a fun instrument. And what’s even cooler is it can stay right in your pocket no matter what you’re doing and at the drop of a shamrock… boom! You’re friends are dancing jigs around you!
The next thing I discovered was that authentic Irish music could be learned online by a really killer website called “The Online Academy of Irish Music” (www.oaim.ie). I’ve learned a lot of great songs with the penny whistle teacher there, Kirsten Allstaff and had a blast practicing these wickedly uplifting little ditties.
One vacation departure day I was really wanting to finish mastering a tune called “I’ll Tell Me Ma” so I stuck my whistle in my backpack. That vacation I discovered just how easy and cool it was to able to pull out the whistle and bring a smile to my family’s face by playing one of the hundreds of lilting, sunny melodies Ireland has produced with this instrument.
Traveling’s never been so happy. 😉
Astronaut Catherine Coleman takes her Irish flute & penny whistle everywhere… even SPACE!
For the record, I play a “Tony Dixon” penny whistle. You can get these in the key of “D”, as I have, or the key of “G”. Those are the two main keys used in Irish music. I find Dixon models to be aligned well for good intonation, tho’, like all wind instruments, you will have to lip up or down occasionally.
By the way, did you know that it’s whispered that soon, if we all call the tune, that the piper will lead us to reason? I think he’s using a penny whistle…
To Record, or Not to Record… There’s No Question!
Micro-cassettes, recorder & hundreds of song ideas!
There was a time when capturing a new song was not as easy as today. Over the course of my career, I’ve purchased digital recorders, several micro-cassette recorders, and even (goin’ way back) a portable cassette recorder, just to be able to capture songs as I come up with them wherever I’m at.
This is crucial, especially when you’re beginning to write songs, because your mind will not always remember what you came up with days ago… or hours ago… or sometimes MINUTES ago!! No matter what, I always record my ideas. Great songs are not easy to come by, so I don’t wanna lose one potentially just because I was too busy putting gas in the car or doing some other mundane task. SO not worth it.
But these days… we’ve got our smart phones, people! No extra device needed. Got an idea? Speak or play it into your phone. Then, just download it later into the computer.
Many times, like on this vacation that I’m finishing up here, I finish the song completely with just my phone. Early this week, for example, I hummed a new melody into the phone as I was driving a long distance. Then, playing it back through the car system via Bluetooth, I came up with the words to the Chorus. Then the verse. By the time we arrived at Mike’s, a keyboard player I like to work with, the song was all done except for a third verse.
Not a bad bit o’ progress for 201.4 miles. 😉
The End of the Road
So there ya go – now you know what to take on vacation that really matters! It doesn’t take a lot, but it can sure make a lot.
As I conclude this post, I am also concluding my vacation. We had a great time in Music City, as well as other towns, and I come back with three new songs in my arsenal. I still have to flesh out all the verses lyrically, but everything alse is there, thanks to my G.A.S. Emergency Kit items!
Crack open some new music on the road!
If you haven’t tried writing or rehearsing while traveling, I hope this article is the impetus for you to give it a try. A couple songs I’ll be releasing soon on my new albums are ones that were written while traveling… one even while on vacation!
If you already write while traveling, what gear do you take? What songs have you brought to life successfully because of it? We’d like to hear, so share in the comments!
In the meantime, as I unpack my luggage AND guitar, go… make… sounds!
It shouldn’t have happened. It should never happen. But it does.
Tho’ it’s not a pleasant topic to discuss for those of us that appreciate, respect and take great care of our music gear, occasionally the unthinkable happens and we are parted from our dear investments.
For me, such a separation occurred in my early 30s. In a groovin’ corner of my brain, a tone-rad’ 1962 Fender Stratocaster is still wailing out, so much so that I still almost look for it at times in my studio when I’m wanting that… certain… sound.
There’s never been anything like it, and I doubt there ever will be. It was, by design, unique; a one-of-a-kind; a singular reflection of my tonal aspirations that has never been equaled.
Why? How did we get separated?? Well, that takes a little ‘splainin’…
Come & Listen to a Story ’bout a Man named… Teaj
Halfway to L.A.!
When I was 19 I moved to L.A. It was sudden, it was starry-eyed, and, to many, it was stupid.
I’d finished my first year of college in Indiana, and I’d started and finished another sophomore year first semester in Michigan. In fact, I had a full ride scholarship because of my vocal abilities at the local college, which is why some thought I was “mucho loco” to walk away from that.
But I had heard the call and there was no going back: my 1st year college roommate in the Valley called to tell me there were a couple job openings at a local record company. He also threw in that if I lived there for one year I’d become a resident and my college cost would be, for 12 credits, less than $500 a semester.
Teaj’s L.A. band at a Pismo Beach gig. Notice the ghostly Strat in the back!
DOH!! I had paid the previous year almost four times that!! Where’s my luggage?!!
I did get the job at the record company, did start school at C.S.U.N. on the cheap after a year, and on top of that, my new best buds Matt, Kenny, Chuck and I formed a band. Life was economically tough, but otherwise… good!
Because of the now ongoing writing, jamming and rehearsing sessions though, the severe limitations of my first electric guitar were soon pretty obvious. Bad intonation; the lack of a whammy bar; bad intonation; tuning pegs that slipped; bad intonation… well, you get the idea.
Enough already! It was time for a serious axe.
The Skill & Smarts of Valley Arts!
Moving to Los Angeles meant getting serious about my playing future, so I did something I’d never done up to that point: I took lessons. Previously I’d always taught myself whatever I wanted, or, if a capable friend already knew it (Brian Stout, I’m looking at YOU!) I’d learn from them, which of course was a lot quicker.
One of the best music stores around if you lived in the San Fernando Valley as I did, was Valley Arts Guitar. At the time, it had an incredible reputation as THE place for guitar instruction and quick, solid repairs.
Many, many top players would hang there, usually in the hidden repair rooms, because of its commitment to quality and being so plugged into the real needs of pro session guys, like Tommy Tedesco, Duane Eddy, Steve Lukather, Lee Ritenour, Robben Ford, Larry Carlton, Mitch Holder, Mundell Lowe, Al Viola…
… and now? Little ol’ me! lol
I began taking lessons there from Lindsey Blair, an exceptional player that had been playing since he was 10, getting paid gigging since he was 11, and was actually from the Midwest (Indiana) just like me. Check out his website HERE.
He had just gotten off a long tour with Maynard Ferguson when I started with him so his chops were burnin’, baby! Interestingly, I had just seen Maynard in concert a year before so I probably had already heard Lindsey in action, without knowing it. Talk about fate!
I immediately could see was leagues ahead of me in fretboard understanding and technical skill. This was exciting, as I knew I’d be learning and becoming a better musician quickly with his guidance. But what was an even bigger blessing… was his offer!
The Strat that’s All That!
Lindsey could probably tell I was a total L.A. newb, and didn’t have a lot of cash since I’d just arrived, just bought a car, just gotten my first apartment, just enrolled in school, yada, yada, yada…
In spite of that though, I really needed a decent guitar.
Lucky for me, it just so happened that Lindsey had an old guitar, a stock ’62 Fender Stratocaster, that he didn’t use much anymore. It needed just a bit of work, mostly just re-soldering a short in the cable jack. That was a quick and easy fix I knew.
My receipt from Lindsey!
He offered to sell it to me within parameters that enabled me to actually pull it off:
The price was low
I could give him payments instead of all the money all at once.
I take good care of it
Obviously, I was ecstatic for this opportunity. I had come into Valley Arts hoping to get a good education. I left with so much more. Lindsey had provided me not only the technique I needed to succeed, but the right tool for the job as well.
Before the upgrades
Could there have been more of a God-send at that moment in my career?!
I think not. Lindsey, I am forever a fan – YOU D’ MAN!!
So that’s how it happened – that’s how I took a really wonderful, solidly-built ’62 Fender Stratocaster off of Lindsey’s hands and it became my own.
Lindsey was obviously helping me out in a big way. I’m still inspired to think of his assistance, and to know that there are people like him in the world that, instead of taking advantage of those less fortunate, help us out sacrificially instead.
So not only did I now have a really quality axe, but I was playing one that had all the skilled vibes and “spirit” of a professional touring musician. Heck yea!!
It had a much different sound that I was used to. The only electric guitar I’d had up to that point was a cheap Les Paul knock-off, so tonally I was in a whole other world. A good world though!
Soon I was using the 5-way switch to dial up specific tones for different parts of songs and making the most of my new friend. I liked how it felt too. The curvature of the body in the back was really sweet – not at all like the flat, cut-into-your-ribs shape of the other guitars I’d played.
But how about those repairs?
Ninow, Not Later!
I showed my band my new (used) guitar and told ’em it needed some small repairs but would have to save up for the repairs. My drummer, Matt, immediately hooked me up with a colleague that he worked with at “James Tyler Guitars”: Robert Ninow.
Robert Ninow, Guitar Surgeon dude!
Robert was the bomb. Totally hip, laid-back, rockin’ cat who knew his stuff when it came to repairs, construction and evolutions of guitars. In fact, he’s still at it to this very day! Check out his website all about his guitar shop HERE.
He and I talked over what repairs were needed, but also he steered me into thinking about what kind of sound I wanted the guitar to provide. I hadn’t really thought of that before, so he opened my ears up to new potentials that started me down tonal paths I wouldn’t have been aware of otherwise.
Together we landed on the way to not only get the Strat in perfect working order, but also to upgrade it to a more “current” sound so I could be relevant to the music scene there at the time.
I was so stoked! Soon I would have a guitar that could bring forth a killer sound, totally on par with what was hot at the time, and still have money left over to buy my mac ‘n’ cheese dinners for the week. Wha-HOOO!!
Robert also helped me out, like Lindsey, by not charging me those high, industry-standard prices for the renovations, which I in no way could have afforded then. Kind souls. They are both such kind souls.
I saved up the money after the components were decided upon and soon after made the purchases. Then, one day after working at the Tyler shop all day, Robert was ready to fire up the ‘laboratory’ and make this singular “Teaj version” of a Frankenstrat. Here’s what we did…
“Give my Creature… LIFE!!”
The neck was a bit baseball bat-ish for my taste, so Robert replaced the original Fender neck with a Schecter neck. It felt much better to my hand, not so deep and beefy into my palm. I felt like I could slide around the neck faster with the Schecter.
Transforming the beast!
Next we replaced the original Fender pickups, which I wasn’t that big a fan of, with the latest fad of the mid-80-‘s… the EMG pickups!!
Seems like, at the time, everybody was getting into these pups. We all knew Lukather from Toto was sporting them, along with his ENORMOUSLY expensive Bradshaw rig. I could only dream of his outboard gear, but at least I could approach his approach with the pickups!
These particular EMGs were the SA/SA/81 pickup set. The rail bridge pickup absolutely ROCKED. I loved that sound. What a great solo tone resounded when I pushed that switch down. BAM!!
Teaj’s ’62 Strat EXPOSED!
The other two single coils were quite usable as well, especially the neck position. I could still chicken pick or get all funky with the low frequencies cut for clarity anytime with these new transducers.
This totally new pickup set allowed me to be current and trendy (a la the sound that was all over the airwaves at the time) but, in combination with my Mesa Boogie amp, forge a unique tone all my own.
Teaj’s newly upgraded Strat’ – KILLER!
When it was finally put together, it looked so different, but still felt so right. The shape of it against me as I played was still the most comfortable I’d ever come across, but now the sound and look of it from the front was completely modernized, unconventional andtotally unique to me.
Radical!
I still remember how different it made, not just me, but our whole band sound. To say it took our sound up a few levels would not be an exaggeration. Those of you who have swapped out pickups before know what kind of a distinctive difference it can immediately make.
As I often tell my students, always buy the very best you can for the money. Spend the most you can afford. You will never be sorry if you work with a reputable dealer or seller. It makes a huge difference in the end product… and your own personal inspiration!
So, from 1987 onwards this Strat was my main axe. It served me faithfully and always provided the electric animus that put swanky, funky wind in my musical sails and let me solo with confidence and many, many a smile.
The Fateful Gig
Some moments in life have a certain bittersweet irony about them. We never know, going into something, if things will turn out like we planned, or really go south in some inconceivable fashion. Such was my experience one night in 1995, years after my Strat’s genesis…
A great look at the finished product
I had been playing with musical genius Steven Sayles for a couple years. At first it was just to put together his original compositions. We’d gone into the studio and cut quite a few of his stellar songs, and to this day it’s my only experience of recording in the studio totally LIVE, with no overdubs.
Fast forward a couple years. We were still working on his original music, but he had a good idea to make some money on the side: why don’t we do a series of concerts highlighting the hits of some of the biggest music pioneers of all time? Sounded good to me. I don’t mind showing my influences and celebrating them.
We booked a local restaurant that had a high-end clientele and that were amenable to live music. Steven had played there as a solo act many times. It was called “Bickerson’s” and had a great reputation as a top-notch place to get a great meal and be entertained.
We started with a Beatles Tribute Night. Because… you know… it’s the Beatles, for heaven’s sake!
Sold out!
We did a follow-up return engagement Beatles Night.
Sold out!
We could’ve kept riding that Beatles horse, but that just wasn’t our style. We had too eclectic tastes. So, next, we decided to do a Billy Joel Tribute Night. Yea, baby!! Now that’s some more great music!!
The summer nights were booked, we practiced hard, and even brought a sax player in on some of the hits to round out the sound.
Things were lookin’ good – the nights were already selling out weeks before. Our vocals were gellin’ great. The grooves were there, thanks to MAH-vellous Marvin Rieli on the drums. This was gonna be GREAT!!!
Teaj’s last concert with the Strat, with Marvin Rieli & Steven Sayles
The nights came and we delivered the goods. Those Friday and Saturday concerts were unforgettably cool – though outside the summer nights were quite warm! Inside, we gave everything we had and left it on the dance floor – mostly because of our lifelong passion for this material. We were doing our favorite songs from an artist we all held in high esteem. Thanks, Billy!
My voice, and my Strat, both served me well those nights, all the way through to eleven o’clock Saturday, when we gave our final bows to the crowd. We definitely knew we’d be back here again. This venue kicked butt for us.
Tearing down our equipment, I had no idea what was coming. I was about to learn a lesson I was never to forget,… that came at quite a price.
Never, ever… EVER… Do This
After the last concert, we shmoozed with the audience members who were quick to wish us well and talk with us. I always enjoy that, although sometimes you feel like you’re talking less with a human and more with a BOTTLE, if you know what I mean. lol
Finally the last patrons left. It was after midnight and the restaurant staff were doing the close-up clean-ups. Looking at the large amount of gear we had, it was a bummer of a proposition to think of hauling it all then as opposed to waiting ’til tomorrow.
Who wants to move all this gear at midnight?!
Steven asked the manager if we could just store our things in a back room until the morning when we’d come by with a trailer to get it all. The manager had no problem with that, so we schlepped it all into the back room and went home very tired, but very satisfied with how everything turned out.
That satisfaction was short-lived.
The next morning, my Strat was gone. No one knew how. No one knew why. No clues. No witnesses. It was simply gone. Everything else was still there, but my good friend had been taken from me.
The manager apologized profusely but what was done was done. At that time, businesses weren’t so “video-feed-frenzied” so there were no cameras to document who had sneaked in to do the dirty deed. I was outta luck.
I had another electric, so that became my go-to axe for the other Tribute Nights coming up, but… none of them after that really pumped me up much. It was too weird and dispiriting to play again in the place where my trust had been violated and my best instrument swiped.
Lesson learned? Don’t EVER, EVER, EVER, EVER, EVER, (etc., ad infinitum…) leave your axe anywhere but in your hands and in your home. No matter how “safe” someone says it’ll be. It’s not. Let caution be your guide and this story be your impetus… keep your gear with you. It’s the only sure way not to lose a precious part of your musical heritage.
Life Post-Strat
I hate to end articles on a downer note, so let me say, as always here on SeriousGas.com, that our love and appreciation for the instruments that help us carve out our signature sounds goes on and on… into the future, but also back into our past. Axes like my ’62 Strat help create musical paths that lead to greater successes, and further inspirations. Its voice and tonal influence will never be forgotten; they were touchstones for progress and creative motivation.
It goes without saying that I really miss my Strat. If any of you see it, obviously let me know. Who knows in what part of the world it is now. I can only hope it’s being treated with the love, care and friendship that I put into it, and that it’s still singing forth its sweet, sweet music somewhere to adoring fans.
Since that time, thank God, I’ve never lost any other piece of gear to theft. And as I look around at so many diverse ways to produce the music we love, and that loves us back, I rest in nothing but gratitude. Let this be my last word on my beloved Strat: “Thanks, bud. May I hear your voice again one day.”
Got any instruments that are dear to your heart? Ever had an axe or some gear stolen? Did any mods ever take your instrument to the next level?? Tell us in the comments. We’d like to hear your story too.
It’s always helpful to commiserate on losses or loves together, right? 😉
Well, they’re the ones that make YOU sound best in YOUR music, of course!
But there is something to be said for putting ’em to the TEST.
Especially when there are CLEAR WINNERS!
Enjoy this unbeatable, in-depth electric guitar strings comparison that I update every year.
Strings are rated in ASCENDING order of performance.
7) D’Angelico “ElectroZinc” Strings
So, here’s the deal with these strings: they’re the newest on the scene (just released in 2016), and they WERE the 2nd most expensive of the lot (at $12.99). Since then the price has gone down to under ten bucks. Nice! They use a different metal alloy from anyone else on the market, and they have a pretty interesting story.
In 1938, John D’Angelico, a guitar maker, and John D’Addario, a guitar strings maker, got together and invented a round wound electric string for the first time, using zinc-coated steel that was “Bethanized”, which they had trademarked.
“ElectroZinc” strings with Teaj’s Paul Reed Smith guitar.
By all accounts it was a great string set, and was used by many for decades. Renowned for fullness, balanced brightness and volume.
Until…
… it disappeared in the 60s. Why? Of all things, because the Bethlehem Steel Plant, which was the only source for this “Bethanized steel” string, closed down, never to re-open. So for half a century its tonal secrets lay unheard.
Cut to today. Not only is the story a great marketing touch, but since no one else has the rights to this particular alloy, a combination of steel and Zinc, they have a tonal corner on the market.
How much did they drop in tuning, one half hour after I initially tuned them? In Hz, from low E to high E: 1, 1, 1, 2, 2, 2.
If I were a jazz player, and my main axe were a hollow-body or semi-hollow body, I’d turn to the the distinct, burnished tone of these in a heartbeat. But, hey, try ’em for other more modern electrics too. Their warmth and dynamic expression might just hook you.
6) Dunlop “Nickel Wound” Strings
These are the favorite of G.C. Accessories Department Rep. Peter at the Southfield, Michigan store.
Peter @ G.C. Southfield
I had never seen or heard of anyone playing these before, but after a long discussion with Peter, I asked him what his typical choice was, and he immediately reached for these strings. He said he loves them for the Blues playing that is his favorite genre.
Dunlop is a common name in the guitar world, but that’s mostly because they make a ton of accessories that most of us have used at sometime or another. They opened in 1965, so they’ve been pleasing spotlight shredders for a while now. They’ve operated out of there Benicia, CA factory to this day.
Dunlop strings with Teaj’s EVH “Wolfgang Special” guitar.
In 2005 they finally decided to also enter the strings business and… boy, did they do it with a bang. I was incredulous when, on their website, I counted THIRTY-FIVE different electric guitar string sets! And that didn’t include strings for other types of instruments. They’ve obviously done their homework, and made sure that, no matter what your tonal taste, there is a string set with your name on it.
The way Dunlop describes these strings is a low end that is “focused’, mids that are “aggressive”, and highs “crisp”. Naturally, these adjectives have been used countless times before for strings of all caliber, so… how did they actually fare?
I found them to have a good balance string-to-string, and generally pretty darn responsive.
The tuning drop in Hertz, half an hour after the initial tuning was: 1, 2, 2, 3, 3, 2
I found that these strings sounded best with a clean tone or subtle crunch applied. When playing through “Something” by the Beatles this set actually was my top pick, for example. Applying distortion changed their tone too much for me though, and other sets usurped their first place.
Sound like your kind of tone? Then give a reliable company that’s served us well a try…
5) Ernie Ball “Slinky Cobalt” Strings
These strings land in the midrange price point, selling for around ten bucks.
Steve Lukather, madman monster player from the stellar band Toto, has been an Ernie Ball user since he began playing in the 60’s, and now endorses these Cobalt strings in THIS VIDEO.
As I researched for this article, Steve’s endorsement really peaked my interest in this string, as his playing prowess is second to none and any recommendation from him I take very seriously.
“Slinky Cobalt” strings with Teaj’s Jay Turser Serpent guitar.
So, what’s with the cobalt? Well, the strings are steel in their core, with a steel/cobalt alloy wrapped around the outside. According to E.B., this produces a stronger magnetic pull between the pickups and the strings. Currently, E.B. holds the patent on this alloy for strings, so they’re alone in this power paddock.
You can see they’re different too, as soon as you take ’em out of the pack – they have a matte-grey, almost blue hue to them that looks different than any other string I’ve played.
What does that do? It translates into a clearer tonal signal, a higher dB output level per string, which in turn allows for a extended dynamic range, and increased frequency response, according to E.B. reps. Because of this, I was really looking forward to seeing if harmonics jumped off the neck better with this set.
Some have said they feel different also, feeling somewhat softer than usual. This is probably because E.B. has confirmed that you’ll have a slightly lower tension with these strings than what you’re used to if you’ve played normal steel strings in the past.
More bendy? Sign me up! 😉
The tuning drop in Hertz, half an hour after the initial tuning was: 0, 1, 1, 1, 1, 2
In recording these strings while playing through a bunch of songs, I found them to be very different in tone than all the rest. They have a really good sustain (an open chord rang for 22.24 seconds) and higher presence above 5k than all the other sets except the Dunlops.
I think the most striking feature of these strings is their unique sound. Because of that, this set is going to be great for some, and “meh” for others. It really comes down to “do you like their timbre or not?”
For me personally, I didn’t find that they made my Paul Reed Smith sound as good as some other sets did. As you might suspect, it’s very dependent on the guitar and the pickups whether or not strings will complement your sound.
But with nothing but respect for “Luke” of Toto, these are definitely a good choice to try, especially if you want your sound to stand out from the ‘standard sound’.
Care to join Mr. Lukather on the cobalt train to glory??
4) D’Addario “NYXL” Strings
These strings are the favorite of good friend and fellow axe-slinger John Fiaschetti, whose Line 6 Helix processor we discussed in THIS VIDEO. John says he A/B’d them against Paradigm strings and the EB Cobalts a couple years back and the NYXLs won the fight.
D’Addario says that these strings, manufactured in New York, are newly engineered to be break-resistant and give us up to 131% greater tuning stability. Sounds good, right? They utilize high-carbon steel cores and plain steel alloys to achieve these goals, and the end result supposedly will cause the high-midrange to be more pronounced on most guitars, in the 1 kHz to 3.5 kHz range. The result is enhanced crunch and more presence.
D’Addario NYXL strings with Teaj’s “Les Paul Mini”.
Their marketing really makes it sound like their after the Paradigm market, in wanting to be the strongest and longest-lived choice we can make. “… bend farther, ring louder, stay in tune better, and take harder strumming than any string you’ve played before.” Bold statement.
How do they do it? They say they completely reinvented the process of “wire drawing”, and combined that with a “fusion twist” that they claim is revolutionary for plain steel string manufacturing.
The tuning drop in Hertz, half an hour after the initial tuning: 1, 2, 1, 2, 2, 2
In my studio this week they lived up to their hype: these strings always sounded at least good on all ten of the songs I played through with them. I can’t say that about some of the others, so that’s significant!
These strings did exceptionally well whenever I played rhythm chording, pinch harmonics and soloing. I can totally see why these are John’s favorites. They are so well-rounded, in both Clean and Crunch amp modes, and can handle about anything you throw at them.
If the N.Y. state of mind sounds like just your kind o’ approach, “take the ‘A’ train” make ’em sing!
3) EVH Strings
These nickel strings have been my go-to sets for a few years now. What can I say? Guitar hero worship never fades! Eddie Van Halen has unknowingly taught me much and influenced my playing considerably since he shot off the solo heard ’round the world (you DO know what that one is, right??). Since I own a few of his guitars, I went with his strings too.
EVH strings on Teaj’s “Frankenstrat” clone!
These babies are nickel-plated, hex steel-core strings, and they’re exactly the ones Eddie uses to put on all his guitars.
This is also the ONLY string set that is not 009 – 042. One of the reasons I like the EVH line is that they offer what Eddie likes to use, which is a set with a wider spread. That’s the set that I use, and that’s what we’re testing here today: the 009 – 046 gauge!
The wider gauge allows me (you, Eddie…) to have a lot more beef in the lower strings, since they’re thicker, for crunch chords and the like, while keeping the higher strings the same for soloing, tapping, hammer-ons, etc. Love that!
Ernie Ball, GHS and D’Addario later introduced the same wide gauge after Eddie launched his into the industry. That’s telling, isn’t it?
So how did my current faves fare in our little musical OK Corral? Was I woo-ed away from Eddie’s brand??
Ooooo… the anticipation is killing you, I know. 😉
No. And yes! I’m always open to improvement and progress in my art; I’m willing to change if it promotes positive development. But in some cases, I will still be using this brand for my playing.
If I need long sustain, EVH is it, baby! These strings had the longest sustained chord out of all the packs I tested – just under 26 seconds. That beat all the other strings hands down!
They also hold their tuning great. A half an hour after the initial tuning they had only dropped by these Hertz: 0, 0, 1, 2, 1, 2. Among the best in the test.
I also found that if I needed a nice, bright tone while in Clean mode on my amp, these strings won every time. Their high end will always help you cut through a mix, whether live or in the studio, like L.A. sunshine through the Valley smog!
If you itchin’ to take this “Spanish Fly” for tone, go ahead and JUMP!!
2) Ernie Ball “Paradigm” Strings
The short, simple tag line for these strings is: “Stronger, for longer”. Their packaging say “Break Resistent” & “Ultra durable”.
These strings are also the most expensive pack I purchased, at $14.99 plus tax. Were they worth it? Let’s take a look…
E.B. “Paradigm” strings on Teaj’s “Tiger Stripe WildKat”.
Ernie Ball has been around making guitar strings since 1962, so this isn’t their first musical rodeo. They’re a Southern California company, so they’ve got a whammy bar up on their competition in the land of fruits and nuts.
The Ernie Ball list of endorsing artists on their website is impressively looooong, so I was anticipating the Paradigms to be a formidable opponent in this contest. The site’s accompanying videos show and tell why the artists use the E.B. products, and are really quite convincing.
If you wanna hear why Kirk Hammet, Steve Stevens, Don Felder, John Petrucci, Andy McKee, Steve Vai, Slash and host of others give E.B. the thumbs up, CLICK HERE.
But regardless of them, here’s what my own testing showed:
The intonation adherence of this string set was nothing short of AMAZING! One half hour after I tuned it the first time, the drop in string tuning was almost non-existent: 0, 0, 0, 0, 0, 1 !!! That puts it easily in first place for staying in tune.
This string set excels at almost everything, and the biggest reason is the width of tone and simple “beef” it has compared to all the others. No other set sounded as thick, yet defined, as this screeching bird of prey!
Because of that, there is actually one scenario in which I would probably not use them: if I were recording in the studio and needed to lay down rhythm parts. Come mix time, it’s all-too-common to EQ out the bottom end of electric guitar rhythm parts so that they sit better in the mix and don’t interfere with other lower-frequency instruments. These strings dish out quite a bit of low end, so… rather than promote that sacrilege I would just use… my number one string pick.
Otherwise, I was so taken by the depth of tone these strings produce… far beyond any others. They really are in a class by themselves. I can totally see why there’s a long list of “guitar gods” who endorse this product.
This will now be my preferred string for live playing… especially if there’s any soloing in the mix. The strength and gravitas it adds to the guitar’s tone is unquestionable – the same result appeared in every song I recorded. The finesse and rich tonal flavor of these strings were one of my personal faves for sure!
By the way, Ernie changed the packaging on the Paradigms from the black cardboard, to the more, uh… fusche foil package. Thankfully they didn’t change the STRINGS, so buy with confidence. Then ditch the foil. LoL
If you want a real “Paradigm change”, to a string that will forever banish all “where’s the beef”-bashers, dig down deep on this gold mine of tone!!
1) Ernie Ball Super Slinky Strings
E.B. “Super Slinky” strings on Teaj’s “EVH Original Strat” clone.
I have to admit here… I did NOT in a million years expect this string set would be the winner.
Why? Two things: the packaging… and the price! The packaging looks, very similar to other very cheap string sets that aren’t nearly as good.
And the cost?? These puppies come in at the cheapest price point of all the string sets. Unbelievable!
So, lemme tell ya… do NOT judge a book by its cover or price in this music store. Prepare to be blown away!
First off, let me say that these strings did not have a tone that was MONSTER and just took your face off. Rather, in most of the recordings I made with this set, they just sounded… right. Like it was the perfect sound for the song.
For someone whose focus is recording, like me, that kind of instant fit is literally music to the ears!!
I guess I’m not the only one to hear this exceptional “fit” either; Peter at Guitar Center told me that these are the most popular string set sold in his shop, except for the 10 GAUGE of same brand, which sells slightly more.
The tuning half and hour after the initial tuning: 81, 109, 146, 194, 245, 328
For palm muting on the clear channel, this string won.
For double stop melodies, this string won.
For rhythm chording, this string won.
For pulling harmonics, this string won.
No other string impressed me so many times, in so many diverse ways. Wow. Just wow.
It came in 4th place in the sustain test, lasting a good long time at 22.35 seconds. No slouch there either.
So, it’s obvious why these strings are my top recommendation. I can’t believe they’re not more expensive. They beat out sets that charge us a lot more for a lot less!
Also, the link below is what I use – you save more when you buy three sets, and that’s STILL under $15.00!!
If you want to see what I mean, and test out for yourself the “one string to rule them all, and in the hot licks bind them”, join me & have a ball… an Ernie Ball!!
Escape Your Personal Gravity
So, there ya go! Any of the above string choices should up your game (if you’re not using them already!) and make your sound an even more desirable, and identifiable, commodity on the gigging circuit.
Our own gravity of choices, based on what we’ve used in the past, can often lock us down into options that are not actually our tonal best.
Open up your receptiveness to change and blast off into whole other galaxies of sound. You just might find your new sound is your all-time favorite.
I’ve switched from using EVH all the time to now, for example, to mostly using Super Slinkies for all studio work on strats or Les Pauls, and Paradigms for live work.
The tape don’t lie!
How I Reached the Top!
If you’re the kind of player who wants to know exactly HOW I conducted this sound experiment, and what the specific parameters were, how I set them, and why I chose the top winners… read on!!
I started by asking two simple questions to knowledgeable gear reps in our field (who are also guitar players):
“What would you recommend as your TOP THREE general use electric guitar strings??”
“What do YOU use?”
Once I compiled the answers to those questions, I quickly saw some consistent winners. I then cut out any duplicates and whittled the list down, based on those professional recommendations, to the finalists that are listed above.
There were lots of one-offs, but the final winners were consistently acknowledged as at least a GOOD choice, if not the best, for all axe-slingers who want to shred on a great wave of impactful tone.
The Specs and Nothing But the Specs
We all have preferences and things we ‘gravitate towards’ in a string. Because of that, I wanted to apply at least a modicum of scientific method by experimenting with specific goals in mind.
First off, I surveyed the same STRING GAUGE for each set. I used “Light” gauge strings, since that is what I typically use on my guitars and my guitar necks are set up for that amount of tension. They start at the top with a .009 size for the high ‘E‘ (You can tell my hero was E.V.H. and not S.R.V.!).
Guitar-wise, I used my impressive Paul Reed Smith guitar (see the full article and specs on it HERE) with the pickup switch set at one of these settings:
The Bridge pickup (detente 5) which produces the most beef for soloing
The Neck/Mid pickups (detente 2) which is great for funk or R&B, and harmonics.
The Bridge/Mid pickups (detente 5) which is perfect for open chords & palm muting.
From there, my signal went into my EVH 5150 50 watt amp, totally bypassing my effects loop so you heard nothing but amp. For clean, the Volume was set at noon. For crunch, the Volume notched down to ten o’clock. The gain remained constant at a noon setting.
I recorded into Pro Tools 12, using no compression, no effect… nada. I wanted us all to hear exactly how the strings interact with the guitar with no help whatsoever.
It’s in the Way That You Use It!
To isolate the differences between the string sets clearly, I recorded the same ten song snippets for each string set. Each of the songs uses contrasting playing techniques, so we can see how the strings respond to the many ways we play.
Everything in the experiment remained the same each time each time I pressed ‘record’, except these two things:
The playing technique
The string set
Here are the songs I used to test the strings, and their corresponding techniques:
“Something”, the Beatles. Strumming. Clean channel, detente 4
“Every Breath You Take”, the Police. Palm-mute picking. Clean channel, detente 4
“Band on the Run”, Wings. Double stops. Clean channel, detente 4
“A Funk in the Trunk”, Teaj.R&B scratching. Clean channel, detente 2
The final ratings were based on these five categories, in light of their responsiveness to the techniques of the ten songs above:
Dynamics
Tone
Harmonics
Resonance (sustain)
Intonation slippage
For DYNAMICS, I’ll be comparing the strings to see if the dB levels fluctuate up or down at all brand to brand. In other words, are any of the sets louder, or softer, by nature?
The difference in TONE between the five sets is obviously a big concern. Some guitarists choose this factor above all others when deciding their string of choice. Because we are comparing these sets by using exactly the same gauge and outboard gear, we should get a fantastic glimpse into how each string counters the energy we put into it and the general EQ of that response.
The responsiveness of HARMONICS obviously has a lot to do with the status of a guitar’s set-up, and whether its intonation is spot on or not. But since we are testing the exact same guitar with all the same gear, it’s more the comparison between our results that matters. That being said, a cursory measuring of my PRS showed that it’s current state is well-balanced and well-intoned for this test.
With regards to RESONANCE, I’m going to be testing specifically how much sustain each set has per string. I really wonder if I’ll find them all in the same ballpark, or if one of more will hit it right OUTTA the park! Regardless, I’ll produce specific, targeted oscillations, record the tone, and measure the duration of each string’s tone.
Just for fun, I also notated the INTONATION SLIPPAGE, from the initial tuning to half an hour later, leaving the guitar sit upright in a guitar stand. The initial correct tuning in Hertz, from which the strings will drop, was: 82, 110, 147, 196, 247, 330.
Let the Snippets Sing!
To make this easy for you, I’ve broken my recordings down into their constituent parts. That way, if you’re only interested in certain techniques, based on your own playing styles, you can skip the others.
Each of the clips below have 7 different takes of each song snippets, showcasing the 7 different strings sets. The order you hear them in is:
Ernie Ball “Slinky Cobalt”
EVH “Nickel Wound”
Ernie Ball “Super Slinky”
D’Angelico “ElectroZinc”
D’Addario “NYXL”
Dunlop “Nickel Wound”
Ernie Ball “Paradigm”
Enjoy these direct comparisons. They really opened up my eyes to the truth of tone!
“Something”
“Every Breath You Take”
“Band on the Run”
“A Funk in the Trunk”
“Don’t Dream It’s Over”
“Roundabout” & sustaining open chord
“Panama”
“Women In Love”
“La Grange”
Even Vibrations Rest Eventually
Photo by Clem Onojeghuo from Pexels
Wow! What an experiment! It took a long time to slog through the string loosening, tightening, tuning, REPEAT… but it was totally worth it. The results speak for themselves. In a nutshell… NOW WE KNOW!
I have to say too that this test, tho’ it took a loooooong time to complete, was really a lot of fun. But then, we’re players… it’s always fun to play through your favorite songs, right?!
How about you? What do you think? Were you surprised? Will you be making a change in your “go-to” string set?? Let us know in the comments, and share the stringy love. I’d especially like to know what your experience was with specific guitars and pickups.
Oh, and one last thing: if you are totally mind-blown that your favorite string set didn’t make the list, and you’ve actually compared them before to other strings, tell me in the comments and I will buy a set and test them against these upper seven, in exactly the same way, with all the same gear.
If they end up beating out any I’ve listed based on my testing, guess what…. I will swap yours out for one of the above. Now that’s service! 😉
For now tho’, I’m gonna take a break, wipe my brow and give my fingers a rest. I was ‘ouch’-ily surprised at the end of the testing to see the side of my thumb was almost to the point of blistering from performing that ZZ Top number so many times and pulling out so many pinch harmonics! What a MARATHON!!
If you’re a drummer/percussionist, you were probably hitting things very early on.
Lots of things!
Like pots, pans, walls, beds, school-books, bus seats, siblings, maybe the occasional pet…
But as you matured you learned something: that the surface that you hit responds to your pummeling in two ways – with a certain bounce and a certain sound. And that some bounces and some sounds are obviously better than others.
Fast-forward to today: scientific studies have shown that… guess what? Drum heads are responsible for 80 percent of the sound of a drum! Whodduh thunk?!
So what does that mean? Simply put, no matter what drum kit you have, whether it’s worth three hundred bucks or three thousand, the choice, tuning and interaction of your drum heads will impact your sound more than anything. So for all of you that can’t afford the super-duper-pro model, fear not – you can actually get a GREAT sound out of your kit most of the time (if it’s free from damage) if you take the time to get the perfect drum heads.
Drum shell thicknesses? Materials? Sizes? Sure, those are still relevant… but they’re not as crucial in determining your final sound as the heads! Knowing this, we must consider, before every session, the state of our heads – both the one on our shoulders, and those on our drums.
In this post we break down our drum head choices into categories, look at their various effects on your sound, and ultimately help you decide which makes you sound the most awesome, in light of your style, venue and gig types.
Let’s start groovin’, shall we?!
So Many Ways To Bang Your Head
In our modern age, the task of choosing drum heads is more complex than ever. I mean, just check out this list of all the options we now have to sift through:
textured or non-textured
dampened or non-dampened
single ply and multi-ply
thin or thick
white or colored
clear or coated
oil between the plys or not
monochrome or hide-emulated
Sheesh! I’ve been playing for years and it still boggles my mind!
Thankfully, there’s an easy way to keep our percussive wits about us. Using a linear process to make your drum head decisions gives you good understanding of the options, plus enables you to make changes in one or all categories as you progress in your playing.
Here are the most important factors to consider, in the order of importance:
Thickness
Ply
Clear vs. coated
Dampening
There are quite a few other factors to choose from, but they don’t carry near the weight of these four. Start here, then whatever else you add to your percussive pie, it’s still gonna end up bamaliciously tasty!
In the Thick of It
Drum heads come in many thicknesses. Why? Because the variances make a big difference in how pronounced your sound is.
Generally speaking, the thinner the head, the more sustain, overtones, and projection you will hear as a result of each strike.
As you thicken the head up, those same descriptors are reduced.
If you’re playing live gigs mostly, then you definitely want projection, so a thinner head would be great.
If you mostly play in studios, for recording sessions, as I do, most of the time (tho’ not always!) you won’t want so much projection or overtones, so thicker is your best bet.
Thickness options also affect music genres. Jazz players tend to like the thicker, warmer heads. Pop/rock players usually opt for the thinner variety. Bebop players often buy the thinnest heads possible because they like to tune them higher than players in other genres.
Whatever genre you’re smashing skins in, there’s a head thickness made that will give you just the right bang for your buck.
Just starting out and don’t know where to begin? Start out with a 7 or 10 ml single ply head . The seven ml is by far the most popular. Then, if you want more or less sustain, overtones and projection, you can go up or down from there. Good examples of this would be the Remo “coated Ambassador”, the Evans “UV1”, or the Aquarian “Texture Coated” heads.
But, now that we’ve broached the subject,… what’s this “ply” stuff mean??
Ply Your Thwackin’ Trade
The ply number of a head is simply how many layers it has. There are really only three choices:
One ply
Two ply
Three ply
The first two are by far the most popular. The three plys are not hugely popular, but they’re out there.
Why would you want that thick of a head? Mostly, because triple-ply heads keep HEAVY HITTERS from breaking through their skins all the time. If you’re a Neanderthal on the kit and find yourself going to through heads too much, try a triple-ply. Probably you’re gonna find your problem solved. A triple-ply also has very little overtones, so if you don’t like ringing, you’ll probably love the dry attack and limited sustain it offers.
If you don’t hit the drums like Thor in Ragnarak, then either the two or one-ply are options. The double-ply will, again, give you a little more protection from ripping through the head (durability), a more focused tone and fewer overtones ringing, but the trade-off is the response and timbre: it won’t project as brightly a thinner head and the stick response won’t be as snappy.
Buy thinner? It’s the opposite.
So, what kind of a sound do you want with this in mind? In the studio, I typically don’t want lots of ringing overtones to muddy up my mix, so I always opt for a 2-ply head. The most popular size for 2-ply is 14 ml, and that’s what I use and it serves me well when recording.
But how come some heads are see-through and others not? I’m so glad you asked…
The Choice is Clear. Or Coated!
If you buy a drum head that is see-through, or CLEAR, then just know that you are opting for a bit longer of a sustain and a more bright, open, overtone-singing sound. If having a “warm” tone is your thing, avoid these clear heads. Instead…
… opt for a coated head! Some describe coated heads by saying they slightly ‘muffle’ the tone. But if you’re not into super-bright whacks, this is your stretch-skin. It’ll have a shorter sustain and give you a toasty tone – one sure to make your “significant other” melt whenever you play and want you, carnivorously, after the set!
Well, actually, about that melting… your mileage may vary. ;-0
My best “brushes-ready” coated head.
One last thing to consider in this category: do you ever play with brushes? If so, you want a coated head on your snare. The rubbing against the coating is what produces that “Ssshhh-sh-shhhhh…” sound we all attribute to the “brushes sweep sound”, but it won’t be there without the coating.
So we see there’s another example of how we play determines which heads to purchase.
Finally, it’s not uncommon to find pro drummers using coated heads for studio recordings, but switching to clear heads when they go on tour. Lars Ulrich of Metallica, for example, does this. It allows for a very controlled sound in the studio, but more ‘bite’ pouncing on the cheering fans when live in an arena!
And it should be said here with great fanfare a loud guitar power chords: here’s to all the drum techs who have to do all these time-intensive head changes on the road with pro bands. You guys are my heroes!! lol
Damp It, Jim!
Now we’re starting to get into the hybridization of drum heads. We’ve gone through the three basic choices, and now we move on to the fourth, which really allows us to mix up our options a bit.
The Studio X snare head. Notice the dampening ring underneath.
Dampening is the ability to cut off a lot of the overtone ringing that heads will give you, especially if they are clear and single-ply. You can get heads that only shave a subtle amount of resonance , all the way up to total tone restriction.
Some adhere a foam ring to the head for dampening. Others use a thin metallic ring. Still another way to dampen is to add a “Dot” to the drum. You’ll see these large dots, either black or white, in the center of the head. The dot is for dampening, and add more focus as well as durability to snare heads.
But wait, there’s also “reverse dots”! This is where the manufacturer adheres a resonance-busting dot beneath the head so that the upper surface remains smooth. You still get the focus and less ring; it just looks normal from above.
Someone experienced in drum setup can get a kit with dampening heads quickly ready for a recording session. Not having to fight the ring means more of the natural sound of the drum can be picked up without usurping the mix. No Ghengis Tom’s allowed!
Oh, but remember this: whatever head you choose, you can use “Moon Gels” or even the ol’ stand-by “Duct tape” to lessen the head overtones and sustain after you buy it. So don’t think you have to achieve the perfect balance with just the head purchase. I do, but I always know I can add a little dampening if needed at the drop of a gel. Nice to have in a pinch.
Flamming Fads & Fashions
If you’ve made wise, informed choices in the above four areas about your drum heads, you are well on your way to making your drums sound amazing!
But there are other specialized additions to heads that you can find. Will they affect your sound? A bit, but not as much as the basic four.
Need more “Sssshhh” for your brushes? By a more “textured” head.
Don’t like the standard white colored heads? No problem; buy black. Or blue. Other colors are available.
Just don’t expect your music store to have a color palette like, say, Baskin-Robbins. 😉
They also make drum heads that look like actual animal hide, if you’re wanting a more, oh, say, tribal look to your kit. Heck, David Lee Roth even call you for a session.
There’s even 2-ply drum heads that have oil between the plies. Why?? It’s yet another way to apply dampening and reduce overtones from your sound. If you typically have your kit mic-ed up, you might wanna try them. If you’re playing live mostly, this would probably kill your chances of getting a great live sound and cutting through the other players appropriately.
Those oil heads are pretty bizarre to look at. If you push your finger down on the head and move it, you’ll see the oil pooling around beneath.
So, are these further options worthwhile? Just a fad? Only you can tell, because only you know if it gels well with the music you produce.
Batter Heads vs. Resonant Heads
The thinnest head on your kit is going to be your resonant heads. These are the heads on the bottom of your drums. Not all drums are made for reso heads, so if yours aren’t… hakuna matata, baby!
A snare drum resonant head
But if you do need resonant heads, I find that simple, clear, thin heads work best. I use Remos, but really any will do.
Frankly, I don’t find that the brand makes much of a difference when buying reso heads, just as I don’t find that they need to be changed that often. Your experience might lead you to another conclusion, but what I hear on my recordings sounds awesome when I dial in the uppers with new heads, regardless of what I have on the bottom (tho’ I DO tune them each time as well), and regardless of how old the reso heads are.
But, hey, if you’re loaded, by all means… change all the heads every time you play out. Ya only live once, mate! lol
Walkin’ My Beat…
Teaj’s Pearl kit
Since I’m always a big fan of full disclosure, lemme share with you what I choose for recording in my studio RIGHT NOW:
First, on my Pearl Export studio kit:
Remo WeatherKing Coated Powerstroke head on all three of my snares
Remo WeatherKing Coated Emperors on all my toms
Remo Powerstroke Pro clear head on the kick
Pearl Resonant black ported head on the kick back
Teaj’s Ludwig rock kit
Next, my Ludwig 1983/4 Keystone Badge rock kit:
Aquarian Texture Coated Studio X head on the snare
Aquarian Performance II clear heads on all the toms
Aquarian Force I Batter clear head on the kick front
Aquarian Force II Resonant black ported head on the kick back
Am I still trying out different heads? Yup. But these have been giving me great drum tracks so I know they work. Can I improve? Maybe. Just like you, we can’t be sure ’til we try, so… let’s keep experimenting!
The Mastuh Blastuh of Drummin’ Disastuh!
All these things we’ve discussed today should help you decide on what really matters to your drum sound: choosing the appropriate heads and letting them sound great. Notice I didn’t say GETTING them to sound great; just let them.
If you methodically think through the lists I provided, you will, with a little trial and success, find the perfect heads that will resonate timbre of your drum shells well and make you sound like a “Mastuh” in the music genre(s) at which you excel!
So put in the time and effort. You’ll be glad you did, and you’ll find knowing how to record your drums at home with pro quality is really achievable… at any price!
Don’t ask how this wacky idea came to mind, ‘cuz I have no idea. But it did, and my dog… now gets more fan mail than I do! LOL
Really, it’s just a matter of taking things in my sphere of influence that mean a lot to me and doin’ a fun mash-up. I mean, come one… who doesn’t like a talking dog who knows how to mix in the studio??!
So, hey, you know what to do! Life’s short… watch more “Gear Hounds“!!


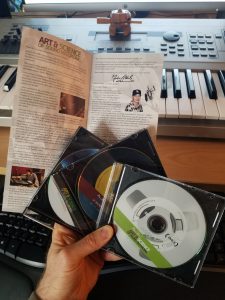

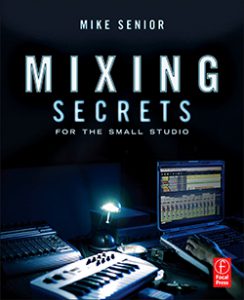


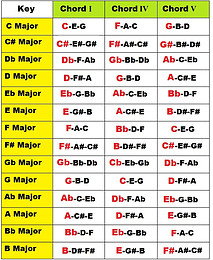


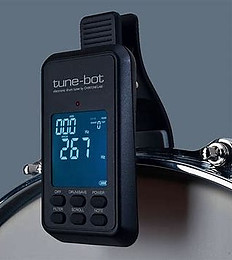


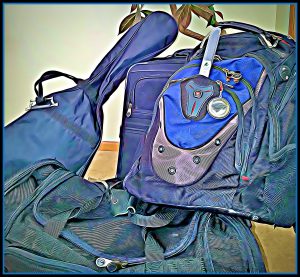
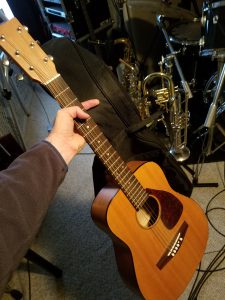

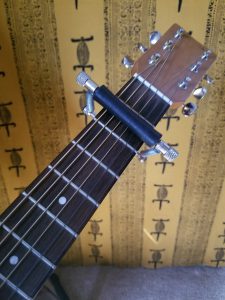


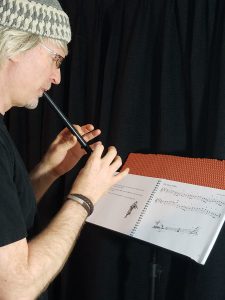


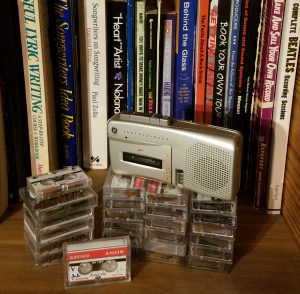


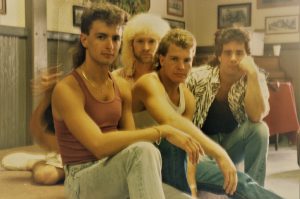

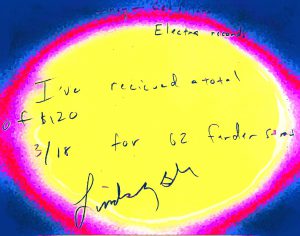
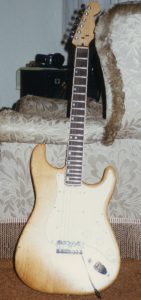
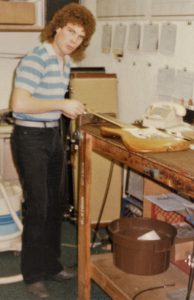

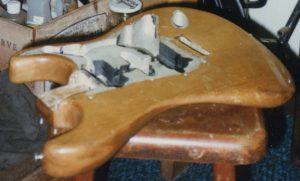
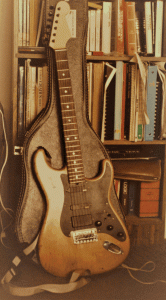
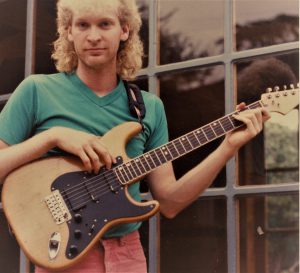

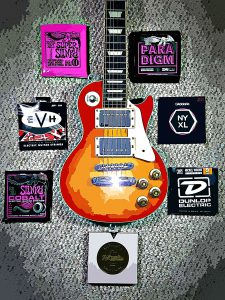
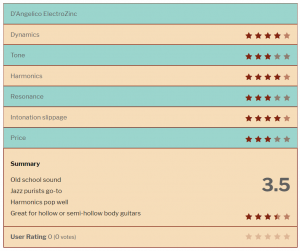
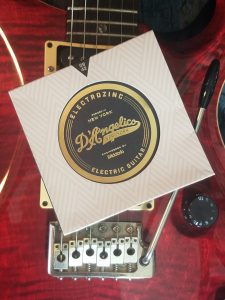

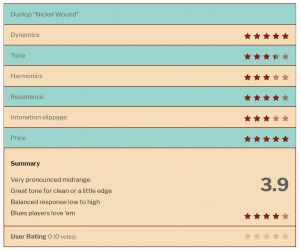
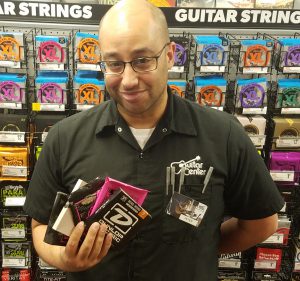
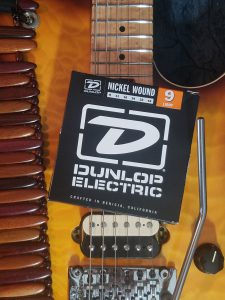

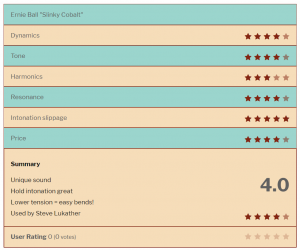
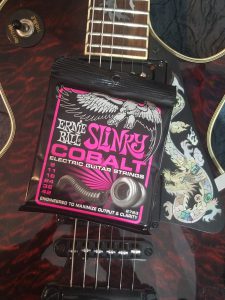

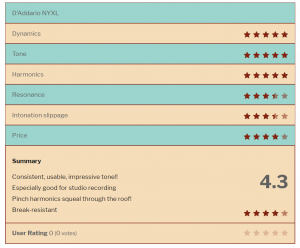
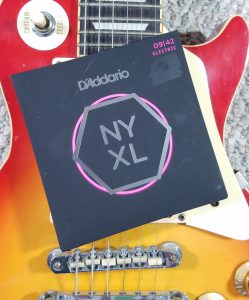

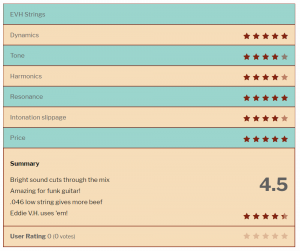
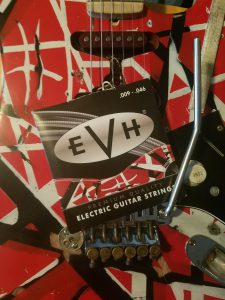

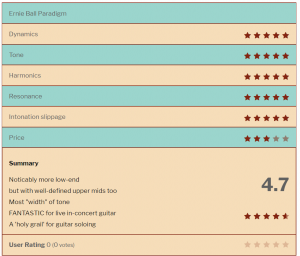
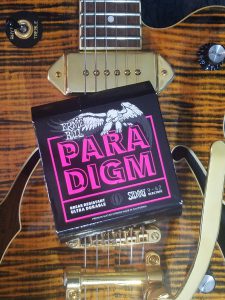

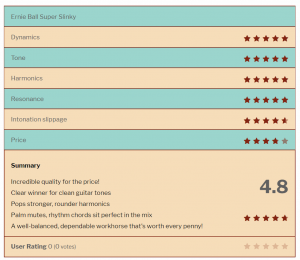
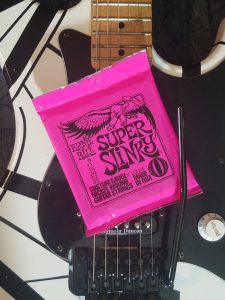


 options we now have to sift through:
 Generally speaking, the thinner the head, the more sustain, overtones, and projection you will hear as a result of each strike.
 Why would you want that thick of a head? Mostly, because triple-ply heads keep HEAVY HITTERS from breaking through their skins all the time. If you’re a Neanderthal on the kit and find yourself going to through heads too much, try a triple-ply. Probably you’re gonna find your problem solved. A triple-ply also has very little overtones, so if you don’t like ringing, you’ll probably love the dry attack and limited sustain it offers.

 Don’t like the standard white colored heads? No problem; buy black. Or blue. Other colors are available.