If you’re a drummer/percussionist, you were probably hitting things very early on.
Lots of things!
Like pots, pans, walls, beds, school-books, bus seats, siblings, maybe the occasional pet…
But as you matured you learned something: that the surface that you hit responds to your pummeling in two ways – with a certain bounce and a certain sound. And that some bounces and some sounds are obviously better than others.
Fast-forward to today: scientific studies have shown that… guess what? Drum heads are responsible for 80 percent of the sound of a drum! Whodduh thunk?!
So what does that mean? Simply put, no matter what drum kit you have, whether it’s worth three hundred bucks or three thousand, the choice, tuning and interaction of your drum heads will impact your sound more than anything. So for all of you that can’t afford the super-duper-pro model, fear not – you can actually get a GREAT sound out of your kit most of the time (if it’s free from damage) if you take the time to get the perfect drum heads.
Drum shell thicknesses? Materials? Sizes? Sure, those are still relevant… but they’re not as crucial in determining your final sound as the heads! Knowing this, we must consider, before every session, the state of our heads – both the one on our shoulders, and those on our drums.
In this post we break down our drum head choices into categories, look at their various effects on your sound, and ultimately help you decide which makes you sound the most awesome, in light of your style, venue and gig types.
Let’s start groovin’, shall we?!
So Many Ways To Bang Your Head
In our modern age, the task of choosing drum heads is more complex than ever. I mean, just check out this list of all the  options we now have to sift through:
- textured or non-textured
- dampened or non-dampened
- single ply and multi-ply
- thin or thick
- white or colored
- clear or coated
- oil between the plys or not
- monochrome or hide-emulated
Sheesh! I’ve been playing for years and it still boggles my mind!
Thankfully, there’s an easy way to keep our percussive wits about us. Using a linear process to make your drum head decisions gives you good understanding of the options, plus enables you to make changes in one or all categories as you progress in your playing.
Here are the most important factors to consider, in the order of importance:
- Thickness
- Ply
- Clear vs. coated
- Dampening
There are quite a few other factors to choose from, but they don’t carry near the weight of these four. Start here, then whatever else you add to your percussive pie, it’s still gonna end up bamaliciously tasty!
In the Thick of It
Drum heads come in many thicknesses. Why? Because the variances make a big difference in how pronounced your sound is.
 Generally speaking, the thinner the head, the more sustain, overtones, and projection you will hear as a result of each strike.
As you thicken the head up, those same descriptors are reduced.
If you’re playing live gigs mostly, then you definitely want projection, so a thinner head would be great.
If you mostly play in studios, for recording sessions, as I do, most of the time (tho’ not always!) you won’t want so much projection or overtones, so thicker is your best bet.
Thickness options also affect music genres. Jazz players tend to like the thicker, warmer heads. Pop/rock players usually opt for the thinner variety. Bebop players often buy the thinnest heads possible because they like to tune them higher than players in other genres.
Whatever genre you’re smashing skins in, there’s a head thickness made that will give you just the right bang for your buck.
Just starting out and don’t know where to begin? Start out with a 7 or 10 ml single ply head . The seven ml is by far the most popular. Then, if you want more or less sustain, overtones and projection, you can go up or down from there. Good examples of this would be the Remo “coated Ambassador”, the Evans “UV1”, or the Aquarian “Texture Coated” heads.
But, now that we’ve broached the subject,… what’s this “ply” stuff mean??
Ply Your Thwackin’ Trade
The ply number of a head is simply how many layers it has. There are really only three choices:
- One ply
- Two ply
- Three ply
The first two are by far the most popular. The three plys are not hugely popular, but they’re out there.
 Why would you want that thick of a head? Mostly, because triple-ply heads keep HEAVY HITTERS from breaking through their skins all the time. If you’re a Neanderthal on the kit and find yourself going to through heads too much, try a triple-ply. Probably you’re gonna find your problem solved. A triple-ply also has very little overtones, so if you don’t like ringing, you’ll probably love the dry attack and limited sustain it offers.
If you don’t hit the drums like Thor in Ragnarak, then either the two or one-ply are options. The double-ply will, again, give you a little more protection from ripping through the head (durability), a more focused tone and fewer overtones ringing, but the trade-off is the response and timbre: it won’t project as brightly a thinner head and the stick response won’t be as snappy.
Buy thinner? It’s the opposite.
So, what kind of a sound do you want with this in mind? In the studio, I typically don’t want lots of ringing overtones to muddy up my mix, so I always opt for a 2-ply head. The most popular size for 2-ply is 14 ml, and that’s what I use and it serves me well when recording.
But how come some heads are see-through and others not? I’m so glad you asked…
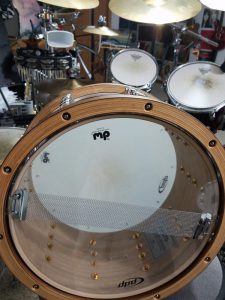
The Choice is Clear. Or Coated!
If you buy a drum head that is see-through, or CLEAR, then just know that you are opting for a bit longer of a sustain and a more bright, open, overtone-singing sound. If having a “warm” tone is your thing, avoid these clear heads. Instead…
… opt for a coated head! Some describe coated heads by saying they slightly ‘muffle’ the tone. But if you’re not into super-bright whacks, this is your stretch-skin. It’ll have a shorter sustain and give you a toasty tone – one sure to make your “significant other” melt whenever you play and want you, carnivorously, after the set!
Well, actually, about that melting… your mileage may vary. ;-0

One last thing to consider in this category: do you ever play with brushes? If so, you want a coated head on your snare. The rubbing against the coating is what produces that “Ssshhh-sh-shhhhh…” sound we all attribute to the “brushes sweep sound”, but it won’t be there without the coating.
So we see there’s another example of how we play determines which heads to purchase.
Finally, it’s not uncommon to find pro drummers using coated heads for studio recordings, but switching to clear heads when they go on tour. Lars Ulrich of Metallica, for example, does this. It allows for a very controlled sound in the studio, but more ‘bite’ pouncing on the cheering fans when live in an arena!
And it should be said here with great fanfare a loud guitar power chords: here’s to all the drum techs who have to do all these time-intensive head changes on the road with pro bands. You guys are my heroes!! lol
Damp It, Jim!
Now we’re starting to get into the hybridization of drum heads. We’ve gone through the three basic choices, and now we move on to the fourth, which really allows us to mix up our options a bit.

Dampening is the ability to cut off a lot of the overtone ringing that heads will give you, especially if they are clear and single-ply. You can get heads that only shave a subtle amount of resonance , all the way up to total tone restriction.
Some adhere a foam ring to the head for dampening. Others use a thin metallic ring. Still another way to dampen is to add a “Dot” to the drum. You’ll see these large dots, either black or white, in the center of the head. The dot is for dampening, and add more focus as well as durability to snare heads.
But wait, there’s also “reverse dots”! This is where the manufacturer adheres a resonance-busting dot beneath the head so that the upper surface remains smooth. You still get the focus and less ring; it just looks normal from above.
Someone experienced in drum setup can get a kit with dampening heads quickly ready for a recording session. Not having to fight the ring means more of the natural sound of the drum can be picked up without usurping the mix. No Ghengis Tom’s allowed!
Oh, but remember this: whatever head you choose, you can use “Moon Gels” or even the ol’ stand-by “Duct tape” to lessen the head overtones and sustain after you buy it. So don’t think you have to achieve the perfect balance with just the head purchase. I do, but I always know I can add a little dampening if needed at the drop of a gel. Nice to have in a pinch.
Flamming Fads & Fashions
If you’ve made wise, informed choices in the above four areas about your drum heads, you are well on your way to making your drums sound amazing!
But there are other specialized additions to heads that you can find. Will they affect your sound? A bit, but not as much as the basic four.
Need more “Sssshhh” for your brushes? By a more “textured” head.
 Don’t like the standard white colored heads? No problem; buy black. Or blue. Other colors are available.
Just don’t expect your music store to have a color palette like, say, Baskin-Robbins. 😉
They also make drum heads that look like actual animal hide, if you’re wanting a more, oh, say, tribal look to your kit. Heck, David Lee Roth even call you for a session.
There’s even 2-ply drum heads that have oil between the plies. Why?? It’s yet another way to apply dampening and reduce overtones from your sound. If you typically have your kit mic-ed up, you might wanna try them. If you’re playing live mostly, this would probably kill your chances of getting a great live sound and cutting through the other players appropriately.
Those oil heads are pretty bizarre to look at. If you push your finger down on the head and move it, you’ll see the oil pooling around beneath.
So, are these further options worthwhile? Just a fad? Only you can tell, because only you know if it gels well with the music you produce.
Batter Heads vs. Resonant Heads
The thinnest head on your kit is going to be your resonant heads. These are the heads on the bottom of your drums. Not all drums are made for reso heads, so if yours aren’t… hakuna matata, baby!
But if you do need resonant heads, I find that simple, clear, thin heads work best. I use Remos, but really any will do.
Frankly, I don’t find that the brand makes much of a difference when buying reso heads, just as I don’t find that they need to be changed that often. Your experience might lead you to another conclusion, but what I hear on my recordings sounds awesome when I dial in the uppers with new heads, regardless of what I have on the bottom (tho’ I DO tune them each time as well), and regardless of how old the reso heads are.
But, hey, if you’re loaded, by all means… change all the heads every time you play out. Ya only live once, mate! lol
Walkin’ My Beat…

Since I’m always a big fan of full disclosure, lemme share with you what I choose for recording in my studio RIGHT NOW:
First, on my Pearl Export studio kit:
- Remo WeatherKing Coated Powerstroke head on all three of my snares
- Remo WeatherKing Coated Emperors on all my toms
- Remo Powerstroke Pro clear head on the kick
- Pearl Resonant black ported head on the kick back

Next, my Ludwig 1983/4 Keystone Badge rock kit:
- Aquarian Texture Coated Studio X head on the snare
- Aquarian Performance II clear heads on all the toms
- Aquarian Force I Batter clear head on the kick front
- Aquarian Force II Resonant black ported head on the kick back
Am I still trying out different heads? Yup. But these have been giving me great drum tracks so I know they work. Can I improve? Maybe. Just like you, we can’t be sure ’til we try, so… let’s keep experimenting!
The Mastuh Blastuh of Drummin’ Disastuh!
All these things we’ve discussed today should help you decide on what really matters to your drum sound: choosing the appropriate heads and letting them sound great. Notice I didn’t say GETTING them to sound great; just let them.
If you methodically think through the lists I provided, you will, with a little trial and success, find the perfect heads that will resonate timbre of your drum shells well and make you sound like a “Mastuh” in the music genre(s) at which you excel!
So put in the time and effort. You’ll be glad you did, and you’ll find knowing how to record your drums at home with pro quality is really achievable… at any price!
Now, go… make… sounds!!
Teaj