How to Make a Song – Live and Let Di-atonic!

(Editor’s Note: Charlotte continues tutoring us for a second time in how to “make a song” today. You guys really liked her first entry, so let’s see what other genius ideas she’s got… this time about the writing of the tune and music!)

Salutations! Charlotte here again. Teaj said you appreciated my last post about how to make a song (read part 1 here), so he invited me back. Thank you for your kindness. I’ll try to be as effective this time as last!

How to Make a SongToday we are going to concentrate on writing the actual music of your song, not the words. The melody of your tune and the chords that back it are your main concerns, and must be there in order to “sound right”. But how do we choose in a world of hundreds of chord and melody choices? What even are those choices? Good questions, and they have simple answers really, at least when you’re starting out.

Before we discover the simplicity of it all, let me catch any fears you might have in my web, roll them up and stuff them in a dark corner. Question not your ability to write music. I’m going to crawl out on a limb (which I do often anyway) and say that composing music is not hard. No, really. You can make it complex if you want, but it doesn’t have to be. So just relax into this lesson with me and by the end… you’ll be cranking out lovely melodies and interesting chords in no time.

Let’s go!

“Count On Me”, the Major said.

Can you count to seven? You can? Then you will have no problem understanding how to write popular music in this day and age. It is as simple as comprehending where it all begins: the major scale!

The Major Scale has seven different notes. Every song you hear is based on one or more major scale. When we play a major scale we usually also throw in another note at the top – this eighth note is just a repeat of your first note. For example, if we start on the note “C”, our major scale is this:

C – D – E – F – G – A – B – C

Notice how that last note is the same as the first one. It’s a repeat. But there are only, again, seven different notes. That’s all. Easy, right?

The major scale will probably sound familiar to you. One famous song that uses a major scale is the “Doe, a deer, a fe-male deer…” tune from “The Sound Of Music”. I like that show. So many good melodies and lyrics. Some excellent songwriting there, friends.

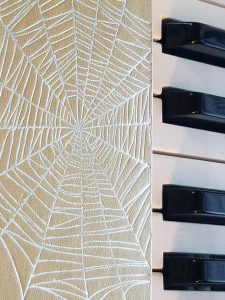
I want you now to go to a piano or keyboard now and play the C major scale. Keyboards are great for songwriting and learning music theory since you can see clearly all the notes you are playing, and not playing. Start on the “C” note. To find it, locate a group of two black keys anywhere around the middle of your keyboard. There are also groupings of three black keys but we don’t want those right now. Once you’ve found a group of two black keys, the white key adjacent to them on the left is the note “C”. Here’s picture to help:

How to Make a Song

Now that you have your starting note, “C”, go ahead and play, going to the right, all the white keys, until you get to the eighth note up, which will be “C” again.

Now play it in reverse, going down, until you reach the “C” note you started on.

There! Did you get it? Great. Keep playing that every once in a while until you can do it without thinking. The sound of the major scale should be so ingrained in you that you can sing it, anytime, anywhere.

The KEY Songwriting Figure… is You!

Some confusion can be found whenever anyone mentions a song having a specific “key”. What does this mean??

Again, it’s really simple. The key of a song is the designated seven notes that you will use in a song. And what do we call those seven notes?? You know. The major scale!

For example, you just played the C Major Scale. If we want to start writing the music for a song, we could use that scale to do so. since the name of the scale is C Major, what key do you think we’d be writing in? The correct answer is… “C”! Whatever your major scale name is, that’s also the name of your key.

Simple, isn’t it?

Here’s a good bit of information to know too, just to round out your expertise on the subject: There are actually twelve different notes total to choose from in the musical tradition of Western Countries. If we counted all the white AND black keys on a keyboard we’d find only twelve different notes. Here is a picture of all twelve, starting with white key A and ending with black key G# (say that “G sharp:):

How to Make a Song

All these notes are repeated again and again as you go up or go down on any instrument. Once you reach G#, you start over again with “A”. Repeat. Repeat. Up and down. Easy peesy.

When you choose a certain key to write a song in, however you only use… how many of notes, again?? Right – seven is correct. That’s why songs can be in many keys, because we can choose many different combinations of seven notes among those twelve total.

I Would… DI-atonic For… YOU…

So, this word “diatonic”… what is it and how does it relate to songwriting? Well, it just means “the chords or notes that are specific to a given key or scale.” And how many of those are there?? Riiiiight,… seven.

Seven notes. That’s it. Out of a total of twelve different notes to choose from, a given key only uses seven. And we call those notes the “diatonic notes”. Think of them as “the right notes” for a given key. So, for example, in our key of “C” from above, what are the diatonic notes for the key of “C”?

Just like before, they are:

C – D – E – F – G – A – B

Strike a Chord With Your Audience

Now the fun begins! It’s time to designate the seven diatonic chords that go along with our key. These will back up our melody and make it sound really wonderful. Chords are a group of typically three or more notes sounded together at the same time. Our major scale we played one note at a time. Chords we play by pushing fingers down simultaneously, so we hear multiple notes, not just one.

To figure out what these seven chords are, we’ll use the formula that is always the same. Any and every key you choose will use this diatonic formula. That’s why writing is easy; there are few rules to remember in diatonic-land. Here is the formula:

  1. Our ONE chord is MAJOR
  2. Our TWO chord is minor
  3. Our TWO chord is minor
  4. Our ONE chord is MAJOR
  5. Our ONE chord is MAJOR
  6. Our TWO chord is minor
  7. Our TWO chord is minor (and diminished)

Notice that there’s really only two choices: major chords and minor chords. What do those terms mean?

First, let’s examine the MAJOR chord. Emotionally, this group of notes sounds bright and happy. Wanna write something to make people smile? Put a lot of major chords in it. Technically, it is performed by playing a root note, a third, and a fifth. Thus, it will have three notes total. The third is found by counting up from your root note FOUR white and black notes. Then, from your third, count up THREE white and black notes to find your fifth.

Now let’s put that theory into practice for some cool-sounding music! Since we began in the key of C, we will start on the first note, “C”. This is our root note. Put the thumb of your right hand on C.

Now count up from “C” four white and black notes. Play that note with C. You are now playing your root (C) and the third of the chord (E).

Now count up from “E” (the third) three white and black notes. Play that note with C and E. You are now playing your root (C), the third of the chord (E). AND the fifth of your chord (G). Congratulations – you’re playing your first real chord!

Here is what our “C chord” should look like:

How to Make a Song

Wow. We’re making exceptional progress here. Let’s keep going!

We must now designate the chord built on the second note of our major scale. This will be called our “two chord”. Why? Because we’re building it off of the second note of our major scale. Makes sense, doesn’t it?!

The two chord is always a MINOR chord. Emotionally, a minor chord sounds dark and sad. Depressing songs love minor chords. Think Pink Floyd. Technically, It also has three notes total: a root note, a third, and a fifth, just like before. The difference is our third is a half-step, or one black or white key, DOWN from where it was for the major chord.

That means we will count up from your root note THREE white and black notes. Then, from your third, count up FOUR white and black notes to find your fifth. See how that is the opposite of what we did for the major chord?

Putting that theory into practice, we will start on the second note in our major scale, “D”. This is our second note. Put the thumb of your right hand on this D.

Now count up from “D” three white and black notes. Play that note with D. You are now playing your root (D) and the minor third of the chord (F).

Now count up from “F” (the minor third) four white and black notes. Play that note with D and F. You are now playing your root (D), the minor third of the chord (F). AND the fifth of your chord (A). Here’s what the chord “D minor” should look like:


How to Make a Song

Congratulations – you’re playing your first real minor chord!

Now all you have to do is continue up the major scale and construct either a major, or a minor, chord upon each of the remaining 5 notes. You will then have the “seven diatonic chords for the key of C”. Here’s a secret for the key of C: your hand will stay in the same shape for all seven chords. Just move up your hand, keeping the same shape, one note at a time and you’ll get all seven chords right.

Make it a point to listen to how the major chords sound bright and the minor chords sound sad. Get to know this difference so you can pick out major and minor chords in songs you hear elsewhere.

When you finish making all 7, you should have, according to our diatonic formula:

  1. C Major
  2. D minor
  3. E minor
  4. F Major
  5. G Major
  6. A minor
  7. B minor (diminished)

Put these chords together with any repeats you want, as many times as you want, in whatever order you want. If you think it sounds good, then it’s right! I recommend having three different chord progressions: one for a verse, one for your chorus and one for a bridge to your song, but you can also just go with a verse and a chorus section if you want.

Once you’ve composed two or three chord progressions that sound good to you, record yourself playing it, with your phone or some other device. Now you’re cookin’!

Breathe, and Be, the Melody

Next, let’s create a good melody to go over those chords. Play your recording of your chord progression for your verse. If you’re good at improvising with your voice, go ahead and create your melody that way. If you’re not good yet at singing spontaneously, just play around with your diatonic notes (the seven major scale notes) until you have a melody that you think sound good over your verse chords. See? It’s not hard at all.

If you have already written words, then try to sing or play a melody that fits them. If, for example, you want to sing “My baby, he reflects me like the wa – a – a – ter”, then you’ll need that same amount of notes for each syllable, which in that sentence is thirteen. They can be all different notes, or only some different and some repeated. You probably don’t want a melody consisting of just one note over and over because, well… it’ll sound a little boring, ya know?

Remember, just like your diatonic chords, you can play any combination of your diatonic notes to create a melody too. Any! Since those white keys are all in the key of C, all of them will sound “right” in most cases.

As you compose, don’t stress about it either. Enjoy this experience. Who you are right now will automatically let you know what sounds good. If you write tomorrow or next year, your senses might lead you another way. Whatever. It’s all good. Breathe in life. Breathe out music. Breathe in music. Breathe out life.

Keep repeating.  😉

Next, continue playing your recording and create a good melody to go over the chords of your CHORUS section. This melody should be different from what you composed for the verse. This helps give the song variety and keeps people from being bored by hearing the same thing over and over.

If you composed chords for a Bridge section, then by all means create a different melody over those chords as well.

Compose Yourself!

You now either have a completely finished song, or you have composed all your music and just need to put words to your melody and you’re done! Way to go!! Not only do you now know how to compose in the diatonic key of C, you understand why everything fits together, and that’s quite a feat.

How to Make a SongIf you’re like Teaj and I, you will find this process so magical and fulfilling that you’ll continue with it your whole life long. Keep doing it and the more time you invest in it the better you’ll get. It’s like anything, right? Practice makes progress. Hmm. I’ll have to spin that one into my web this week!

Thanks for stopping by. Let us know how this and our other articles have helped you, and if you have any questions, as always, drop us a line in the comments section.

Here’s to hearing your songs in the top 50 someday soon!

Now, go… spin… songs!

Charlotte


Best Recording Software for PC – the Game of Audio Thrones!

So ya wanna know what’s the best recording software for PC, eh? Ok! Let’s look at the options.

But first… a grand audio adventure… !

“Back against the cold stone, Bereso’s sweat was nonetheless rolling down the back of his neck, produced by the exertion of running the three miles from the tower’s hold.

He had found and taken the proof he was looking for: the Usurpers had continued honing their new magic, and two days hence they would meet in the royal court to perform their latest Direwolf & Pony show – proof that Proto’s dynasty was at an end and no longer needed. That he… was no longer needed.

Best Recording Software for PC

He listened. Faint metallic clinks around the corner. Deep murmurs in the dark.

The Usurper mercenaries were onto him. It was just a matter of minutes before they’d find him, seeking to steal the object of gold that hung heavy around his neck.; the seal of authority that gave the King’s preference, now more hotly contested than ever in the islands of Stoo’Dyo.

He must get to his ship!

Suddenly a bright archway of light stabbed the dark-adjusted open pupils of his eyes.

As he quickly squinted, he could see and hear his crew on the shoreline, his ship safely moored, and the smell of the ocean entering his nostrils like an old friend.

The audio magic had earned him another magic portal!

“Here! Over here!!” They’d seen the light. Without hesitation, he plunged into the unnatural doorway, leaving rock, dust, hate and death behind him as it closed just as suddenly behind him, giving the Proto dynasty one further day… to rule the waves.”

SOUND waves, that is!

The domination wars that have been raging for years continue, and the same question that’s flown by ravens to every corner of the land every year still persists: 

Who has the best recording software for PC??!

If you’re wondering yourself, then come with me as we sit by a fire in the gloaming woods, safe for the moment, and let us read with caution… the carrier raven’s words…!

Sonar – Greyjoy Sails on the Horizon

I’ve been a Sonar user since… well, since it was only called Cakewalk! Now the company is called Cakewalk and the software Sonar. I didn’t mind the name upgrade tho’, since they also consistently upgraded the software year by year too.

Sonar has always been only for PC, and is the only one on our list today that is not cross-platform. There’s a rumour that it will be Mac-compoatible one day, but it hasn’t arrived yet.

Best Recording Software for PC

It’s claim to fame thus far has been as an easy (but not simple!) recording platform used in home studios and by bands when they’re on the road and want to throw something down.  George Clinton, Jimmy Buffet, Jon Anderson from Yes, Tom Hamilton from Aerosmith – they all use it these ways. I’ve never gone into a pro studio and seen Sonar, but that’s not to say it can’t happen. Just not likely as yet.

One way I like to use Sonar is as a recording device for video production. It isn’t as demanding on computer resources as some of the other options mentioned here so it resides on my laptop. When I shoot a video and have a mic on a long boom stick, I run it into Sonar. It’s quick to launch, easy to utilize and gets the job done with a minimum of hassle.

One thing really going for Sonar right now that makes it excellent for non-professionals is the inclusion of Melodyne pitch correction software that’s included with your purchase. Melodyne is well-respected in the industry, and the fact that you don’t have to buy this as an extra additional plug-in is rare. Sometimes kings do share a feast with their people!

I’ve always found Sonar easy to use. It doesn’t have many complicated menus with unheard-of terms like some other options out there. To me, it’s like House Greyjoy of the Iron Islands – an uncomplicated, capable folk with powerful assets and ambitions for a more prevalent, ruling future. Don’t underestimate this house just ’cause it’s on the outskirts!

Currently there’s four different levels of Sonar to choose from, their cheapest being Sonar “Home Studio”, all the way up to “Platinum” which tops out their offerings with more pro features. Especially if you’re new to DAWs, you may want to start here.

Pro Tools – Hear It Roar!!

Ah, Pro Tools. The name that’s been bouncing around in our pro audio heads for decades now, like the little square ball in Pong. And if you know what Pong is you probably have some cassettes lying around that sound a lot worse than today’s MP3s!

For so long Pro Tools by Avid has completely dominated the recording software market. Like the Lannisters of Casterly Rock, it has ruled on an iron throne for more time than anyone. But time has passed, and contenders rise up every year with more frequency and more variety, just itching for that powerful crown. Thus, Avid’s sword is swinging more than ever these days, guarding its spoils, defending its “ProTo” legacy the best it can… and peering ’round every corner!

Best Recording Software for PC

Pro Tools was the first recording software I ever worked on, back in the late 90s. That was when it was only Mac-driven (now it’s cross-platform) and, really, no other company could touch it. They were the first to use their sales people to get Pro Tools into the recording industry in L.A. and the early bird definitely got the ear-worm in this case. They’re so entrenched there the other companies find it hard to get into the party.

Post-production studios, for example, still use it as the software of choice. I can attest to this fact since quite a few of my friends in L.A. use it professionally in that field. If the entertainment capital city made it number one, who am I to argue? It’s reasons like this that PCMag recently choose Pro Tools as this year’s Editor’s Choice for PC recording software? It’s no accident; it’s earned.

So, being that it’s the platform I’ve used most you can see why I’m a fan. The album I’m in the mixing stages of right now was cut on Pro Tools so I’m still actively jousting in the ‘Avid arena’ towards that end. But even if I weren’t, Pro Tools is either my number one or two platform. Which, at any given moment, depends on the project I’m involved with. My other favorite you’ll meet later.

Besides my longtime familiarity, its ubiquitous presence and the powerful menu options of the software, why else am I a fan? Well, Avid doesn’t appear to show any signs of slowing down, giving up or bowing out of the recording industry any time soon so they’re gonna stay around. They also continue to upgrade their software with features we, the users, are asking for and that counts for a lot. And, similarly, they have an excellent support line that I have used at least seven times in the past 2 months that totally resolved my issues.

Is it perfect? No. But none are. Like its competitors, there’s always room for improvement. I have two engineer friends that really would like to see Avid do a complete software redesign from the ground up. They see a couple areas in which they could further improve their sonic quality by doing so. But none of us see that happening any time soon.

Anyway, is it needful? Probably not. Pro Tools sounds really good if you use it correctly. If you’re in a multi-million dollar studio with monitor speakers worth more than $10,000… each… then maybe you’d hear the difference my friends are talking about. Otherwise, you’re gonna hear what you put in, represented quite well digitally, and able to be manipulated by more impressive plug-ins than probably ever will have the heart (or income!) to buy.

One con I have heard is that the cost of plug-ins for Pro Tools tends to be higher than plug-ins for other DAWs. I can say I have seen that to be the case a lot, so if you’re an effects fiend and have no self-control in the face of plug-in G.A.S… you have been warned!!

Oh, but one more plus: Avid is known for making extremely high quality hardware for Pro Tools that is really killer. If you have a slightly higher budget to spend, a full PT system with complimentary hardware, like their 16×16 HD I/O, is going to be amazing, flexible and deliver serious goods for clients or yourself.

As with all of these, different levels abound: you can download it free to try it, or buy several other iterations, the highest-priced being $2,499. Find out all you need to know to buy here.

Studio One – Rising with Dragon Wings

Because the audio gear market is so overrun with options on every side, it’s hard to get a new product noticed. The din of voices in the king’s court market square are those scrambling for what’s always been the norm; the safe bet. But sometimes a contender comes from seemingly out of nowhere and manages to get an audience… with the king… and with an audience! Presonus’ new recording software, Studio One 3, is getting this kind of major press, apparently for one reason: it’s impressing a lot of engineers!

Just as a certain dragon queen from the Targaryen line came from left field (well, really right field according to the maps…) and boldly made her claim, Presonus is planting their flag and taking their place in the game of audio thrones.

The company has long been known for making good hardware audio pieces, but in 2008 Presonus released the first version of Studio One to ply for the software business too. They obviously really thought it out well and did their homework too, because, even then, Studio One seemed to be instantly a champion: mature, strong, ready for a challenge. Kind of like a girl and her dragons I watched recently.

Best Recording Software for PC

A good friend and fellow songwriter/recorder of mine, Steven, recently left Logic Audio for Studio One. His personal take is all thumbs-up, especially for its computer stability (it’s never crashed), easy-to-see work flow and the plethora of educational videos out there to help him learn it.

One interesting feature is that you work from a single “Song Page”, so there’s no having to switch back and forth between windows a lot. Others have lauded the drag-and-drop Effects feature, and how it provides auto-routing, both of which are cool time-savers.

Like all of these options, it comes with a ton of sounds, synths, loops and libraries. You’ll have a robust set of raw materials to work with for sure. And you’ll have the “cool factor’ bragging rights of using the latest great product on the block.

One caveat: if you’re really into MIDI this is probably not your best choice, as its MIDI editing capabilities are much weaker than its competition, especially Cubase. Also, if a somewhat cluttered mixing console bugs you, you might wanna pass.

Otherwise, you currently you have three different dragons… DOH, I mean, levels to choose from via Presonus, ranging from free (say, thaaaat’s a good price!) all the way up to the pro model at $399. Check out the specifics here.

Reaper – Stark Excellence

Reaper is in a class of its own for many reasons, but let me start with what to me is the biggest reason, and the one that really matters to us G.A.S.-heads anyway: its sonic quality.

If you missed my post about setting up a home music studio, then you have not yet met Dr. Edward Wolfrum, former engineer with Motown and the creator of the D.I. box, which is now on every stage around the world. Read that post here for more detail, but in a nutshell, the good doctor has tested every major software in the industry with his PhD-approved equipment and concluded that Reaper is direwolf-head-and-shoulders above the rest with regard to its audio purity and digital sound reproduction.

Best Recording Software for PC

If, then, you want the best sound possible… download Reaper now. Just know that to do that, you will need to go, not to a store, not to an online merchant, but to the website of Reaper’s company, Cockos. It’s the only place you can get it.

Wierd, right? But I’m not kidding. It’s another reason it stands alone.

See, Cockus wants you to download and evaluate Reaper. They are so convinced that it’s the best available they know if you try it, you’ll like it. They don’t spend millions on big marketing campaigns. They don’t play the schmooze and glitz game across the kingdoms. Instead, they make a great product, continue to spend their profits making great upgrades, and listen closely to what their users suggest, probably more than any other recording software.

As for drawbacks, I have to look hard to see any, but there is a lack of virtual instruments and sample content that could be an issue depending on your sound set capabilities. If that’s the case you may need another software to handle synths, loops and such.

But even so, I suggest you get this gem of a product downloading and give it a go. It’s totally worth the look, I promise you. I don’t have all the gear it takes to prove its superiority but Dr. Ed sure does, and his PhD and ears don’t lie!

Once you’re convinced, there are only two pricing options, and they both show yet another way Cockos is just radically different from the competition: their buying structure is based on the honor system! After sixty days, if you want to continue to use their program they ask you to pay $60 for an individual,/educational license, or $225 for a business license. Do they track your adherence to this protocol in any way? No. They just ask you to be nice. Just be nice. Do the right thing. Pay the cheap price and go make hit records.

What a cool company. The link to their site is here.

So for all that and more, Reaper represents Winterfell and the Starks to me: solid, trustworthy, strong, honorable. It doesn’t try to take over the world, but rather seeks to do its best in its own area with class and dignity. Winter is… always a good option!

Cubase – The Hissing of Summer DAWs

What’s that rustling in the reeds? Could it be that same shrewd threat that year after year continues to spar with Pro Tools and the other recording options like Dornish sand snakes? Why, yes, I think it is! It’s Cubase!

Best Recording Software for PC

I’ve had numerous friends over the years that preferred to record on Steinberg’s flagship software, all the way back to the late 90’s. Today, like Pro Tools it’s direct competition, it’s still going strong and remaining relevant.

Cubase has always been known for providing very intuitive, strong MIDI recording and editing capabilities. If you’re really into MIDI you’re going to love Cubase. Pretty much anything you want to manipulate in MIDI can be done and done quickly. Many who work with virtual instruments and loops also prefer the tools and layout that Cubase has created.

On a personal note, I first got to know Cubase back in the 90s when I worked for Sweetwater Sound, a respected pro audio dealer. I remember being impressed with Cubase even then. I ended up going with Pro Tools but that was mostly due to how things looked. From a performance standpoint they were both strong, and remain so.

I’ll let the final Cubase song be sung in a fine Dornish accent by my esteemed colleague SIDney Howard, chief engineer and producer for Lake Gennesaret SPS studio. He’s a long-time Cubase aficionado and sums it up this way:

“First, Cubase Pro sounds cleaner and truer than most of its competition.
Second, when MIDI is required, it is among the most intuitive…so it’s fast
Third, Steinberg invented VST, the virtual studio technology. So, Cubase Pro is always ahead of the curve of the virtual studio standards.”

Well typed, sun-spear man! Now that Pro Tools has changed its plugin platform from VST to SAX you will have to give thought to it IF you already own plugins in either format. If not, there’s plenty in both fields for you to choose from so no worries.

Steinberg currently has three version of Cubase on the market, ranging from the cheapest $99 “Elements” package to its high-end $484 Pro version. Check out the specifics here.

Keep the Ice & Fire, but Bring On the Songs!

Best Recording Software for PC

Choosing a DAW is a BIG deal. You will spend massive amounts of time: hours, day, yea, even years on some piece of software. The least you can do is make sure it’s worth the investment.

The five alternatives I listed above are exactly that; no matter which of them you choose, you’re going to feel like a king. I cannot promise, however, that Brienne of Tarth will come swear to you her sword.

But if you write a reeeeeeally good song… who know?!  😉

Will peace ever come to our fair audio lands? In a word – nay. Usurpers will always abound, and kings and thrones will always seek to defend their advantage.

For us non-royal subjects, however, we shall reap the benefits, for none of them can afford to rest on their laurels. They must constantly progress, and prove their worth with every pass of the fiery sun… to those of us who wait, not with sword, but with mouse in hand!

Now, go… make… sounds!

Teaj

CARTOON Teaj in Gtr


How to Play the Guitar For Beginners – Pt. 1: Beavis-to-Keaggy Mastery Awaits You!

How to Play the Guitar For Beginners

Ever since Elvis Presley appeared in 1956, flailing and rhythmically beating up the guitar that was strapped just above his undulating hips, guitars have been one of the best-selling instruments among youth in America.

Currently, it’s the second most popular instrument for students taking private music lessons in America, dancing only behind the ubiquitous piano.

In my studio, the charm, charisma and iconic flash of the guitar is always represented by dozens and dozens of starry-eyed youth, wanting to emulate the latest axe-slinging guitar star, and trying not to think about how their fingertips hurt.

The question of how to play guitar for beginners is one that has many answers. Like any instrument, there’s so much to learn when you first pick it up that it seems ridiculous to believe you’ll ever be more than a hack.

Also, there are so many ways to play the guitar that one could get stuck just considering which educational direction to take on the instrument.

How to Play the Guitar For Beginners

If you’re just looking into it, you might feel confused and uncertain; you may feel like taking the Beavis route – pick up a guitar, strum any old place on the neck, start singing radical, crazy guitar licks and then proceed to demolish the guitar in true Pete Townsend fashion all over the floor. You may have even already tried that and now need a new guitar!

It might not be a great guitar performance, but I’ll give ya points for Hendrix flair.  😉

Instead of pretending and being a laughable poser like Beavis, let’s look at the best first steps to take as a beginner that will help you make the most of this radically esteemed instrument with such a rich, inspiring history, and put you in the footsteps of the masters. Let’s rock!

The Right Tool for the Job

Legendary stories abound of many guitar slingers, Elvis included, who started out on a guitar that was so hard to play their technique suffered horribly and they couldn’t progress. This is why it’s important to have an instrument that’s not so hard to play it feels like Steve Martin’s “Cruel Shoes”.

After all, who wants to play an instrument that uses a vice and razor blades to hold their hands in place?!

You want to make it so that the guitar is inviting, and fun to spend time with. If you’re spending less than $100 on some “new” guitar, you’re probably going to be sorry you even tried. Instead, if you don’t have much cash to initially invest in your new interest, try CraigsList or Music-Go-Round.

CraigsList will show you people in your local area who want to get rid of guitars in their homes, and sometimes these are really good instruments that are stupid cheap because the person selling it has no idea of its worth.

Music-Go-Round is a store that specializes in used gear. I personally have saved hundreds of dollars buying from them, and all the gear they’ve provided me with is still in excellent shape.

How to Play the Guitar For Beginners
Would YOU play a baseball bat guitar?

If money is no object and you’re looking to buy new, my recommendation is to spend at least $250. Then you’re pretty much assured that you’re not going to go home with a baseball bat that has strings on it.

If you want an electric guitar, get one of THESE ELECTRICS FOR UNDER $200!

If you’re feeling called more towards acoustic guitar, any of THESE ACOUSTICS will cost little and work great!

Also, before you buy be sure you play quite a few guitars. This will give you an idea of how they all feel. Make sure one of them is a really expensive model, over a $1,000. This will let you experience what a quality instrument should feel like. Then try to buy the closest thing to that that doesn’t keep you from making your rent payment.

It all comes down to this: buy the very best instrument you can afford, and stay away from anything that feels incredibly hard to play. Got one? Ok, let’s move on…

Dream On, Dream Until Your Dream Comes True…

How to Play the Guitar For Beginners

Before you strike a note, imagine the instrument you just bought… years, even decades from now.

There it is… still delivering great sound. It’s been constant in its tonal friendship. Inspiring you to greatness in soloing, rhythm chording, melody-writing… all the things you’ve come to love and be quite good at in music.

It’s been with you in your room, with your friends, on your first stages, into the spotlights… and the glory.

You’ve written dozens, maybe hundreds of songs on it. Some of them can still make you laugh out loud, or still bring you to tears. Its sound, through those decades, was the magic, the glue, that held every song together. Always just a reach away, it has become… like an extension of your soul.

There’s a reason why guitarists often name their guitars – they become so familiar and cherished through the years and gigs that they’re almost like a dear friend; a part of the family.

This now is your opportunity; the chance to discover the power and alchemy of your new companion. And if you invest time in this symbiotic partnership, I promise you it will take you and your aspirations to places you never thought possible. Dreams come alive and stay alive through one thing…

All Hands On Neck!

Practice. It’s the best next step. Spending time with your new instrument like a friend will start unlocking its secrets, and reveal to you understandings you never knew were even there.

How to Play the Guitar For Beginners

Like any great relationship tho’, it shouldn’t be forced. Don’t wanna play today? Then don’t. Would your girlfriend or boyfriend want you to be with them because you “should”? Or because you want to? We all know the answer to that.

And don’t view your new instrument like the U.S. Mint, locking all the greatest treasures away, and mocking you – just daring you to try to get in. It’s not at all like that!

How to Play the Guitar For Beginners

Rather, see your new guitar like the very best teacher you ever had; you know, the one that showed you endless ways to enjoy the subject at hand, that kindled a real fire inside about the possibilities and wonders that are latent in its study and tools. THAT is this new companion. And that is just a glimpse into the time treasures to come.

With all this in mind, keep your guitar out of the case, in arm’s reach, somewhere that you will be often on a daily basis. If you keep your instrument accessible, just seeing it will remind you of its devotion to your happiness, which will in turn prompt you to pick it up. If you can get it in your hands just ten minutes a day, you will see real progress.

How to Play the Guitar For Beginners

As I type this, one of my guitars is right next to my table on the right, ready at a moment’s notice to deliver the goods. 

It’s my oldest guitar, and it has been put through the ringer. It’s not expensive. It doesn’t even have a recognizable brand. It was my first acoustic and remains what it was when I bought it: a cheap beater.

Good thing too, because one time going to a gig in Idaho from L.A. our drummer fell asleep at the wheel at 5 a.m. and all of our luggage, instruments… and myself were thrown headlong into the Arizona desert plain!

None of us were hurt (read that as “miracle”) but the truck was totaled. One of this guitar’s seams, along the back bottom edge, was cracked open. It still is today. I leave it that way to remind me of how blessed I am to still be here writing this.

Nail it!

There are few feelings more awesome than that of accomplishing something very difficult, that took a lot of commitment, time, energy and patience to bring to fruition, and that you now see happening in front of your very eyes. When you have practiced something enough this will happen to you, again and again. And just like any human… you’re gonna love it!

How to Play the Guitar For Beginners

To get there, make sure you spend at least half of your practice time focusing on a specific song and trying to play it as exactly as you can. This teaches you technique, and after doing this with many songs, you will naturally have many techniques to draw from.

Some you will play more than others, and this is partly what becomes your “style”. Thus, learning music by others actually unlocks your own music, and one day… a student will be excited to learn your songs!

The other half of your time you can mess around on your instrument. Do crazy things. Pretend you can play things you can’t. Get in front of big windows or mirrors with your favorite songs on and mimic being the guitarist. It’s FUN! And it helps you visualize yourself actually being an accomplished player.

Basically, if you’re playing your instrument at all, it’s a good thing, but mix it up with half free-play and half applied study on some tune. This will mature your playing quickly and be entertaining at the same time.

Was it You That Said, “How Long….?!”

How to Play the Guitar For Beginners

How long will it take ’til you’re any good? Depends on how much you’re hangin’ with your new friend. The more your fingers on the fretboard the faster you’ll progress.

Oh, yea, and if you do, don’t be surprised if times just flies! Countless times I’ve picked up one of my instruments to practice “just a few minutes” and found myself still there, digging, searching, pushing, plaaaaaaying… hours later.

That’s because music is so much fun, and so rewarding that it never gets old. If you treat it like the gift it is, and go it with anticipation, never in drudgery, you’ll be amazed at the bond you’ll create.

As for what to play, that’s also up to you. Got a favorite song? Google it with “how to play…” in front of the title. You’ll find hundreds of websites and YouTube videos showing you how to play it.

Especially when you’re first beginning, just learn songs you like. Don’t try to play something you hate but someone else recommends. Life’s too short. Investigate what you’re interested in and you’ll have an absolute blast!

… And Be a Juke Box Hero!

One guitarist that I’ve always looked up to and is still, in my opinion, the best guitarist alive today, is Phil Keaggy.

I’ve seen him play countless types of music: rock, classical, country, roots, medieval, pop… and he not only plays them adequately, he excels in each of them!

How to Play the Guitar For Beginners
Phil Keaggy with Paul McCartney

Here’s what he says about playing guitar:

“There are times when I am able to free myself from concerns about technique, and suddenly my spirit soars and the music just flows through my hands spontaneously. That comes with living with the guitar for a long time.”

Take it from my hero Phil and I: enrich yourself with quality and quantity time with your new axe. Do so, and you won’t have to try to be good at your instrument – you will simply become so.

Explore, attempt, stay curious & inspired, and practice like a boss. You’ll be pleased with how easily progress comes.

Oh, and if you’re ready… HERE IS PART TWO of how to play guitar for beginners… all about focusing your efforts to make quicker progress.

Now, go… make… sounds!

Teaj

Teaj in the storm fields!

How To Make a Song – Charlotte Shows the Ropes!

(Editor’s Note: Teaj here. Today you’re in a for a special treat! While I’m unpacking a brand new mic pre, my ol’ pal Charlotte will be tutoring us in “how to make a song”, as she puts it. 

How To Make a Song

She’s really good at it and I know you’ll dig her methods. I asked her to share with us because it’s not often that someone comes along who is a good friend and a good writer.

Charlotte is both. Enjoy!)

Salutations! I’m Charlotte. You may have heard of me and my famous “Web” from a while back. My friend Wilbur and I created quite a stir in our little town with our unique method of communications.

I still get fans asking for my trademark “eight signatures” wherever I go because of that. Today though, I’m here to teach you how to make a song. Didn’t know I was into that too? Well… one book can’t tell you everything!

Oh, and if you’re wondering how I’m able to write you this when I’m supposed to be… well, gone, the answer is simple: every 65 years a spider’s essence, or “Spinneseele”, is reincarnated into another web-working wunderkind.

Back in ’52 when I exited, stage left, I knew my comeback was inevitable. This time I’m extending my writing into the musical kind, so look out, barnyard slackers… Charlotte’s baaaaack!

Spin Your Web

Everyone knows the glory of a spider is her web. The intricasy and incredible complexity of our gossamer nets cannot be equaled in the animal world!

Humans have come very close to producing our thread, but even now have never quite equaled the properties of what we create – our silk has a tensile strength greater than steel and tougher than Kevlar!

How To Make a Song

As such, it’s the perfect tool for catching things and keeping them. After all, a girl’s gotta eat, right?

To begin writing songs, you will need to produce your own ‘web’ – something to catch and keep ideas for songs upon which you can build and complete your own classic tunes.

I happen to know that your WEB-master and my friend Teaj, has kept many journals, cassettes, mini-tapes, CDs, palm-sized digital recorders and, today, smart phone recordings, that have captured literally thousands of ideas for his compositions.

Like his tools and my webbing, you need to carry with you, wherever you go, something like these to speak into or write upon that becomes your go-to place for storing great song ideas.

If you do this, you will never run out of places to start writing, which is often the most difficult part. The blank web is the most daunting, so keep yours full! Then you’ll never have to try to create from scratch something to write about.

FAW Ago & High Away

If you are going to write songs with a vocal, then that means by default you’re going to have to write lyrics. AAach! I can hear some of you trembling now. “But I’m not good at writing words. How can I even start?!” Trust me, you’ll have no problem if you use the method I’m going to give you.

The method that both Teaj and I use often in our writing, in addition to capturing ideas on the fly (that phrase always makes me hungry) or writing lyrics straight from our poetic brains, is called F.A.W., or Free Association Writing. There are two kinds, the Textual F.A.W. and the Tonal F.A.W. We’ll begin with the Textual. Here’s how it works:

Set in front of you a blank piece of paper. Or, if you prefer the digital method, set yourself  in front of your keyboard with a blank document at the ready.

You may have an idea in mind of what you want to write about, or you may have nothing; it doesn’t matter, because either way will work.

Next, at whatever moment you choose, you simply start writing.

But here’s the catch: you may not stop writing until you have filled a page completely or TWO pages completely. No exceptions!

You. May. Not. Stop.

Once you have filled the page, or two, you may relax, take a deep breath and shake your hands (or spider legs) in the air to rid them of the ‘worked-out’ feeling you’ll probably have.

Now, believe me, I’ve done this hundreds of times and I know you will get to a point on the page where you can’t think of anything to write. That’s okay – write that!! Meaning actually type out “I have no idea what to say here. I really don’t…”

Whatever words fill your head, no matter how unrelated, asinine, pedestrian, vulgar (yes, that pops up occasionally), confusing, metaphysical, ordinary or hippie-sounding….write them down!

The goal here is to start getting your mind released from the confines of its usual “editor”. You know the one: it’s that voice that frequently tells you your thoughts are too this, or too that, or not worth sharing, or dumb, or…

How To Make a Song

You get the picture. During the F.A.W. stage there are no bad ideas. They are all terrific. Radiant. Impressive.

Don’t let your mind tell you otherwise. Release yourself from the stranglehold of the “Office of Self-Doubt”, that for too long has pushed you around. You don’t have to take that! You’re some pig!!

Oh, whoops, I mean… you’re SOME WRITER!!

When you have finished this first part of F.A.W.-ing, take a break. Go do something else. Leave it. At least for at least a few minutes.

Sometimes I don’t go back and read what I’ve spun in the corners of my web until the next day.

Abandoning it helps seperate the two roles you must play in the your head and let’s them know you will not ever allow them to speak to or influence each other.

The first role you played was the great superhero “F.A.W. Girl!” (or Guy), where there were no boundaries, no parameters, no off-limits barriers to your progress.

The second role?

Well, once that’s done, you can play the Editor. This is where you’re finally free to get picky.

Get a highlighter if you went the paper route (hey… I had one of those in a way distant past!).

If you typed digitally use the computer highlighter option which is almost always included with any writing software.

What you do now is read through what you wrote. As you do, highlight or digitally “grab and paste” to the top of the page any words, phrases or sentences that sound unique, eloquent, arresting or extraordinary.

If you started your F.A.W. with a specific theme in mind, cull out anything that really helps you tell that theme’s story.

Once these choice, superior lines are collected on a seperate piece of paper, or at the top of your digital document, voilà – you have the beginnings of your song!

If you don’t like much of what appeared in your first F.A.W., try again. Keep trying. If you F.A.W. enough times you will eventually teach your mind to “shut up!” and allow you, unfettered, to unfurl the sails of your creative mind and travel to the inventive islands, inspired reefs and innovative isles that only your personal genius can reveal.

But like Columbus, you must go! Put the pencil to paper, lassie! Type until you ache there, laddie!

There are always new world’s to discover!!

Harmony, Gee I Really Love Ya…

How To Make a Song

Next I would start putting your words to music. Now, there are two musical anchors you must produce for a song to get everyone singing along to it:

  1. the CHORDS
  2. a MELODY

First, let’s look at CHORDS. These will be the notes behind what you sing that harmonize with them and provide emotional color to your three or four-minute journey of sound.

There are three levels of familiarity to chords in music. You must honestly surmise where you place on this list:

  • You understand how to make chords and know how to use them
  • You understand how to make chords but don’t know how to use them
  • You don’t understand anything about chords

No matter which one defines you, it’s no problem. We can get there!

If you are in the first two definitions, you’ll be happy to know that I’ve already finished a whole article just for you that Teaj will be sharing with you soon, probably in the next week. It will really empower you once you spend a little time with it because it explains, in a very easy-to-understand way, how to make sense of chord options within a song.

So hang on… it’s comin’.

If you’re a musician familiar with chords and such, then you probably already have a good idea what you must do. If not, I’ve got a recipe for you. Compose three different chord progressions for the following popular song sections:

  • the VERSE
  • the CHORUS
  • the BRIDGE

These sections are currently in almost all popular songs, so if you want your compositions to be popular (you do want that, right?) then I’d make sure your first songs have each of them represented.

I play the different sections of my web, which have different lengths of silk, to get these sections and the chords I need. It’s hard to hear for humans, but for me… my web is like the world’s largest harp! And every day I’m on it, writing for the world.

Play the each section through, and then proceed through the song stringing all the sections together to make sure they transition well with each other.

How do you know? Use this technique: record the whole thing and see if it sounds right to you when you listen back to it objectively. If not, change it.

Then record it again. Repeat this process until the whole thing sound killer to you. Only then can you move on to… the melody!

It’s Whispered That Soon, If We All Call the Tune…

How To Make a Song

The MELODY is what you are singing along with your words. If someone whistles your song, the notes they blow out would be your melody.

There are two ways you can spin a melody onto your lyrics:

  • humming or singing
  • playing notes on an instrument

Which one of these you use depends mostly on whether you play, or have, an instrument (besides your voice) or not.

If all you have is your voice, then your first step is to tell your internal Editor to shut up once again and start improvising melodies over your lyrics. This is the Tonal F.A.W. I mentioned earlier. Because we’re working with sound instead of words, you’ll need something to record what you come up with, like your phone. Record while you sing one, then stop.

If you are just starting out, I suggest coming up with at least three different melodies for your words. This gives you some choice when you bring out your Editor again and will probably cause you to have better quality of music up front than if you only came up with one option.

After you’ve recorded three different melody options, do the same as with your earlier Textual F.A.W.s and leave it. Go away. Do something else. Swing on a barn rope. Talk to a pig. Bathe in buttermilk (it does wonders for the skin, I hear). Just don’t listen to it now.

Later come back and listen to all three. I guarantee you one of them will stand out as a better melody. That’s the one to use!

Fully Anchoring Your Web

Now that you have lyrics, a melody and chords you are only lacking one thing – a recording! The only way a song truly exists these days is if it is recorded and put out on the Web for all the world to hear.. and know… and (hopefully!) love.

If you don’t already have it, get some recording software (Audacity is free!) and go record that bad boy!!

First put down the chords and make sure they sound perfect.

Then overdub (to record on a separate track, over the chords) your words sung to your melody.

This is where you truly know if your song is ready for the world, because if something isn’t quite right in your vocal, instrument or words, the recording software makes it obvious.

If you are satisfied with what you hear, then you know have a good, quality song that, like a good, quality web, is anchored in at least four places: your lyrics, your chords, your melody and your recording.

Is this truly all you need to make your impact on the world huuuuuuge (Trump quote notwithstanding)?

Yes, indeed. Oh, yes, indeed!

Conclusion

My song “Sleep, Sleep, My Love, My Only” has done especially well over the years, but it too was once just an idea I had spun in a corner of my web. It took effort, perserverance and study to get it to the level of excellence it ended up at. 

How To Make a Song
My pup Pippin after Charlotte sings “Sleep, Sleep, My Love, My Only”

My good friend E.B. really likes that one, as does Teaj. And his dog Pippin!

Songwriting is ever the wonderful adventure, but don’t be fooled -it’s also hard work, and demands undaunting focus and dedication.

Like anything though, it gets easier the more you practice. So keep studying, keep trying, and never stop believing you can make a song too. 

As Teaj always says:

“Writing a song is easy.

Writing a good song is hard.

Writing a great song… well, you won’t even know if you’ve done that. But the world will… !!”

Keep at it, fellow composers, and someday you too may produce a “magnum opus” just like I have so many times (in more ways than one!).

Hope to hear from you. If this article helped, comment below and let us know. If you have questions, Teaj is here always, and I’ll check in from time to time.

Now, go… spin… songs!

Charlotte

How To Make A Song

(Editorial note #2: Teaj would like to sincerely thank E.B. White and his wonderful book, “Charlotte’s Web“, without which my childhood would have been much less inspired. Indeed!)

The Aston Spirit Mic – Shootout in the Studio!

Aston Spirit Mic

Well, I have had a blast as usual in the studio today, and you all will reap the benefits of my fun!

I decided to really put my new Aston Spirit mic through the ringer and test it against other mics in my arsenal that I use on an ongoing basis.

The results are pretty much what I expected based on the research I’ve already done, but with the samples and data I provide here, I’ll let you make up your own mind on the subject!

The Set up

So, for any type of mic shootout it’s important to keep the individual elements as uniform as possible when it comes to levels, enhancements, dynamics, effects and so on. I was extremely careful here to verify that all were exactly the same for each mic before I committed the performance to disc.

Aston Spirit Mic

To make this shootout as transparent as possible, I only added one thing to the raw signal, and that was a small 2:1 compression from my good ol’ dependable Tascam 16×08 I/O (see it’s review here). The reason for this is I wanted to make sure I could perform a very wide dynamic range for these mics to pick up.

Mics can act very differently at different dB levels, so what I’ve delivered here really shows us the goods concerning mic dynamic sensitivities. Because my dynamics were so wide though I had to use a little compression so my quiet section wouldn’t be completely lost.

Aston Spirit Mic

I also took great pains to point the mics in the exact same direction, so they’d pick up the same point of reference. I usually would not do this. Acoustic guitar, for example, usually has four mics on it in my studio, but all in different places, to pick up diverse nuances of the instrument. I have always adhered to the recording rule that it’s always best to have a lot of inputs even if you don’t use those inputs in your final mix. The extra tracks have come in handy maaaaany times!

As for the Spirit, I did not use the high-pass filter on it. I also kept the normal cardioid polar pattern, tho’ I really can’t wait to use the other two it provides, the omni and the figure-eight, on something soon. I just love it when a mic is versatile but remains top shelf in sound!

I have constructed a section of my house to be very sound-proof, but not totally so. I find my recordings to be quiet enough by far, so I decided long ago not to go to the trouble and expense of constructing a “room-in-a-room” for vocals and such. As you can hear in these recordings my dead zone is exactly that, and sucks up noise like elephants to water.

“I… like… mics!”

Most condensor mics sold these days have a shock mount of some kind to go with it, either as an option or sold with the mic.

The Spirit does not.

Aston Spirit Mic

“But why not??!”, you may ask. Well, the Aston company constructed this mic to internally mitigate hits or rumbles. What does that mean??

It means you don’t need one. When you plug it into the bottom it is connected to an internal mic cage that is designed to keep those pesky thump gremlins from jumping up and down on the capsule and ruining your take.

I thought I’d test their mic the way they say we should trust it, so thus it is connected straight onto the mic stand, with no shock mount at all.

Bring on the gremlins.   😉

Lastly, I also did not use a pop filter for the vocal track. Usually I would, but I wanted, again, for us to be able to hear the naked mics (sounds like a Leslie Nielsen movie!) in all their glory.

So with all that in mind, let’s get on to the shootout…

Pickin’ and Grinnin!

Aston Spirit Mic

Acoustic guitar is such a great instrument. It’s the first thing I ever played besides singing all my life, so it holds a special place in my heart.

I used my bangin’ M.J. Franks guitar on this tune, as is usual whenever I’m tracking acoustic here in the studio. It’s my go-to recording acoustic simply because… well, it’s AWESOME! But also because I paid Mike to make for me the perfect RECORDING guitar, with a very balanced EQ and warm, legacy sound.

You can learn all about it, and Mike the luthier who made it for me, in my review of it HERE.

The mics you shall hear appear in this order:

Aston Spirit Mic
  1. the Oktava MK319
  2. the Audix i5
  3. the Audio-Technica 4050
  4. the Aston Spirit
  5. Guitar D.I.

Rather than bore you with the whole song, I chose a short recorded snippet for both guitar and vocals that showcases extreme dynamic ranges. You will hear them, in order, one after the other with only a second in between.

Obviously, listening to this recording with either headphones or through some studio monitors will provide you with the best audio fidelity. They are being played in the .wav file format to circumvent compression loss and noise.

And, with that… let’s listen!

Whatja think?? Have a favorite? Was it what you expected from each mic? Were you surprised by any mics performance? Which one sounds like you want a guitar to sound like without having to EQ it or change it at all? These are the types of questions to ask yourself if you’re considering buying any of these. If you’re just starting out, the best thing is to get a mic that can handle a lot of sound sources and get the result you want.

I have these answered for myself certainly, but I’m gonna hold my cards close to my chest for the moment, so as to not influence your decision. Base it purely on how it sounds, ‘cuz if it sounds good… it IS good.

I Hear Voices…

Aston Spirit Mic

Now let’s add a vocal. This was a fun song to write and even more fun to record. I firmly believe the vocal is the most important part of a sung song, so mic effectiveness is a big deal to me. Let’s look at how I threw the gauntlet down for these four mics:

  1. the Oktava MK2500 Tube Mic
  2. the Shure SM58
  3. the Audio-Technica 4050
  4. the Aston Spirit

As before, you’ll be hearing a short recorded snippet of the full vocal. This part really has extreme dynamic ranges; it goes from a whisper to a rock roar! You will hear the mics, in order, one after the other with only a second in between, just like before. Here we go….

And again… whatja think?? All the same questions apply here as we asked for guitar, but there are some more I ask for vocals, like was this mic good for this song? Was this mic good for the timbre of this singer? Does the transparency of the mic (or lack thereof) help to sell the song lyric? Which of these mics makes me believe what the singer is telling me most?

If I fully produced this tune there’s effects I’d put on, a flat note I’d fix, further dynamics I’d apply… but this was a shootout so I’m keeping it raw and real, cowboy! Or cowgirls. ‘Cuz… there are girls who are into pro audio, ya know. Not a lot, mind you, but… enough to keep us interested!

I Got My Mind Set. On. You.

Aston Spirit Mic

The decision to keep the Spirit mic to me is a no-brainer. I still like how a couple of the other mics brought my guitar and vocal to life and I will still be using them frequently, but, as you can hear, the Spirit just brought a special something that the others did not have. It’s own unique color. It’s own spin on things. And it’s a spin I can really use to make my recordings better. I’m sure you heard it too.

Aston Spirit Mic

For the vocal I’m personally torn. I could use the Spirit. But I also like how the 4050 put the brightness in that I like (as usual). This always helps it cut through a bigger mix. So if I end up putting drums and bass on this tune, I probably would stay with the 4050 track.

If I keep it stripped-down though, I really like the ‘width’ that the Spirit mic adds to my voice. It thickened it up a bit somehow, and, hey, what guy doesn’t want his voice more manly? Well, at least this guy likes the extra beef.    😉

My Oktava tube mic, as usual, sounds good and warm, but a little too warm for this particular song. I always judge by the song, and just try to facilitate its message, or the emotion it’s trying to convey?

Everybody… Sing Along!!

Finally, my gift to you: here’s the two put together on this, my latest tune. I call it… well, DUH, whaddya think I call it. “Serious G.A.S.!!” of course!   lol

Agree? Disagree? Unsure?? Mic shootouts can be very subtle comparisons so if you’re fine with all of ’em that’s okay too. There really wasn’t a bad mic in the bunch. I use them all, all the time.

If you, like myself, have just become an avid fan of Aston mic clarity and color, here’s your quick ticket to Hitsville:

Spirit mic BUY

If you prefer Amazon Prime, no problem, their coming drones will fly one to you in no time!:

When you start using the Spirit in your own studio, share your thoughts and results with us. Use the Comments section below. Gear isn’t just made to use, after all – it’s there to talk about! Especially if we’ve been G.A.S.-ing for it for weeks or months, like I did for the Aston Spirit.

Special thanks to David Borovoy from Guitar Center, Southfield for turning me on to this mic and being my “go-to” rep when serious G.A.S. drives me to his pro audio corner!

Now, go… make… sounds!!

Teaj

Teaj in the storm fields

Aston Microphones – Toe Goes In… Hits Come out!

Aston Microphones

The world wasn’t really expecting, wanting or needing yet another microphone, let alone another microphone brand, to appear in 2016.

Most would’ve said, “Okay, there’re enough kids in the pool at this point. Let’s stop the propagation before one of ’em breaks the ‘no pee‘ rule!”

But despite our jaded-gearhound cynicism, a resounding SPLASH was heard ’round the pro audio pool last year, the waves of which are still gently bobbing us towards superlative sound here in 2017.

The debut line of Aston microphones has arrived, people, and quality sound is more attainable than ever!

We Love Critics! Let’s Go Find a Bunch!!

Aston Microphones

It’s not every day that a product is made by a group of USERS, instead of just profit shakers and specs-focused engineers. Aston decided before they opened that they would demand of themselves as a microphone company the highest audio outcomes for their products.

The biggest way they chose to do that and keep themselves accountable to their goal is by bringing together a “Development Panel” of pro audio experts who work daily in the field as their ears for testing. The sheer breadth of knowledge and number of collaborators in this panel is daunting; I’ve never seen so many amassed to bring their competence to bear upon a singular product. Here’s the full list of panel auditors: http://www.astonmics.com/the-a…

But they didn’t just ask these folks to use the mics and then help ’em endorse them: they conducted double-blind listening tests to prove that these mics could stand up against the big boys. Finally, after months of tweaking, Aston chose to deliver the mics that consistently impressed their pro audio consultants to the point where they all wanted one of their own. Now that’s what I call a job well done.

Obviously these guys and gals are into the details. Their focus is on making products that audio professionals can use, day in, day out, and actually want to use. No small feat considering the dizzying array of mics that are available in this day and age. I first was told about these mics by a fellow musician and G.A.S.-er who said was using one over a Neumann (more on that to come). That got my attention pretty quick. And so, dear readers, this is why we’re here. Let’s take a peek into the products of this rare ensemble of audio nerds…

The Starlight: A G.A.S.-y Wish Come True!

Okay, I’m just going to put this out there: putting a pointing laser on a pencil mic?? Brilliant move!

Aston Microphones

Not only is that extremely usable feature that I would use every time for drum overheads, but, can we just talk about the cool factor a minute? What client is not going to mention something about those lasers being the bomb when they see the engineers setting the mics up and using ’em? They’re like mini Star Wars light sabers making that “Hhruoom” sound over the drum kit! You know the one. “Hhruoom.Hhruooooom!!”

Help me, Aston Kenobi, you’re my only hope for an engineer that knows what they’re doing.

Your clients will also know by the mock laser battles that you, along with your closet of classic ‘older mics’, are staying on the cutting edge of things for their recordings, with new, fancy-schmancy gizmos, and since they’re our bread and butter, that’s what matters.

For the Starlight mic, Aston expanded their Development Panel from 33 to 50. They knew this mic would be used on many different sound sources, so they opted for more diversity in the auditing – a brave and vulnerable move on their part. But this is what separates the Poe’s from the posers, folks…and it worked.

In testing this mic actually caused a ‘listeners rift’ between our friendly auditing panel. Aston discovered as they put the starlight through its paces that half the pro audio guys liked the “old school sound” of small diaphragm condenser mics: those that exhibited a warm, “vintage” tone. The other half had a penchant for brighter, ‘airy-er’ sounding mics for their small condenser uses. With a pretty dead-even split, they did what any great compromiser does – they gave us both! What this means for the industry is we now have the first small diaphragm condenser mic that offers voicing options built in. Touché, Aston!

If you want specs and pics, check ’em out here. My personal take? Get two of these before the price is raised. They’re currently at $349 retail. But I can’t see the prices staying as low as they are now on any of these three mics. They’re that good. Oh, and the guy that sold me these (you rock, David at G.C. Southfield!!) thinks so too.

The Origin of Bees-Knees

Aston Microphones

Now we’re in the land of large condensers. It’s getting bigger in here! The Origin is designed to excel on acoustic guitars and vocals according to Aston and its secret weapon is the 1″ gold evaporated capsule that captures your sound source.

Aston went through hundreds of these types of capsules before they settled on three that were consistently awesome enough to put their name on.

There’s a gentle slope boost from about 3 to 20k on this mic, giving it some nice “air”, a definite must for acoustic guitars and vocals. Otherwise, it’s pretty flat from around 100 and up. I’m used to seeing mic frequency charts look pretty wavy and hilly. Not this contender! And with the rave reviews I’m hearing and reading it seems pretty clear: if you make something well you won’t have to EQ it up the wazoo.

Quiet. Smooth. Direct. I’d put it in the category of WYSIWYG. Not a whole lot of colorization going on here. It just transparently bears your soul clean, so… make sure you’re ready for a vocal session with this puppy. There’s no hiding! It will find you!!

Currently under $300 retail, if you’re just getting into audio, don’t have much cash but want a quality mic, especially for vocals, this has to be your first choice. For the price, I don’t see anything beating it out right now. Compare its specs here and you’ll see what I mean.

And the Spirit of the Waters Doth Call Thee…

The Spirit mic is the Aston option that I immediately was most interested in, because one of my engineer comrades told me he tried it out and since then is consistently using this mic instead of his Neumann U-87.

Impossible, you say?? Pas de tout, mon ami!

I myself had a similar experience, not choosing the esteemed U-87, years ago while testing mics for my first album. Check out that story here. But that just goes to show what a shocker this mic is with regard to quality per price point.

Aston Microphones

The Spirit is Aston’s better choice for acoustic guitar and/or vocals, as compared to the Origin, due to its lower noise floor.

If you’re doing a stripped-down number that needs a reeeeeally quiet mic, you’ve found it. Not to mention it’s extremely flattering EQ, which has only two slight hills at 4K and around 10K and is otherwise flat above 90 Hz.

It’s also tremendous that, at this price, we also get three polar patterns that all sound so good! If you need cardioid, omni or a figure-of-eight pattern, just dial it up on the mic and voilà… you’re in the zone.

I am more than happy about purchasing this mic. If you want to hear the recordings I made with it, showcasing the acoustic guitar and vocals, check out my SPIRIT MIC REVIEW HERE. Suffice it to say for now that I really think that, like me, you’ll appreciate what this baby brings to the studio, no matter what you want to use it for.

It’s hard to believe this mic is selling at a $449 retail price. These specs bespeak of a much more expensive microphone. When it first came out in 2016 it retailed for $299 (told ya it’s gonna go up!) but the sound it provides, trust me, is worth way more than either of those numbers.

Like I mentioned, it’s being compared to Neumann mics frequently. That says it all.

They Pooled Their Talent, Now Pool YOURS!

Aston Microphones

Aston pulls no punches. Because of the lengthy development, testing and auditing by pro audio purists of their microphones, they boldly state that these are the best-sounding mics available, not only at their price point, but well beyond it.

I, for one, think they’re onto something. The only area where I see these mics having any lack at all is in their self-noise numbers: they each rank in the “good” range at 15, 18, and 14 respectively. But the fact is that few condensers go below 10 dB. The Neumann TLM103 is one of them, but that mic retails for over $1,000!!

Aston Microphones

Unless you’re doing an extremely quiet song with, say, only a vocal and one soft instrument, you’re not even going to notice any noise at all. I didn’t, and my hearing is still very good thanks to vigilance against extreme sound levels. Just ask my son; he’ll tell ya: “Dad’s always saying to watch dB levels and wear earplugs if needed!!”

Aston Microphones

So, having dipped my foot into Aston’s private mic party pool for my own recordings, I heartily endorse their findings – these things really are as versatile and useful as they say they are. And I’ll go out on a very strong limb and say that I choose the Spirit as the best new, mid-priced condenser mic of the year for vocals. I’m lovin’ mine!!

Stay tuned for specific recordings from each mic. I’ll be A-B-ing them against other mics in my arsenal and will share the results, with you, soon.

Until then, definitely check these out. Make some music with them and let me know your results. These windows through which our talent shines can be murky or heavenly, but Aston is consistently making the angels sing.

Whether you have two or eighty-two mics in your closet, their products are almost a steal at current pricing, and will hold their own long into your production future.

For SeriousGAS.com, this is Teaj, sayin’…

… go… make… sounds!

Teaj in the storm fields!